On this page
Create a zone, connect its nameservers, add common record types, and check what public resolvers actually return.
This walkthrough follows a working CyberPanel installation from the DNS form to a public lookup. The screenshots show actual browser actions on an isolated test server. We create a dedicated lab zone, inspect the records CyberPanel generates, add several record types, update a TXT value, and compare the panel with independent DNS results. The purpose is to make the relationship between a saved record and a working answer visible.
Our server is 136.243.211.212, with its panel at https://origin-edge-wp-e2e-20261010.cyberpanel.net:8090. The demonstration zone is dns-lab-20261015.cyberpanel.net. Treat these as lab references, not addresses to copy into your own domain. Substitute your domain and the IP addresses of your own DNS infrastructure.
Watch the live walkthrough
1. Understand the boundary of this lab
A DNS zone contains the answers a nameserver is responsible for. A nameserver can hold a perfectly valid zone while the public internet still sends queries somewhere else. That is why this exercise has two parts: configure CyberPanel’s authoritative DNS data, then delegate the lab subdomain from its parent.
Our nameservers are ns1.dns-lab-20261015.cyberpanel.net and ns2.dns-lab-20261015.cyberpanel.net. Both point to the same server. This is useful for an isolated demonstration, but it provides no redundancy: a failure of that machine or network affects both names. A production design needs independently available authoritative servers and an appropriate replication arrangement.
This existing test installation originally omitted PowerDNS. Before the recorded form operations, we installed and configured its PowerDNS MySQL backend, checked the schema, and verified the running service. We also issued a valid certificate for the existing direct-origin hostname so the panel could be opened over trusted HTTPS.
The server must answer DNS on port 53 over both UDP and TCP. A working CyberPanel login on port 8090 does not prove that DNS is reachable. Also identify where your domain is currently authoritative before editing anything; a record saved in an inactive DNS provider will not change public answers.
2. Create the zone in CyberPanel
Open Server → DNS Zones and enter the domain you intend to manage. We enter dns-lab-20261015.cyberpanel.net, submit the form, and confirm that the zone appears in the interface. Creating a separate lab zone keeps the exercise away from the parent domain’s website and mail records.
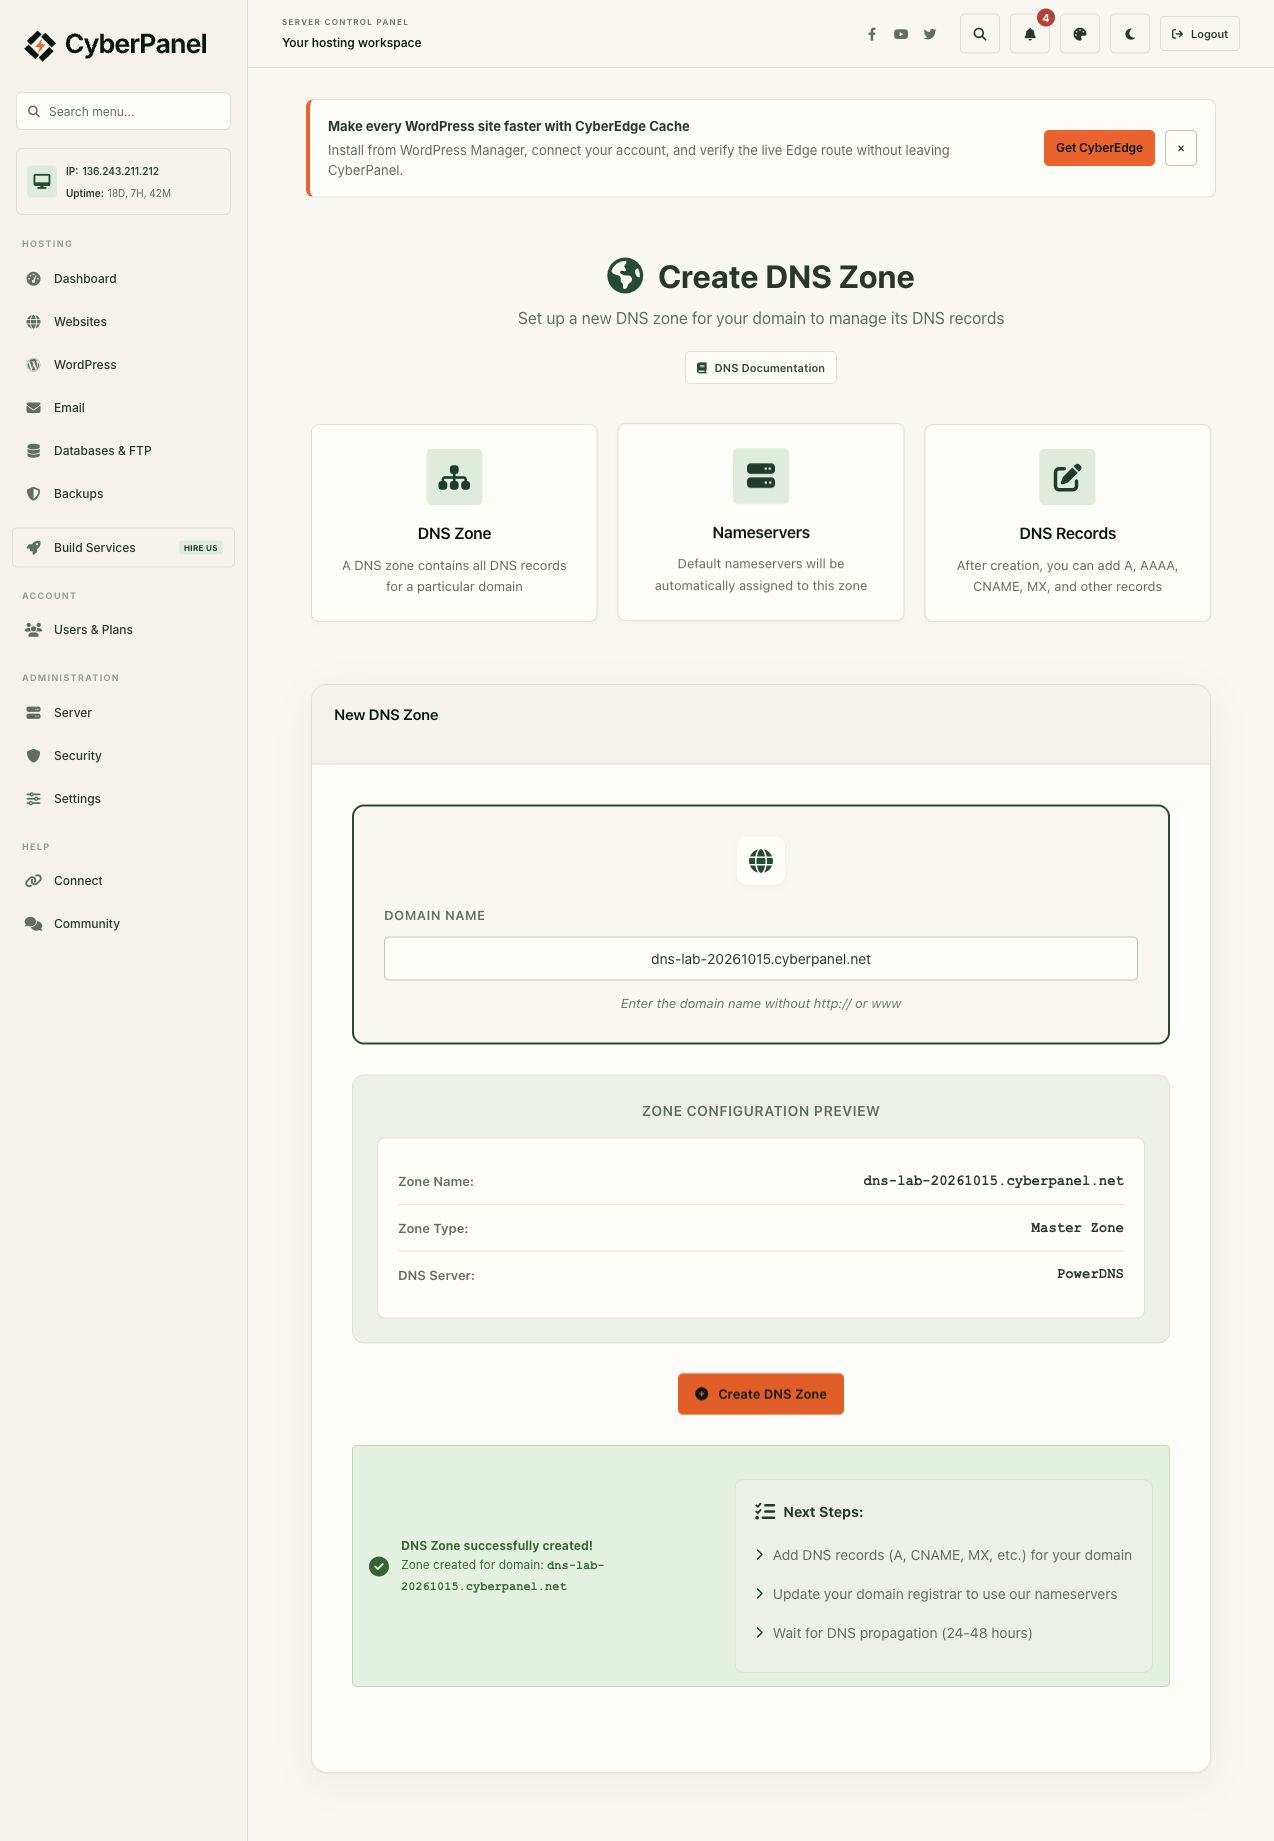
Next, open DNS Records Manager at /dns/addDeleteDNSRecords and select the new zone. Review what CyberPanel has already generated before adding anything. Automatic defaults are a starting point; they still need to match your intended web, mail, and nameserver setup. Duplicate records with different values can produce confusing results later.
3. Create nameserver hosts and inspect NS and SOA
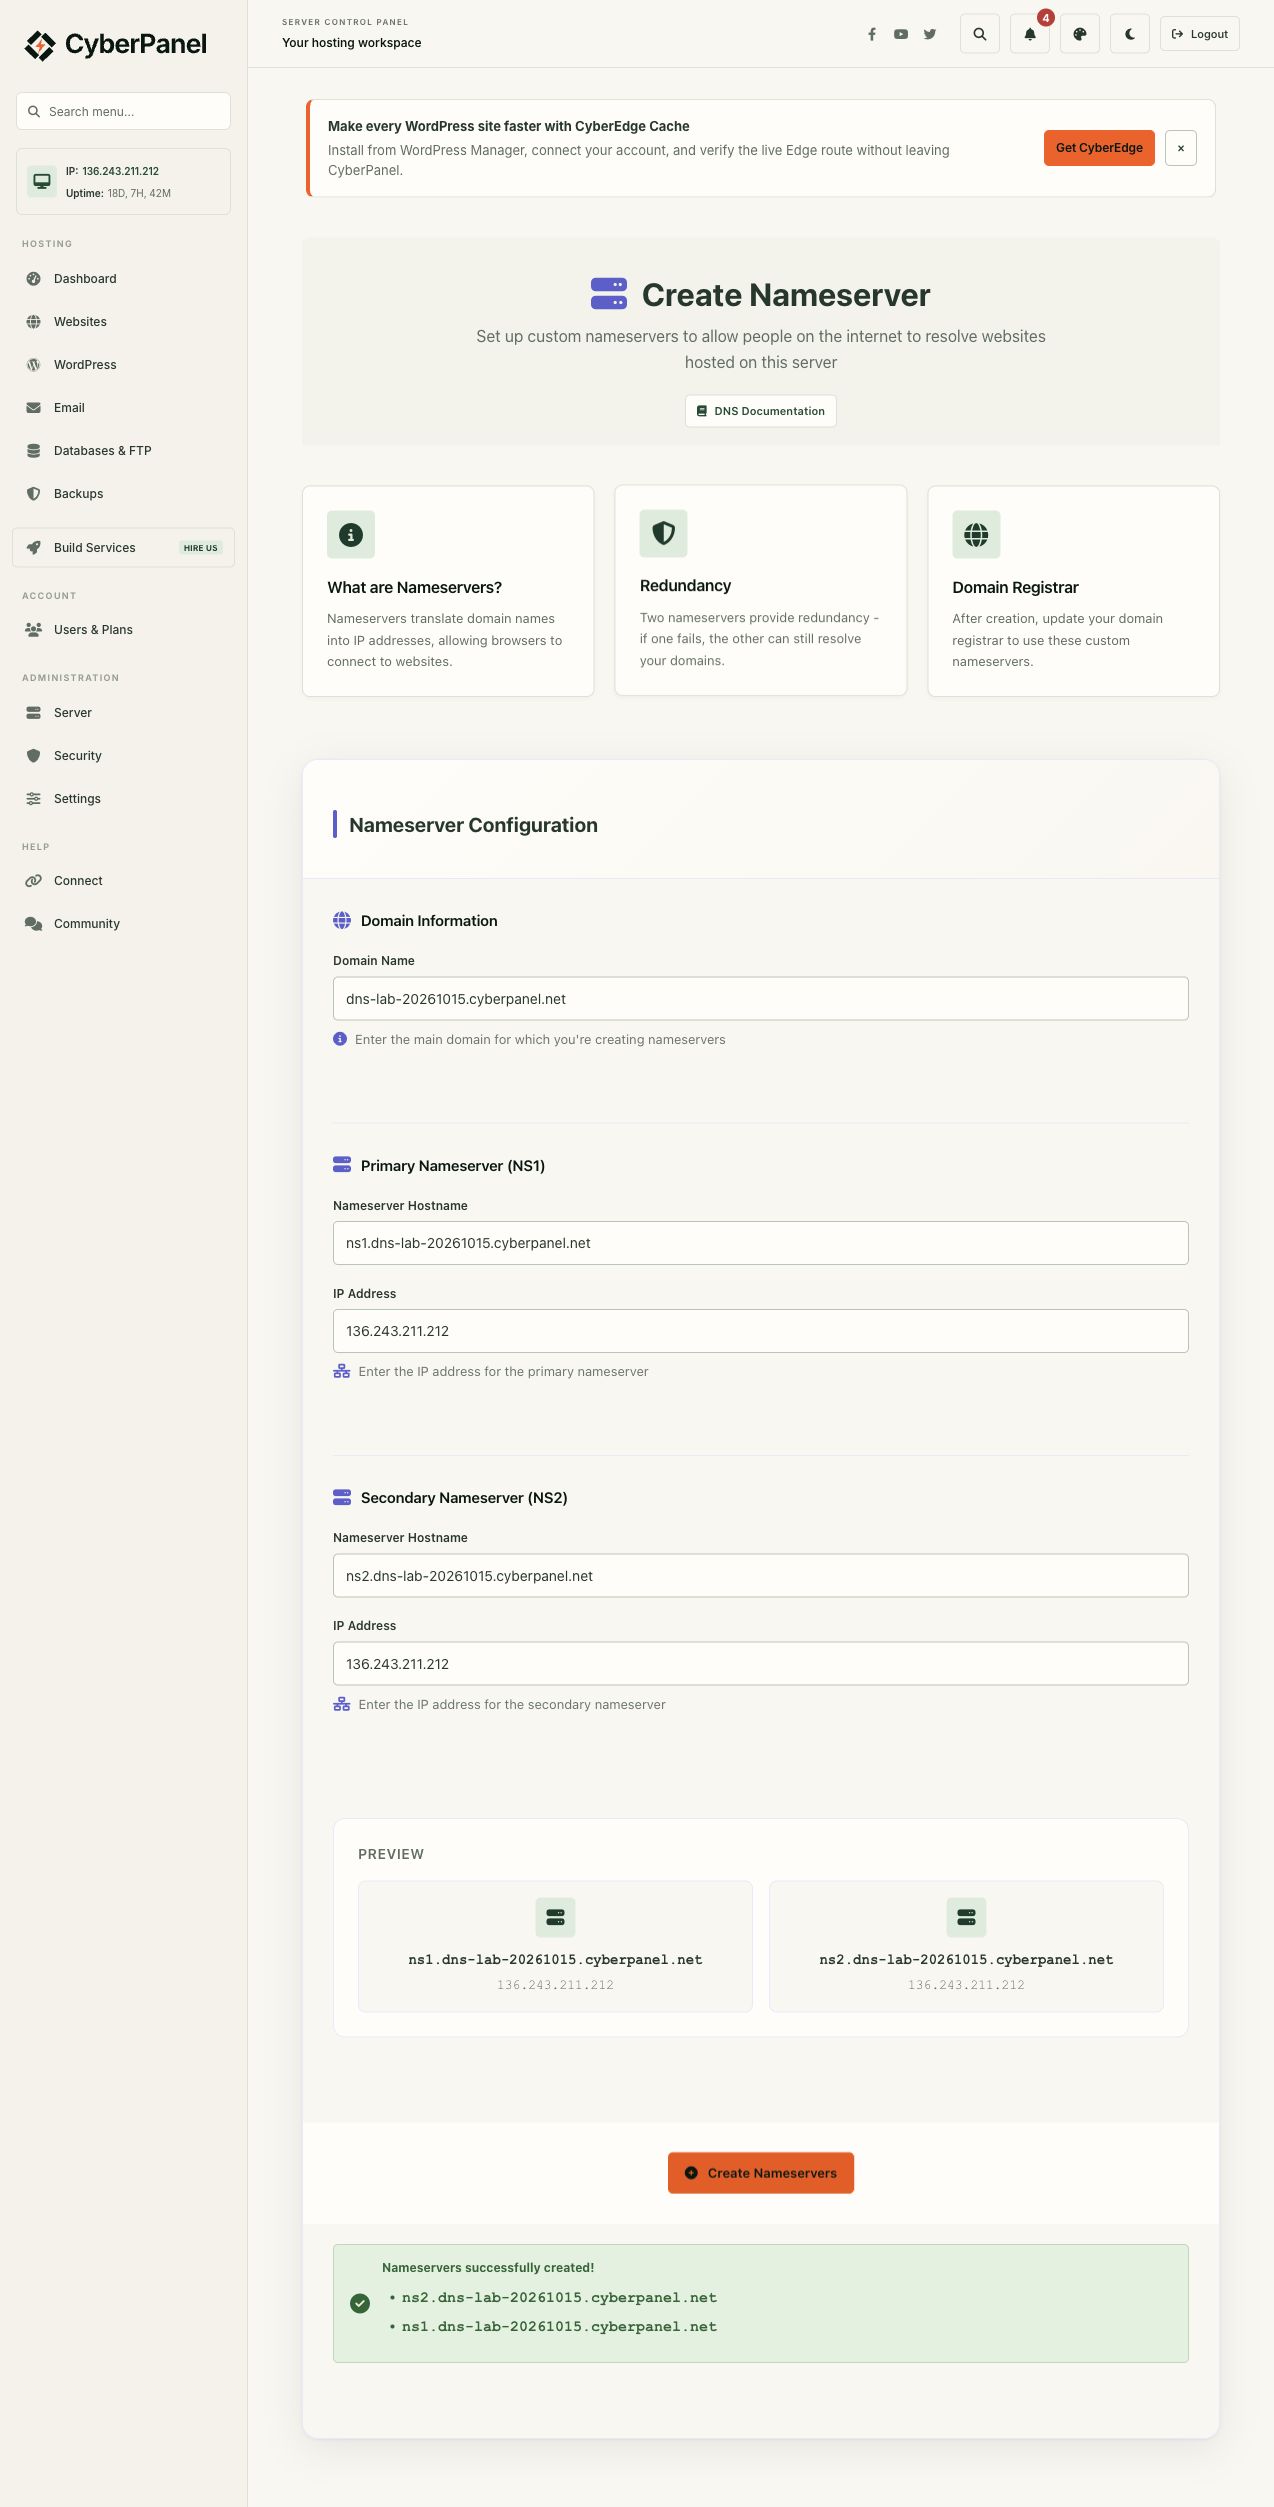
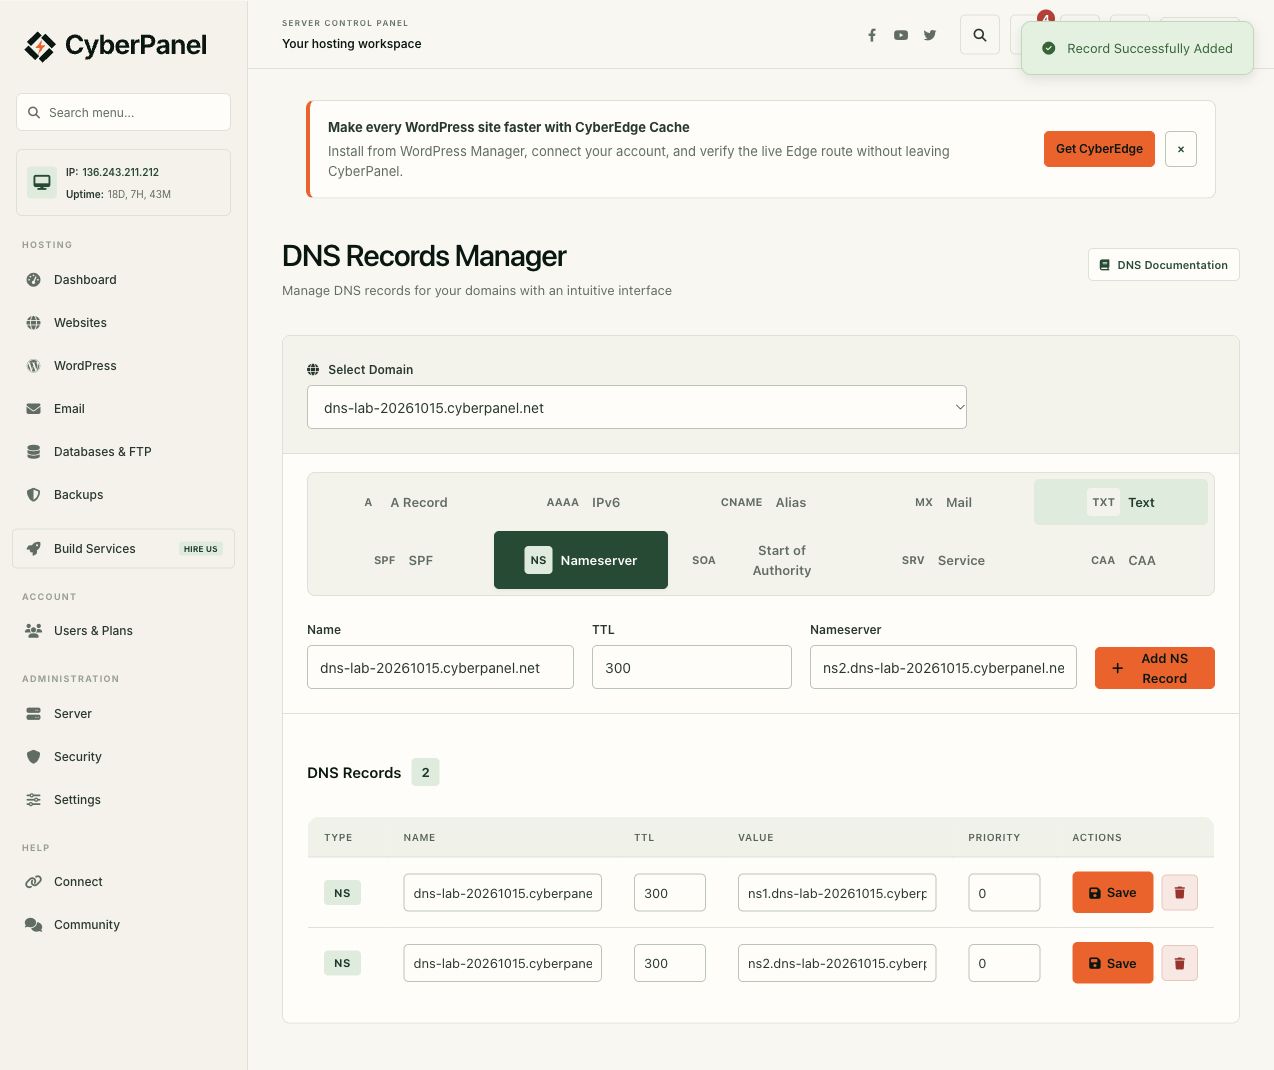
Use Create Nameserver to enter the two nameserver hostnames and the lab IP address. Then inspect the zone’s NS records. An NS record names a DNS server; an A record supplies its IPv4 address. Because these nameserver hosts live inside the child zone itself, the parent also needs address information, known as glue, to let a resolver find them.
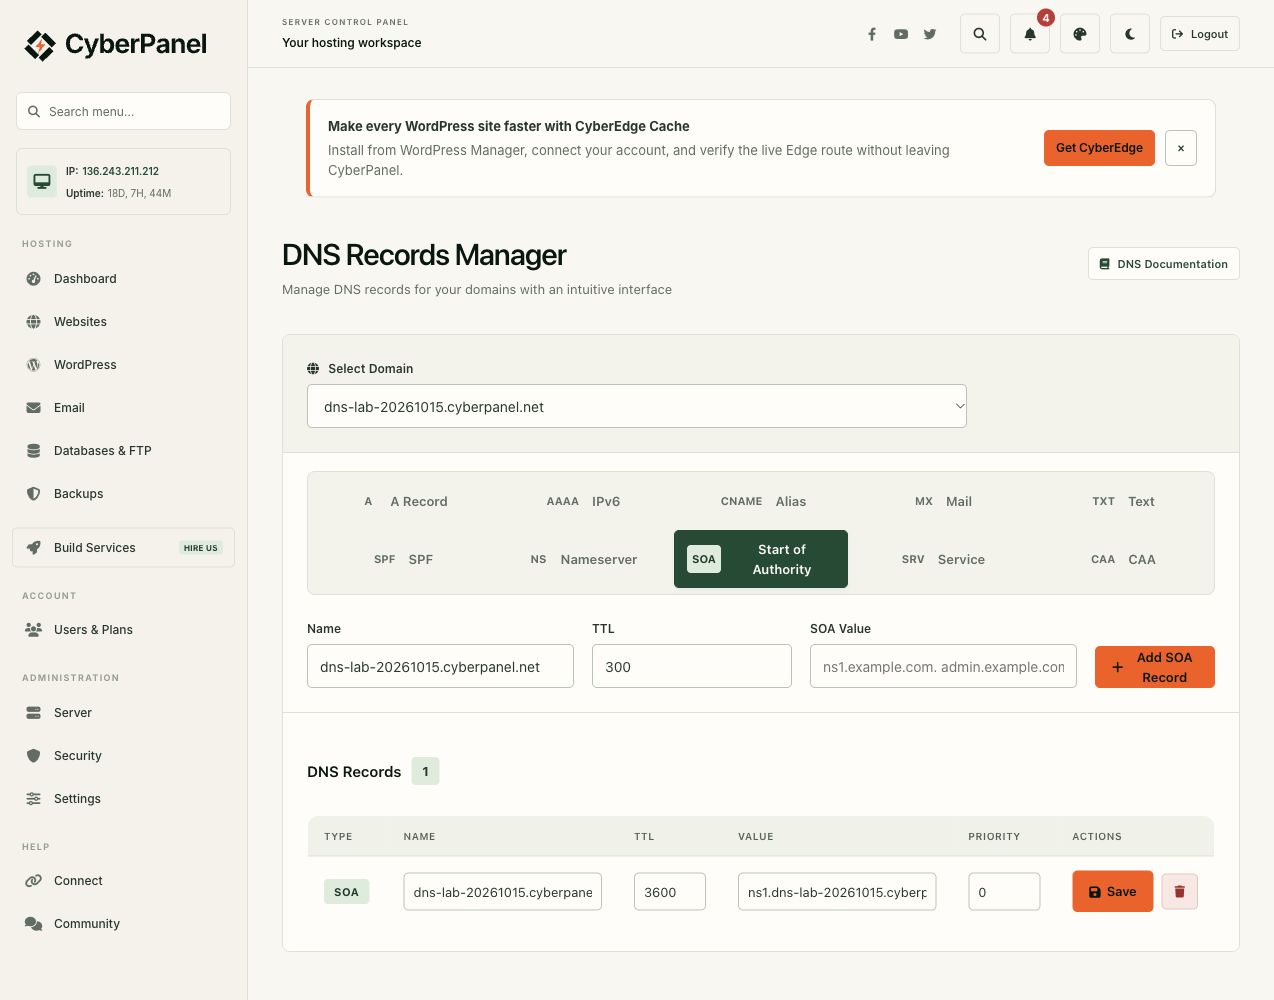
Inspect the SOA tab as well. The Start of Authority record describes the zone’s authority and includes timing information used by DNS systems. Its serial is relevant when secondary servers transfer changes, but seeing an SOA record alone does not establish that replication is configured. We inspect this record without claiming a tested secondary DNS service.
4. Delegate the subdomain from its parent
This example uses a subdomain of cyberpanel.net. Its parent zone is hosted on Cloudflare, so the delegation belongs in that parent’s DNS records. We create two NS records for the lab and two DNS-only A records for its nameserver hosts.
| Type | Name | Value |
|---|---|---|
| NS | dns-lab-20261015.cyberpanel.net |
ns1.dns-lab-20261015.cyberpanel.net |
| NS | dns-lab-20261015.cyberpanel.net |
ns2.dns-lab-20261015.cyberpanel.net |
| A | ns1.dns-lab-20261015.cyberpanel.net |
136.243.211.212 |
| A | ns2.dns-lab-20261015.cyberpanel.net |
136.243.211.212 |
All four parent records use a TTL of 300 seconds, and the A records are not proxied. Cloudflare explains this arrangement in its external subdomain delegation guide. These parent records were actually created for this exercise.
A registered root domain is a different boundary. To use custom nameservers under that domain, you normally register nameserver hosts or glue with your registrar, then change the domain’s nameserver assignment there. Saving nameservers in CyberPanel does not perform either registrar action. Here, we delegate a child zone from an existing parent instead of changing the registrar’s delegation for cyberpanel.net.
5. Add website and alias records
On the A tab, set the zone apex to 136.243.211.212. The apex means the zone name itself. Use the field format shown by your installed interface and inspect the resulting full name after saving. Some DNS tools accept @; others expect a fully qualified name. What matters is the stored DNS name.
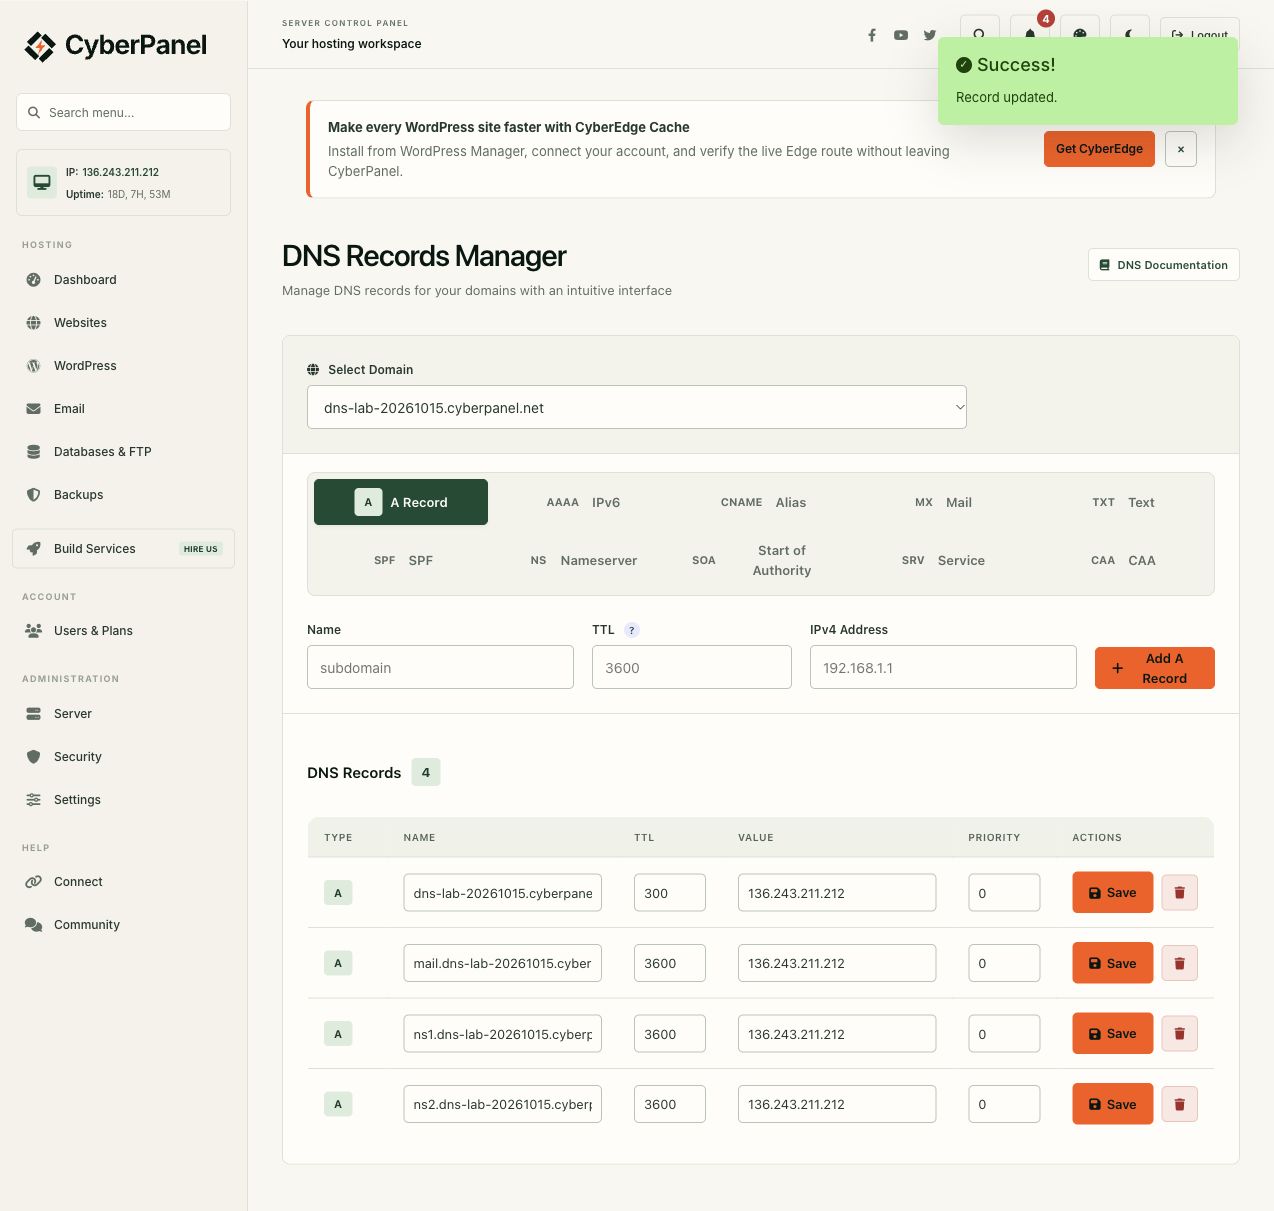
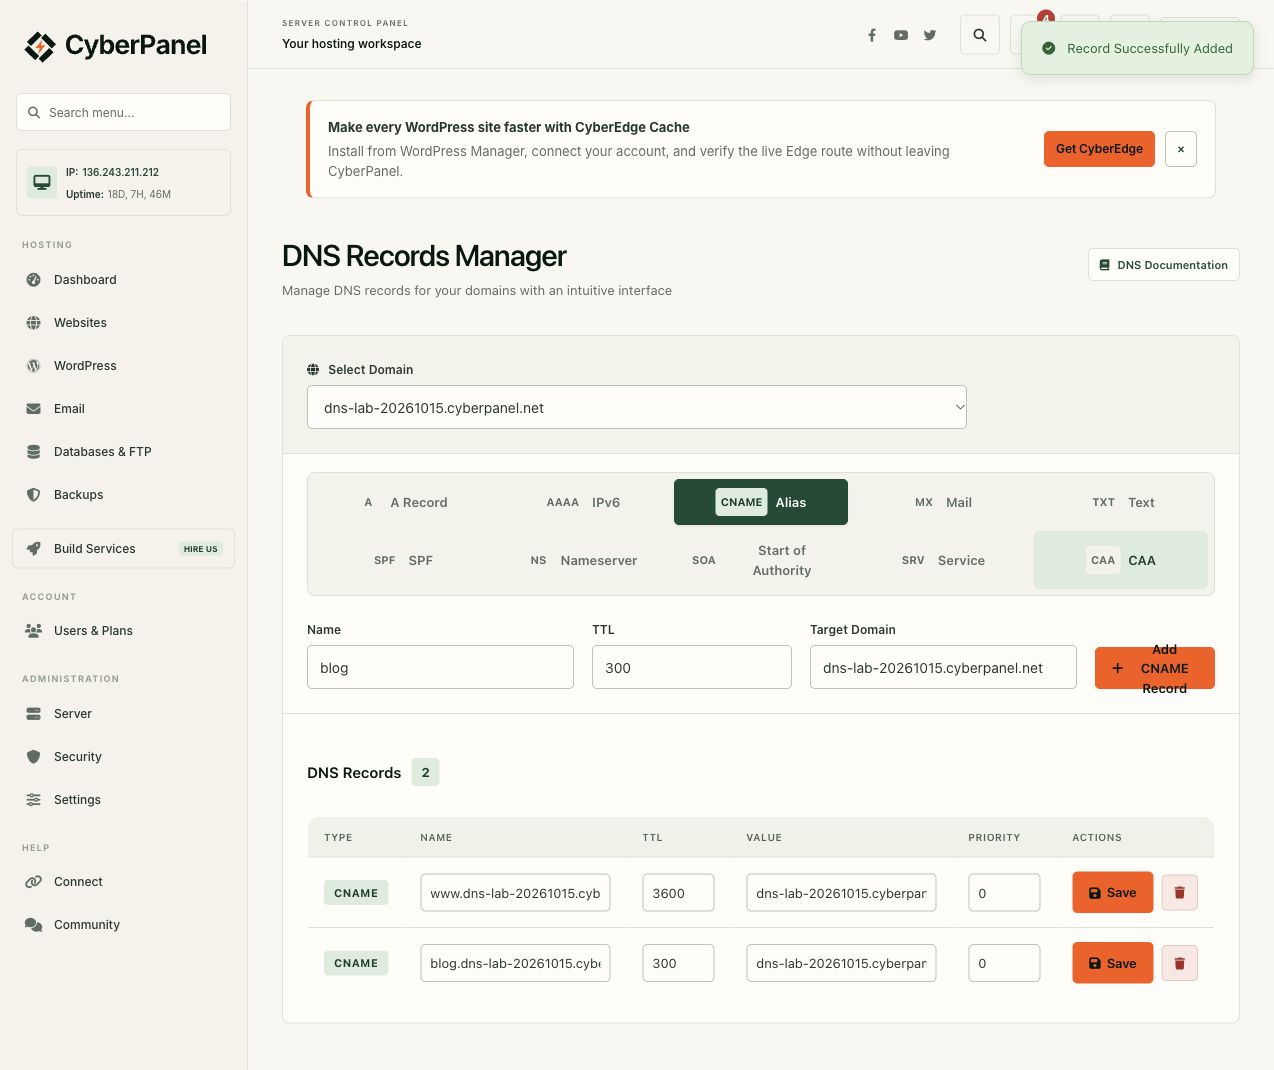
On the CNAME tab, add blog.dns-lab-20261015.cyberpanel.net as an alias of the lab apex. A CNAME points to another hostname, not an IP address. Avoid mixing a CNAME with other record types at the same name. Creating this DNS alias also does not create a website or virtual host for that name.
6. Configure mail routing and text records
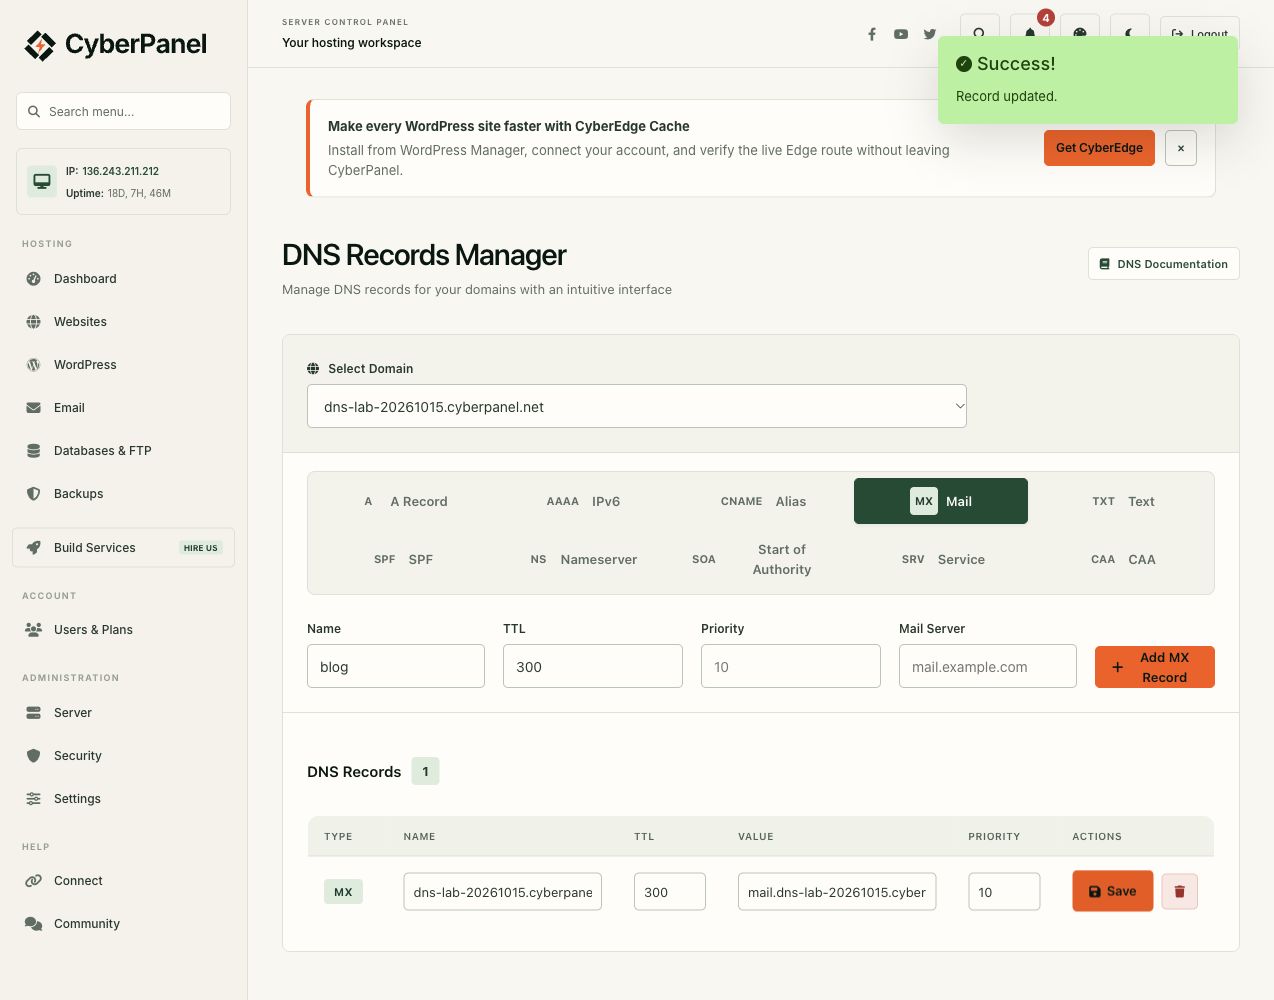
Our MX record uses priority 10, TTL 300, and target mail.dns-lab-20261015.cyberpanel.net. An MX target should be a hostname with an appropriate address record. Lower numerical priorities are preferred when multiple MX records exist. This lab demonstrates the DNS configuration; it does not provision mailboxes or establish working email delivery.
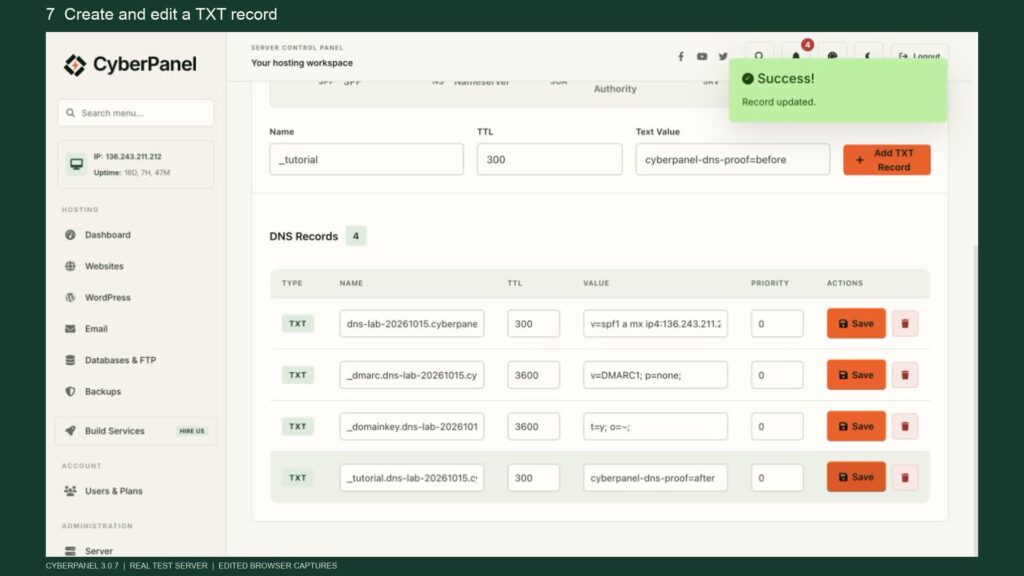
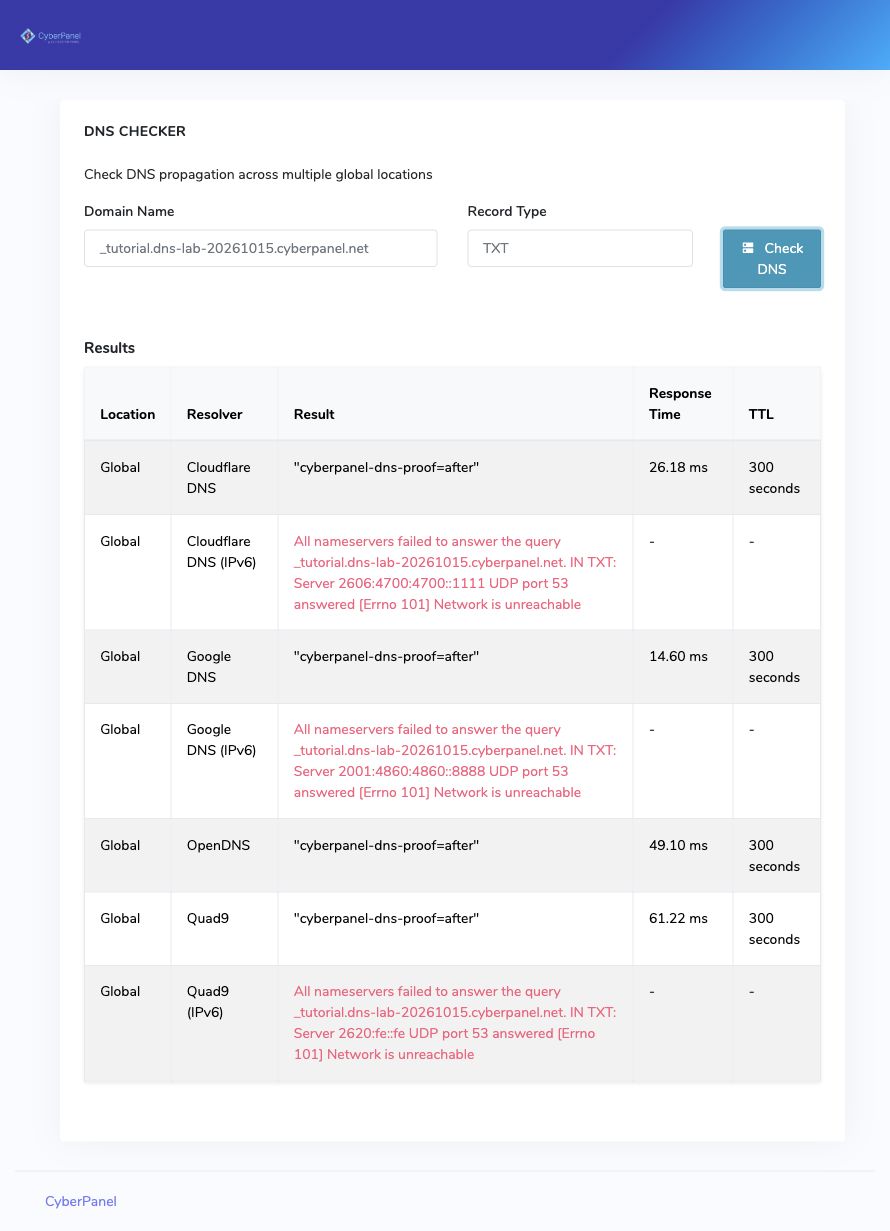
We also add a TXT verification record at _tutorial.dns-lab-20261015.cyberpanel.net, then update its demonstration value from the initial “before” state to the “after” state. The exact final value is cyberpanel-dns-proof=after. This is a convenient way to practice an edit without changing the website address. Inspect the saved value, then query the authoritative server and a public resolver separately.
CyberPanel also exposes a legacy SPF tab. Modern SPF policies belong in TXT records: RFC 7208 specifies the TXT record type. Review any automatically generated SPF TXT policy and adapt it to the mail systems you actually authorize. Do not copy a permissive policy simply to make a checker turn green.
DKIM requires the actual public key supplied by the sending mail system at its selector’s _domainkey name. An old _domainkey policy record is not a DKIM signing key and does not prove messages are signed. This demonstration makes no claim of working SPF alignment, DKIM signatures, DMARC enforcement, or email delivery.
7. Explore AAAA, SRV, and CAA
For the AAAA example, we add ipv6-example with 2001:db8::10. The 2001:db8::/32 range is reserved for documentation by RFC 3849. This is intentionally an example record, not a reachable IPv6 endpoint. Replace it with an assigned, routed IPv6 address before using an AAAA record for a real service.
Our SRV example uses _demo._tcp, priority 10, and content 5 443 dns-lab-20261015.cyberpanel.net. The content supplies weight, port, and target. Together, these fields describe where an SRV-aware client should find a named service; they do not start that service. See RFC 2782 for the record structure.
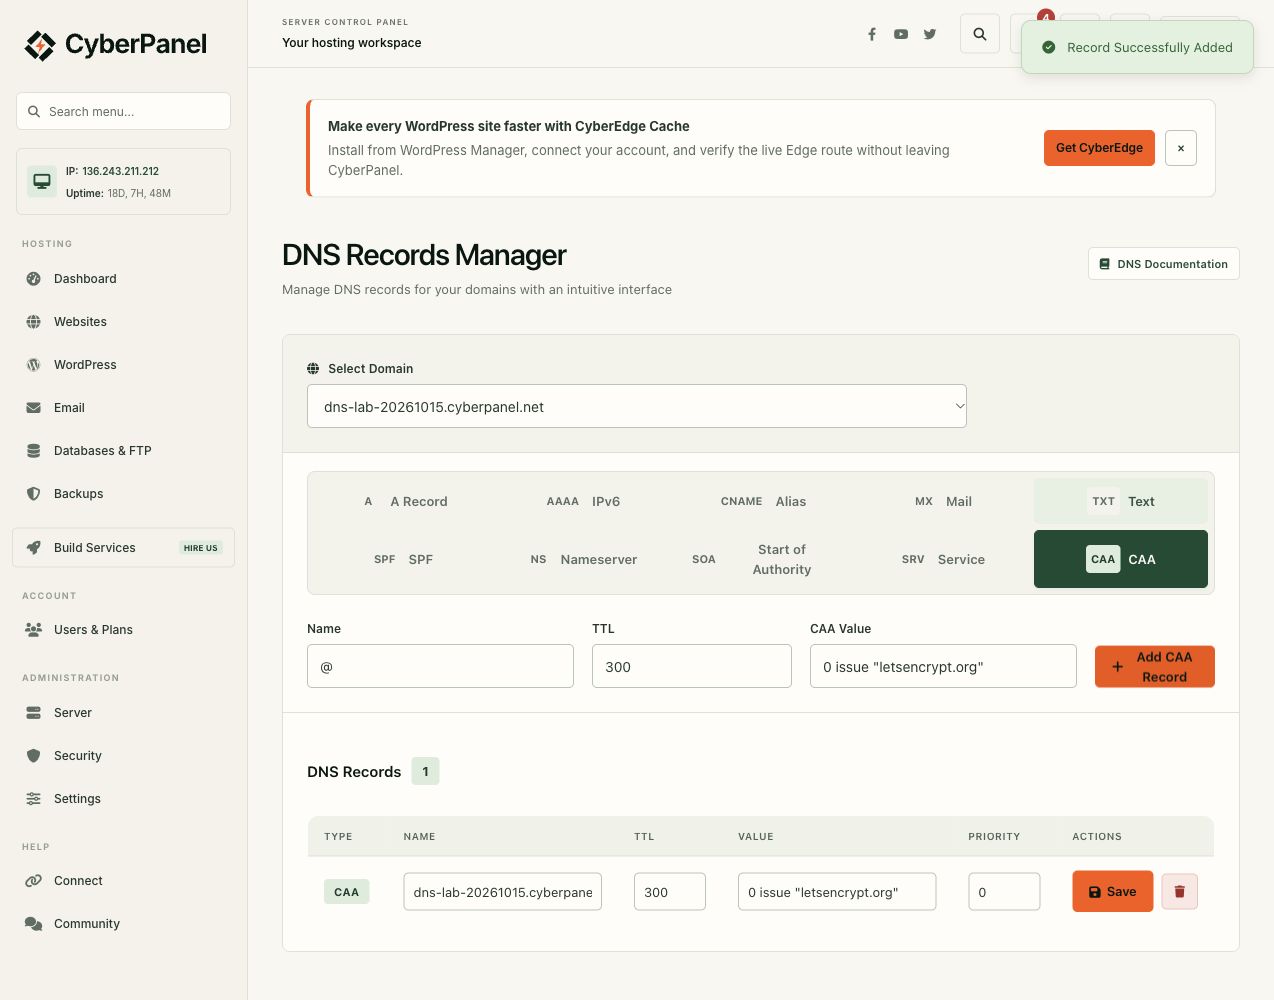
Finally, we add CAA with 0 issue "letsencrypt.org". This authorizes that certificate authority under the applicable CAA policy. It neither requests a certificate nor proves that domain validation will succeed. Keep certificate issuance, DNS policy, and service reachability as separate checks.
The lab’s record values
In this table, LAB means dns-lab-20261015.cyberpanel.net. The final apex, mail, ns1, and ns2 A records all point to the test server. Inspect each record’s displayed TTL rather than assuming every generated default uses the same value.
| Type | Name | Configured value | Purpose |
|---|---|---|---|
| A | LAB |
136.243.211.212; TTL 300 |
Lab apex |
| A | mail.LAB, ns1.LAB, ns2.LAB |
136.243.211.212 |
Mail host and nameserver addresses |
| CNAME | blog.LAB |
LAB |
Hostname alias |
| MX | LAB |
Priority 10, mail.LAB; TTL 300 |
Mail route example |
| TXT | _tutorial.LAB |
cyberpanel-dns-proof=after |
Edited verification marker |
| AAAA | ipv6-example.LAB |
2001:db8::10 |
Documentation-only IPv6 example |
| SRV | _demo._tcp.LAB |
Priority 10, weight 5, port 443, target LAB |
Service discovery example |
| CAA | LAB |
0 issue "letsencrypt.org" |
Certificate authority policy |
8. Verify authority, then cached public answers
The most useful verification starts with the authoritative server. Query it directly and check for the expected answer and authoritative flag. Then query recursive resolvers to confirm delegation and public resolution. These commands show the pattern; replace the queried type to inspect MX, TXT, CAA, or SRV.
dig @136.243.211.212 dns-lab-20261015.cyberpanel.net A +norecurse
dig @136.243.211.212 _tutorial.dns-lab-20261015.cyberpanel.net TXT +norecurse
dig @1.1.1.1 dns-lab-20261015.cyberpanel.net A
dig @8.8.8.8 dns-lab-20261015.cyberpanel.net A
dig +tcp @136.243.211.212 dns-lab-20261015.cyberpanel.net SOA
Independent checks passed all 40 comparisons: ten record questions queried through authoritative UDP, authoritative TCP, Cloudflare at 1.1.1.1, and Google at 8.8.8.8. The checks were recorded at 23:04 PKT on October 15, 2026. The saved readable verification report and JSON evidence include those results. This establishes the tested DNS answers at capture time, not application connectivity or mail delivery.
The public browser checker returned 136.243.211.212 through IPv4 resolver checks for Cloudflare, Google, OpenDNS, and Quad9. Its IPv6 transport checks reported “network unreachable” from the checker host. That error describes the checker’s network path; it does not establish a fault in this zone. It also does not turn the documentation-only AAAA example into a connectivity test.
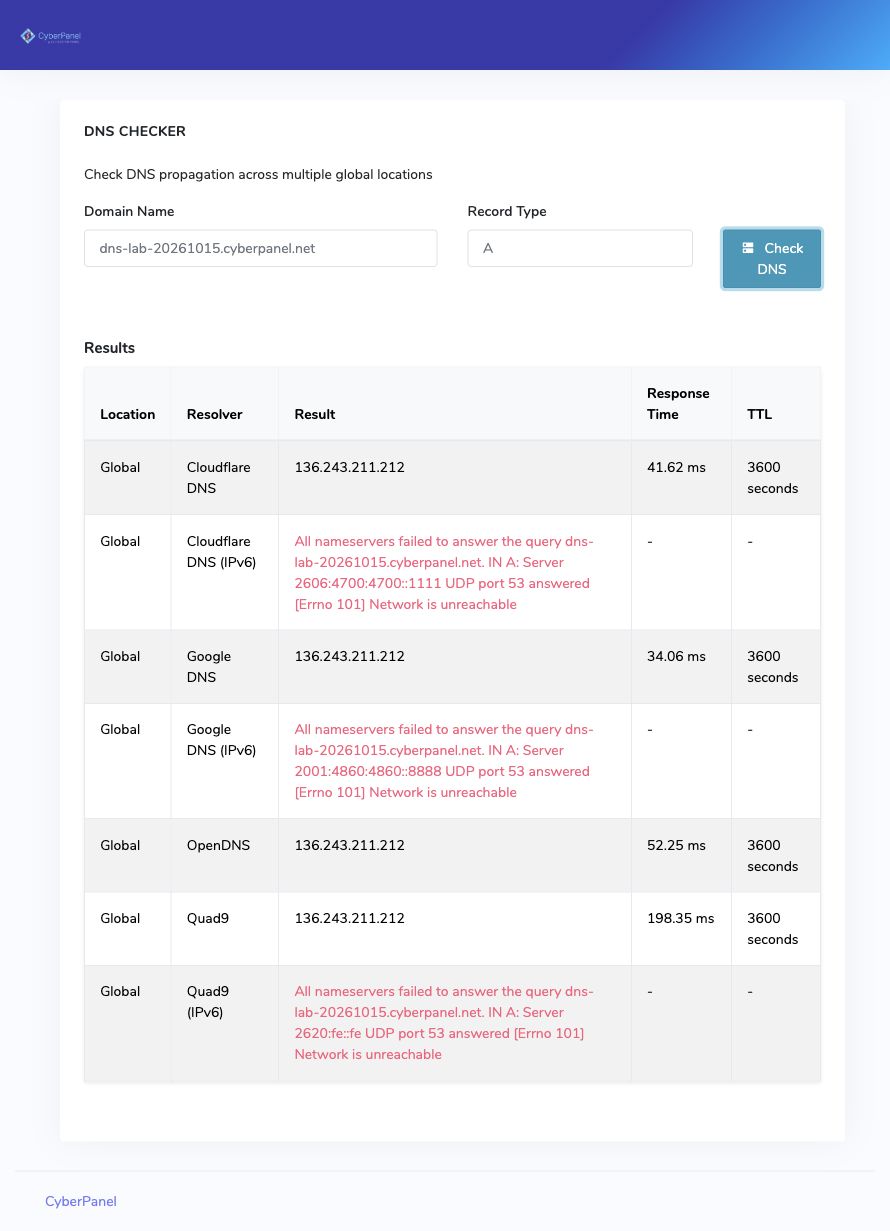
TTL controls how long answers may remain cached. It does not promise a universal 24–48-hour wait. Existing positive answers and negative answers can have different cache lifetimes; delegation caches also matter. If the authoritative result is correct but a resolver differs, compare its remaining TTL and retry after that cache expires.
A real verification issue appeared. Seven generated records for the child zone were assigned to an existing cyberpanel.net zone. Their ownership was corrected within the isolated fixture before the public proof. This was a scoped lab correction, not a shipped product fix. It is a reason to inspect actual zone ownership and authoritative responses instead of treating a success message as complete validation.
9. Review defaults and deletion safely
We saved the lab nameservers in the test server’s default nameserver settings. Those defaults guide subsequent zone creation; they do not update a registrar, delegate an existing domain, or create a secondary DNS server.
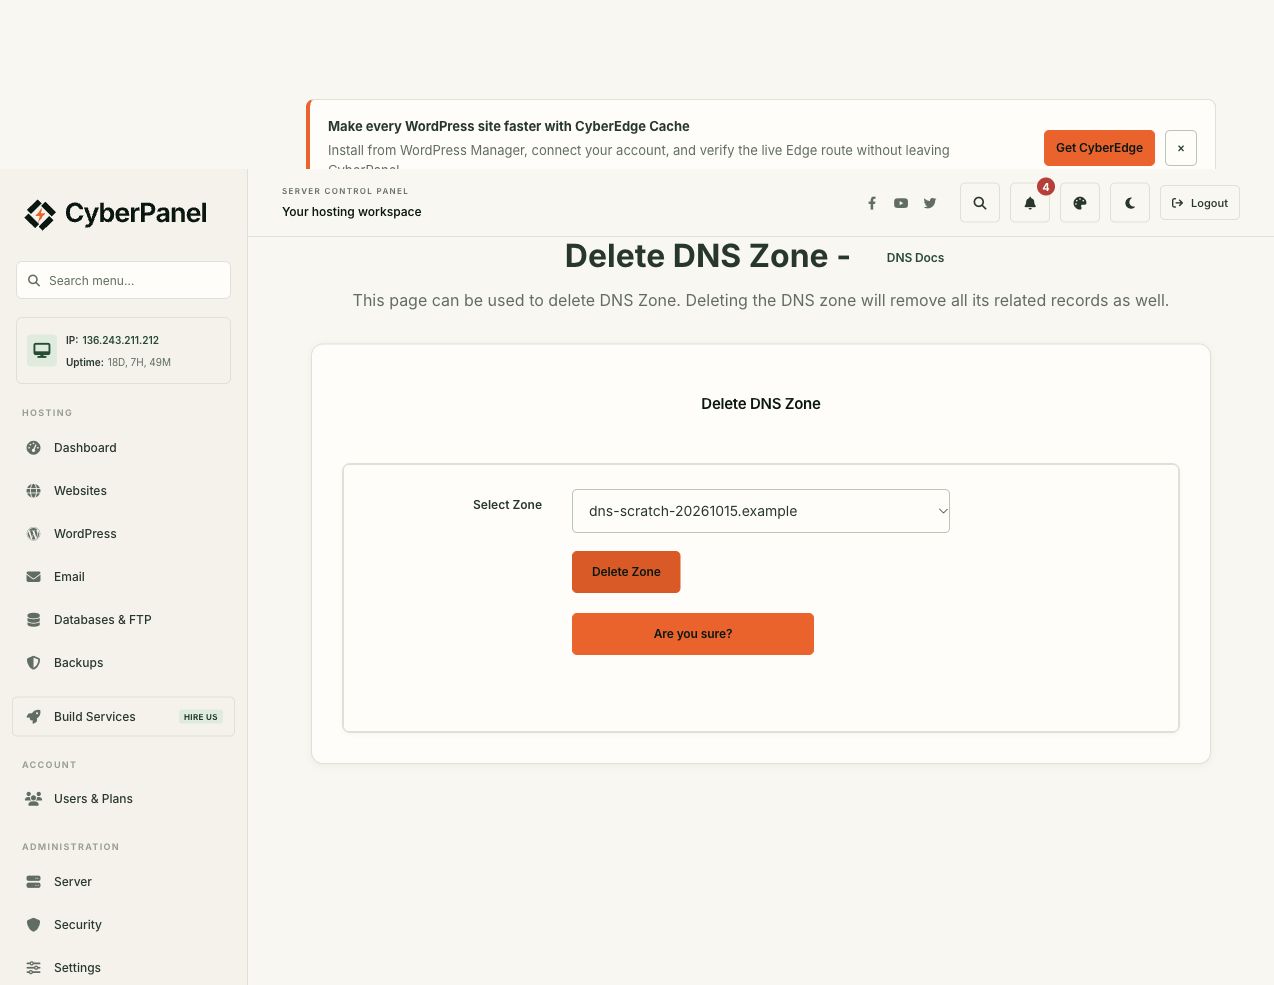
For deletion, we created dns-scratch-20261015.example and opened the confirmation dialog. We stopped before the final delete action. The screenshot demonstrates the confirmation step, not a completed deletion. Review the exact zone name before confirming deletion on your own installation, because removing a zone can remove the answers its services depend on.
The PowerDNS service and modes page was also inspected. Replication, Cloudflare synchronization, and DNSSEC were not tested in this walkthrough. Use the official CyberPanel DNS guide alongside your installed version, then verify the exact feature you intend to deploy.