
On this page
A Redis object cache stores frequently used WordPress data in memory so it can be retrieved without repeatedly querying the database. On a Linux VPS, Redis can reduce database work and improve response times for dynamic WordPress requests.
This guide explains how Redis object caching works, how to install Redis on a Linux VPS, connect it to WordPress, configure it with LiteSpeed Cache, monitor it, and troubleshoot common problems.
What Is a Redis Object Cache?
A Redis object cache is a persistent caching layer that stores WordPress objects in Redis instead of keeping them only in PHP memory for the duration of a single request.
WordPress uses its object cache to store data such as results from expensive database queries. By default, the WordPress object cache is non-persistent, so its contents normally disappear when the request ends. A persistent object cache allows cached objects to remain available between requests.
Redis is well suited to this job because it keeps frequently accessed data in memory.
The basic flow looks like this:
WordPress
    ↓
Check object cache
    ↓
Redis
    ↓
Cache hit → Return cached data
    ↓
Cache miss
    ↓
MySQL/MariaDB
    ↓
Return data → Store result in RedisThis does not replace your WordPress database. Redis works alongside it.
Does Redis Object Caching Make WordPress Faster?
Yes, but the improvement depends on how your WordPress site works.
Redis is most useful when WordPress repeatedly needs data that can be cached between requests. This is especially helpful for dynamic pages, logged-in users, WooCommerce stores, busy dashboards, and sites with database-intensive plugins.
However, Redis is not a replacement for full page caching.
LiteSpeed Cache can serve a cached page without invoking PHP at all. In that situation, WordPress may not need to query Redis because the request never reaches the application layer. Object caching becomes more useful when WordPress actually has to execute PHP and retrieve data from the database. This layer is vital when you are working to reduce initial server response time in WordPress for dynamic requests.
That means a strong WordPress VPS can use both:
Browser
   ↓
LiteSpeed Page Cache
   ↓
If dynamic request
   ↓
WordPress
   ↓
Redis Object Cache
   ↓
MySQL/MariaDBRedis Object Caching vs WordPress Page Caching
These two caching systems solve different problems.
| Feature | Page Cache | Redis Object Cache |
|---|---|---|
| Main purpose | Cache complete pages | Cache application data |
| Works before PHP | Yes | No |
| Reduces PHP execution | Yes | No |
| Reduces database queries | Indirectly | Directly |
| Useful for logged-in users | Limited | Often useful |
| Useful for dynamic requests | Limited | Yes |
| Stores data in memory | Usually not | Yes |
| WordPress database still needed | Yes | Yes |
A page cache can avoid WordPress processing entirely for a cacheable request.
Redis works deeper inside WordPress. It helps when WordPress needs to retrieve objects while generating a response.
What Does Redis Object Caching Store?
WordPress can cache many types of data through its object cache API.
Examples include:
- Database query results
- WordPress options
- User-related data
- Metadata
- Taxonomy information
- Transients
- Plugin-generated objects
- Frequently requested application data
The exact objects stored depend on WordPress, plugins, themes, and the object cache implementation.
You should not assume that every database query automatically becomes a Redis key. WordPress and individual plugins decide what is placed into the object cache.
How Does Redis Object Caching Work in WordPress?
WordPress communicates with the persistent object cache through an object-cache.php drop-in inside the wp-content directory.
The Redis Object Cache plugin provides this persistent backend and supports Redis clients such as PhpRedis and Predis.
The request flow becomes:
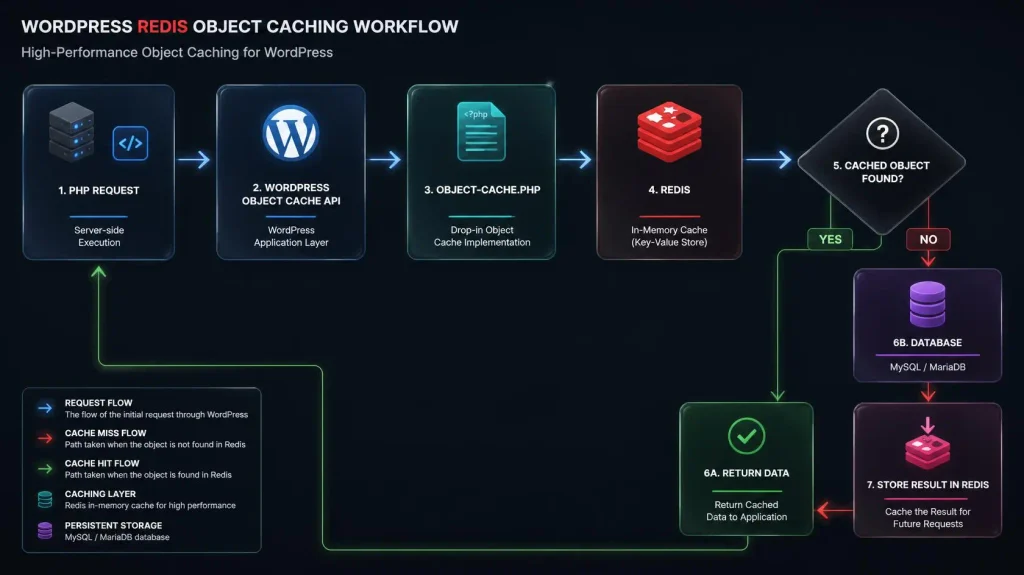
This is why simply installing the Redis server is not enough. WordPress must also be configured to use Redis as its persistent object cache.
How to Install Redis on a Linux VPS
The following example uses Ubuntu or Debian with the official Redis APT repository.
Step 1: Add the Redis repository
Run:
sudo apt-get install lsb-release curl gpgThis installs the packages needed to add and authenticate the Redis repository.
Add the Redis signing key:
curl -fsSL https://packages.redis.io/gpg | sudo gpg --dearmor -o /usr/share/keyrings/redis-archive-keyring.gpgSet the correct permissions:
sudo chmod 644 /usr/share/keyrings/redis-archive-keyring.gpgAdd the repository:
echo "deb [signed-by=/usr/share/keyrings/redis-archive-keyring.gpg] https://packages.redis.io/deb $(lsb_release -cs) main" | sudo tee /etc/apt/sources.list.d/redis.listUpdate the package index:
sudo apt-get updateRedis documents this installation method for current Ubuntu and Debian systems.
The Proven Alternative: 1-Click Redis Infrastructure Automation
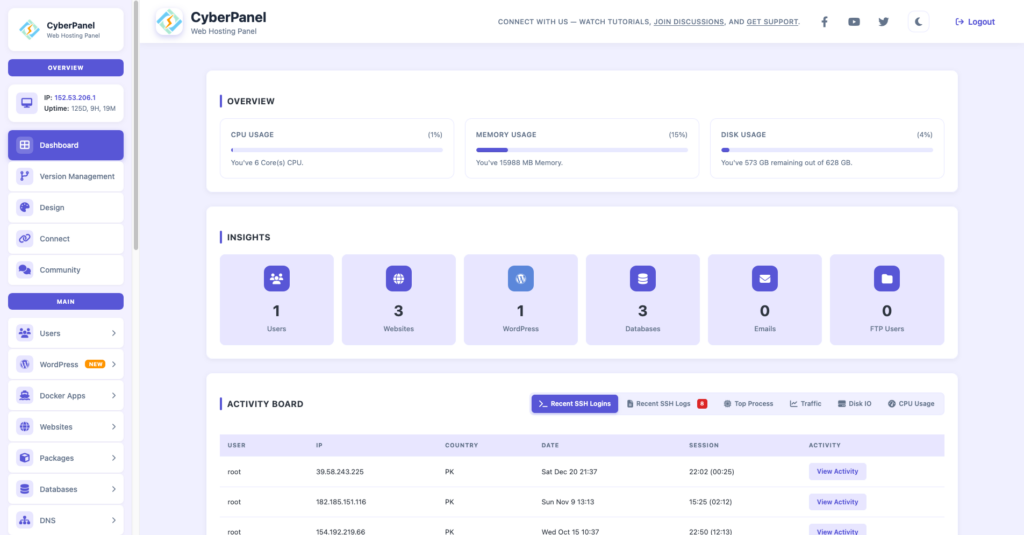
Manually configuring official APT repositories, processing curl pipes, setting GPG archive keyrings, and matching client extensions across multiple isolated PHP versions is a slow process that invites syntax file drops.
If you want to bypass the command line entirely, you need a modern web hosting control panel natively built to handle your infrastructure deployments. For years, CyberPanel has been the industry-leading free web hosting control panel engineered for peak OpenLiteSpeed caching performance. In our latest architectural and visual evolution, we have streamlined these backend memory configurations entirely:
- Open your central dashboard and check your real-time Server Metrics.
- Navigate to Manage Services inside your central infrastructure tab.
- Locate the field-tested Redis module component and click the electric green Install/Enable toggle.
CyberPanel automatically compiles the background repository architecture, sets optimal eviction rules, and connects it natively to your server environment safely with zero downtime. You get all the features of an elite hosting control panel with absolute speed and zero manual complexity.
Deploy Your Scalable CyberPanel VPS Server for Free Today!
Step 2: Install Redis
Run:
sudo apt-get install redisThe Redis package includes the Redis server and Redis tools such as redis-cli.
Step 3: Check the Redis service
Run:
sudo systemctl status redis-serverYou should see a running service.
If it is not running:
sudo systemctl start redis-serverEnable it at boot:
sudo systemctl enable redis-serverRedis normally starts automatically after installation, but these commands ensure the service starts after a reboot.
How to Test Redis on Your VPS
Before connecting WordPress, test Redis itself.
Run:
redis-cli pingOutput:
PONGredis-cli is Redis’s command-line utility, and PING is a simple way to verify that the server accepts connections.
You can also enter the Redis CLI:
redis-cliThen run:
127.0.0.1:6379> PING
PONGExit with:
127.0.0.1:6379> exitIf redis-cli ping fails, fix Redis before attempting to configure WordPress.
How to Check Whether PHP Can Use Redis
WordPress needs a PHP Redis client, or another supported Redis client, to communicate with the Redis server.
On Debian or Ubuntu, one common option is the PhpRedis extension.
Install it with:
sudo apt install php-redisThen check whether PHP can see the extension:
php -m | grep redisOutput:
redisThe PHP version used by your WordPress site must have the Redis extension available. Installing the extension for a different PHP version will not automatically make it available to the PHP process serving your website.
If your VPS uses multiple PHP versions, verify the extension for the specific version assigned to the WordPress site.
How to Set Up Redis Object Cache WordPress
Once Redis is running and PHP can communicate with it, connect WordPress to Redis.
One straightforward option is the Redis Object Cache plugin by Till Krüss. WordPress lists it as a persistent object cache backend powered by Redis.
Step 1: Install the plugin
Using WP-CLI, move into your WordPress installation:
cd /var/www/example.com/public_htmlReplace the path with your actual WordPress directory.
Install and activate the plugin:
wp plugin install redis-cache --activateStep 2: Enable the object cache
Run:
wp redis enableThis enables the persistent object cache drop-in.
The plugin provides several WP-CLI commands, including:
wp redis status
wp redis enable
wp redis disable
wp redis update-dropinThese commands are documented by the plugin project.
Step 3: Check the Redis connection
Run:
wp redis statusThe command displays Redis connection and object cache diagnostics.
A healthy setup should report that Redis is connected and the object cache is enabled.
How to Configure Redis in wp-config.php
For a local Redis installation, WordPress can normally connect to:
127.0.0.1:6379If your setup requires explicit connection settings, add them to wp-config.php before the line:
/* That's all, stop editing! Happy publishing. */Example:
define( 'WP_REDIS_HOST', '127.0.0.1' );
define( 'WP_REDIS_PORT', 6379 );
define( 'WP_REDIS_DATABASE', 0 );For a server hosting multiple WordPress sites, use a unique cache key prefix or separate Redis databases so that different sites do not accidentally share the same cache namespace.
For example:
define( 'WP_REDIS_DATABASE', 1 );
define( 'WP_CACHE_KEY_SALT', 'example.com:' );Use a different database or key prefix for another site.
After changing wp-config.php, check its PHP syntax:
php -l wp-config.phpOutput:
No syntax errors detected in wp-config.phpHow to Configure Redis Object Cache With LiteSpeed Cache
If your WordPress VPS uses LiteSpeed, Redis object caching can complement LiteSpeed’s page caching. Choosing a dedicated WordPress cache plugin designed to utilize server-level architecture ensures your dynamic query results load swiftly.
LiteSpeed Cache for WordPress supports external object caching through Redis. Its Object Cache settings allow you to specify the Redis method, host, port, database ID, lifetime, and other options.
In WordPress, open:
LiteSpeed Cache → Cache → Object
Then configure:
| Setting | Example |
|---|---|
| Object Cache | ON |
| Method | Redis |
| Host | 127.0.0.1 |
| Port | 6379 |
| Redis Database ID | 0 |
| Persistent Connection | ON |
The exact values depend on your Redis configuration.
If Redis uses a Unix socket instead of TCP, use the socket path and the corresponding port configuration instead.
LiteSpeed also supports a custom object cache prefix, which can help separate cache keys between sites sharing the same Redis service.
Redis Object Cache WordPress With LiteSpeed
The two caching layers should not be confused:
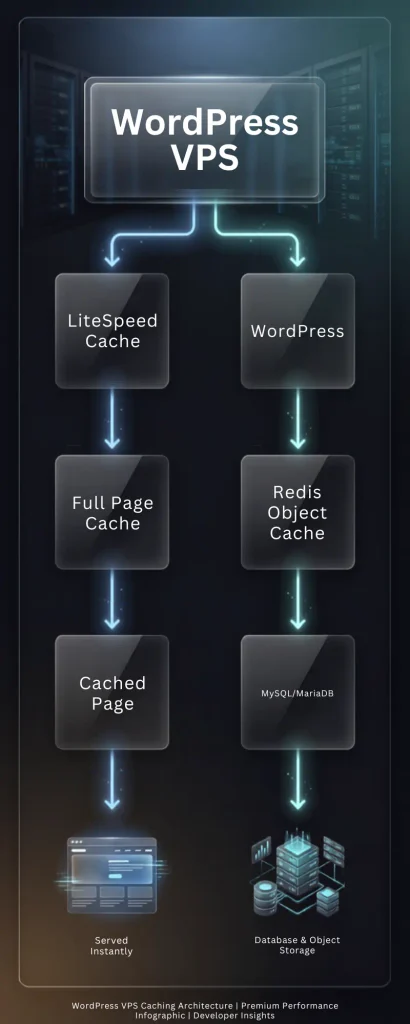
If LiteSpeed can serve a page directly from its full page cache, WordPress may not need to execute.
If WordPress must generate the page, Redis can reduce the work required to retrieve frequently used data.
How to Configure Redis Memory Limits
Redis stores cached objects in memory, so a VPS should not allow Redis to consume unlimited RAM.
The maxmemory directive defines the memory limit for Redis data. Redis then uses the configured eviction policy when that limit is reached.
For example:
maxmemory 512mbThe correct value depends on your VPS RAM, WordPress workload, database requirements, PHP workers, and other services.
Do not blindly allocate most of the server’s RAM to Redis.
A VPS running WordPress may also need memory for:
- PHP workers
- MySQL or MariaDB
- LiteSpeed or OpenLiteSpeed
- Operating system processes
- File system cache
- WordPress background tasks
Leave enough RAM for these services.
Which Redis Eviction Policy Should You Use?
When Redis reaches its configured memory limit, the eviction policy determines which keys are removed.
Common policies include:
| Policy | Behavior |
|---|---|
noeviction | Returns errors instead of evicting keys |
allkeys-lru | Removes less recently used keys |
allkeys-lfu | Removes less frequently used keys |
allkeys-random | Removes random keys |
volatile-lru | Removes less recently used keys with an expiration |
volatile-lfu | Removes less frequently used keys with an expiration |
volatile-ttl | Removes keys with the shortest remaining TTL |
Redis documents these policies and their behavior in its eviction documentation.
For a cache-only Redis instance, an eviction policy such as allkeys-lru can be a practical starting point because Redis can remove less recently used cache entries when memory becomes full.
Do not choose an eviction policy without understanding what your Redis instance stores. If Redis is also being used for persistent application data, cache-style eviction may be inappropriate.
How to Configure Redis for a WordPress Cache
For a Redis instance dedicated to WordPress object caching, you can define the memory policy in the Redis configuration file.
The location can vary by distribution and installation method, so first identify the active configuration:
redis-cli CONFIG GET dirYou can also inspect the service configuration and package files on your distribution.
Once you identify the active redis.conf, relevant settings can look like:
maxmemory 512mb
maxmemory-policy allkeys-lruAfter changing configuration, restart Redis:
sudo systemctl restart redis-serverThen verify that Redis is responding:
redis-cli pingOutput:
PONGRedis recommends leaving some memory available when persistence or replication buffers are involved because those buffers are not counted in the same way as cache data for eviction decisions.
Should Redis Persistence Be Enabled for WordPress Object Caching?
Not always.
If Redis is being used only as a disposable WordPress object cache, losing the cached objects normally means WordPress can regenerate them from the database.
Redis persistence is more important when Redis contains data that must survive a restart.
This distinction matters because Redis supports persistence mechanisms such as snapshots and append-only files, but a cache does not necessarily need the same durability requirements as primary application data.
Before changing persistence settings, determine whether Redis contains only cache data.
Do not disable persistence blindly on a Redis server that is also being used for queues, sessions, or application data.
How to Monitor Redis Object Caching
After enabling Redis, monitor whether the cache is actually being used.
Check Redis memory
Run:
redis-cli INFO memoryThis shows Redis memory statistics.
For a shorter view:
redis-cli INFO memory | grep used_memoryCheck cache statistics
Run:
redis-cli INFO statsLook for:
keyspace_hits
keyspace_misses
evicted_keysThese metrics help you understand whether Redis is receiving cache requests and whether keys are being evicted.
Check WordPress Redis status
Run:
wp redis statusThis is one of the quickest ways to verify the WordPress side of the integration.
Check the object cache directly
WordPress also provides WP-CLI commands for interacting with the object cache:
wp cacheFor example:
wp cache get my_key my_groupThe WordPress CLI documentation provides commands for adding, retrieving, deleting, and flushing object cache data.
How to Know if Redis Object Caching Is Working
Do not judge Redis only by whether the plugin says “Connected.”
Check three layers:
1. Redis is running
redis-cli ping2. WordPress is connected
wp redis status3. Redis is receiving cache activity
redis-cli INFO statsAfter visiting the site and performing normal WordPress actions, cache statistics should change.
A connected Redis server with no meaningful cache activity can indicate that the application is not actually using it as expected.
Common Redis Object Cache Problems
Redis connection refused
You may see an error similar to:
Connection refusedCheck the Redis service:
sudo systemctl status redis-serverThen test it:
redis-cli pingIf Redis is stopped:
sudo systemctl start redis-serverPHP Redis extension is missing
Check:
php -m | grep redisIf nothing is returned, the PHP process may not have the Redis extension available.
Install the appropriate package for your PHP version and restart the relevant PHP service.
The important point is that the CLI PHP version and the PHP version serving your WordPress site can differ.
WordPress says Redis is connected, but object cache is not enabled
Check:
wp redis statusThen enable the drop-in:
wp redis enableWordPress persistent object caching relies on the object-cache.php drop-in. Installing a Redis server alone does not activate persistent object caching in WordPress.
The object cache drop-in cannot be created
The Redis Object Cache plugin needs access to the WordPress files to create or update its drop-in.
Check:
ls -la wp-content/object-cache.phpAlso verify that the user running WP-CLI has the required permissions.
Do not solve permission problems by making the entire WordPress directory world-writable.
Fix ownership and permissions according to your web server and deployment setup.
Another object cache drop-in already exists
WordPress expects the persistent object cache drop-in at:
wp-content/object-cache.phpIf another caching system already controls this file, do not overwrite it without checking what it does.
The Redis Object Cache plugin provides:
wp redis update-dropinfor updating its own drop-in.
First identify which caching system your website is already using.
Redis uses too much memory
Check:
redis-cli INFO memoryThen inspect:
redis-cli CONFIG GET maxmemory
redis-cli CONFIG GET maxmemory-policyIf Redis has no sensible memory limit, configure one based on the VPS’s total RAM and the requirements of the other services.
Redis supports maxmemory specifically to limit cache data and eviction policies to control what happens when that limit is reached.
Redis keeps evicting keys
Check:
redis-cli INFO stats | grep evicted_keysA growing eviction count can mean Redis is reaching its configured memory limit.
That does not automatically mean Redis is broken. Cache eviction is expected when a configured eviction policy removes older or less useful keys.
If eviction is excessive, review:
- Redis memory allocation
- Object cache size
- WordPress plugins
- Cache key growth
- Cache expiration
- VPS available RAM
Redis Security Best Practices on a VPS
Do not expose a Redis server directly to the public internet unless you hagve a specific architecture that requires it and have secured the connection appropriately.
For a WordPress site and Redis running on the same VPS, keeping Redis on localhost is usually simpler.
Check the Redis listening configuration and avoid unnecessary public exposure.
A local setup commonly uses:
127.0.0.1:6379Redis’s own documentation notes that Redis is designed to operate in trusted environments and that authentication and network isolation need to be considered when it is exposed beyond that environment.
Also:
- Use a firewall.
- Do not expose port
6379publicly without a reason. - Use authentication or ACLs when required by your architecture.
- Keep Redis updated.
- Separate cache databases or key prefixes between sites.
- Monitor memory usage.
- Do not store sensitive application data in a cache without understanding its security requirements.
Best Redis Object Caching Practices for a Linux VPS
Use these practices when configuring Redis for WordPress:
- Keep Redis private. Use localhost or a private network whenever possible.
- Set a memory limit. Do not let a cache consume RAM needed by MySQL, PHP, and the operating system.
- Choose an eviction policy intentionally. A cache can usually regenerate evicted data, but application data may have different requirements.
- Use separate namespaces. Give each WordPress site a unique key prefix or Redis database where appropriate.
- Monitor before tuning. Check memory, hits, misses, and evictions before changing settings.
- Do not confuse page cache with object cache. LiteSpeed page caching and Redis solve different performance problems.
- Verify the PHP Redis extension. The extension must be available to the PHP version serving the website.
- Keep the object cache drop-in healthy. WordPress needs the persistent cache integration to actually use Redis.
- Do not blindly flush Redis. A shared Redis instance may contain data belonging to other applications or sites.
- Benchmark after changes. Compare TTFB, database activity, PHP execution time, and real user performance before and after configuration.
Redis Object Cache vs Memcached for WordPress
Both Redis and Memcached can provide persistent object caching for WordPress.
| Feature | Redis | Memcached |
|---|---|---|
| In-memory caching | Yes | Yes |
| WordPress object caching | Yes | Yes |
| Persistent object cache | Yes | Yes |
| Data structures | Rich data structures | Simpler key-value cache |
| Memory eviction | Multiple policies | Supported |
| WordPress support | Strong | Strong |
| Useful with LiteSpeed | Yes | Yes |
| Good choice for WordPress VPS | Yes | Yes |
The right choice depends on your application, hosting stack, existing tooling, and operational requirements.
If your VPS already uses Redis and your WordPress stack supports it, there is usually no reason to introduce another caching service solely for object caching.
Does Redis Object Cache Reduce TTFB?
It can.
TTFB depends on everything between the client and the first byte of the response, including network latency, web server processing, PHP execution, database queries, application logic, and caching.
Redis can reduce the time WordPress spends retrieving repeatedly requested data from the database.
However, it does not guarantee a specific TTFB improvement.
For example:
Without object cache:
  Request
    ↓
  PHP
    ↓
  MySQL query
    ↓
  Process result
    ↓
ResponseWith Redis:
Request
  ↓
PHP
  ↓
Redis lookup
  ↓
Cached result
  ↓
ResponseThe second path can be cheaper when the required data is already cached.
For the largest TTFB improvement, evaluate the complete stack instead of treating Redis as a standalone speed switch.
When Should You Use Redis Object Caching?
Redis object caching is particularly useful when:
- WordPress performs many repeated database queries.
- The site has logged-in users.
- WooCommerce generates highly dynamic requests on cart and checkout pages that cannot utilize standard full-page caching. Activating an object cache layer is one of the most effective methods to speed up a WooCommerce store under high operational workloads.
- Plugins rely heavily on database reads.
- The site has a large or frequently accessed database.
- The VPS has enough RAM for Redis.
- Full page caching cannot cover every request.
- WordPress Site Health recommends a persistent object cache.
It may provide less visible benefit on a small, mostly static site that is already fully served from a page cache.
The best way to determine whether Redis helps is to measure the workload before and after enabling it.
FAQs
Is Redis object caching safe to clear?
Usually, if Redis contains only disposable WordPress cache data, clearing the cache causes WordPress to regenerate the missing objects. However, never assume this is safe on a Redis server shared with other applications.
Does Redis replace MySQL in WordPress?
No. Redis acts as a cache layer. WordPress still relies on its database for persistent site data.
Does enabling Redis automatically improve every WordPress page?
No. Redis is most useful for dynamic application requests that actually access cached objects. A page already served directly from LiteSpeed’s full page cache may not need Redis at all.
What happens when Redis reaches its memory limit?
Redis follows the configured maxmemory-policy. Depending on the policy, it can evict keys or reject writes when the limit is reached.
Can Redis make a slow database query disappear?
No. Redis can avoid repeating a database operation when the required result is available in the object cache. A query that is never cached still reaches the database.
Final Takeaway
A Redis object cache adds a fast persistent caching layer between WordPress and its database. On a Linux VPS, the setup involves installing Redis, verifying the service, making the Redis client available to PHP, enabling the WordPress object cache drop-in, and monitoring memory and cache activity.
For a LiteSpeed WordPress stack, Redis works alongside full page caching rather than replacing it. LiteSpeed can handle complete cached pages while Redis helps WordPress retrieve frequently used objects when PHP still needs to run.
Start with a simple local Redis configuration, set a sensible memory limit, keep Redis private, monitor cache behavior, and measure your site’s TTFB before and after the change.
Ready to optimize your WordPress VPS? Install Redis, verify the connection with redis-cli ping, enable the WordPress object cache, and measure your TTFB and database workload before tuning further.