Both SPF (Sender Policy Framework) and DMARC (Domain-based Message Authentication, Reporting and Conformance) are extensions to Internet email. In this way, unauthorized persons cannot use your email address to impersonate you.
During the SMTP conversation, the results of the authentication verification should be returned to the sending Mail Transfer Agent (MTA). Keep in mind that not all mailbox providers use SPF authentication in their spam filters.
SPF records are maintained at your DNS Manager, we personally use Cloudflare to manage our DNS and have videos on how to manage DNS via Cloudflare. But if you manage it somewhere else you will have to adjust your records there, or you can also ask your hosting provider or system administrator to do this for you.
SPF is DNS record of type TXT and it usually looks something like this
v=spf1 a mx ip4:52.26.86.77 ~allNow in this tutorial we will see how to fix “spf fail – not authorized send”
Also read: What Are SPF, DKIM and DMARC Records? And Why Do You Need Them?
Get exclusive access to all things tech-savvy, and be the first to receive
the latest updates directly in your inbox.
How to Fix “spf fail – not authorized send”
If your receiver get an error “spf fail – not authorized send“, it means your server IP is not authorized to send email for your domain.
For example you have a email called [email protected] (hosted on 198.168.100.100) and you are sending email to [email protected] now Gmail will check if your SPF records allow 198.168.100.100 to send emails for staging.cyberpanel.net. For this to work your SPF record should look like
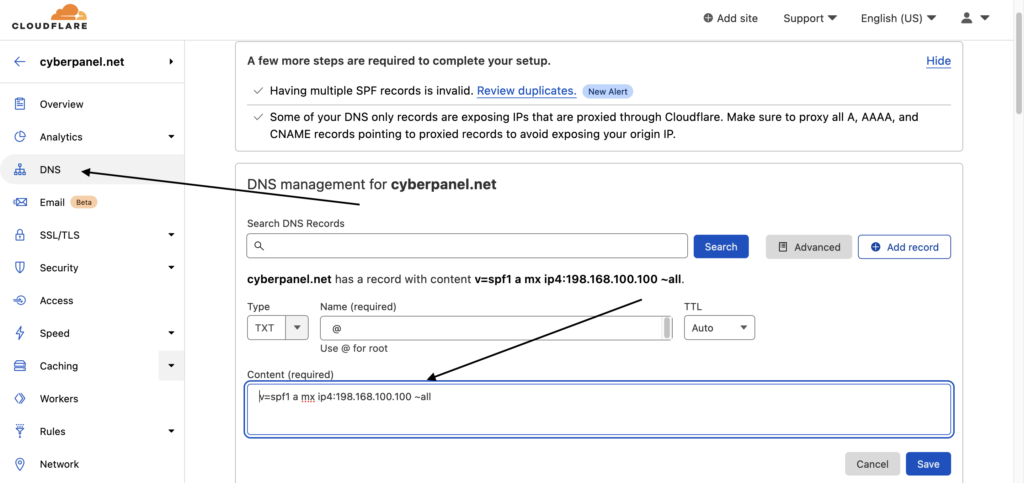
v=spf1 a mx ip4:198.168.100.100 ~allBut if your SPF records does not looks like this you will keep getting an error, all you need to do is update or add your SPF record to allow your server to send emails on your domains behalf.
We’ve created a video and article on how you can do this for dmarc record, since dmarc is also TXT record you can follow the same procedure.
Add SPF Record in Cloudflare to address “spf fail – not authorized send”
If you are using Cloudflare to manage your DNS records then it is really easy to add SPF record in their DNS Manager, just log-in to Cloudflare Dashboard and select the domain for which you want to add an SPF record.
Now in left-side bar select DNS and then add your SPF record as shown below:

Conclusion
It is always good to have a valid SPF record because not every email provider will perform this check but you still need to have valid SPF records published in-case you run into any issues.
Because God knows what someone can do by impersonating you.


