
If you’re looking to run Windows applications on Ubuntu, Wine (which stands for “Wine Is Not an Emulator”) is one of the best solutions. Imagine you’ve just switched to Ubuntu, excited about the world of Linux, but then you realize your favorite Windows software doesn’t work here! Don’t worry, you don’t need to abandon Ubuntu or set up a complicated virtual machine. That’s where Wine comes in. Wine allows you to run Windows programs on Linux without requiring a virtual machine or dual-boot setup. In this guide, you will be taken through the process of how to install Wine on Ubuntu in a simple, step-by-step manner.
What is Wine?

Before jumping into how to install Wine on Ubuntu process, let’s quickly understand what Wine is and why it is so useful.
Wine is a compatibility layer that translates Windows API calls into Linux-friendly ones, allowing Windows applications to run as if they were native Linux apps. Unlike emulators or virtual machines, which simulate an entire Windows environment, Wine directly executes Windows software, often with better performance.
Key Benefits of Wine
- Allows you to run Windows software on Linux.
- No need for a Windows license.
- Faster than using a virtual machine.
- Active community and regular updates.
Now, let’s proceed with how to install Wine on Ubuntu.
Step 1: Check Your Ubuntu Version
The process to install Wine on Ubuntu slightly varies depending on which Ubuntu version you are using. To check your version, open the terminal (Ctrl + Alt + T) and run:
bashlsb_release -a
This will display output similar to:
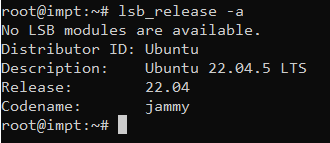
Make a note of your Ubuntu version, as we will use this information in the next steps.
Step 2: Enable 32-bit Support
Many Windows applications rely on 32-bit libraries, so enabling 32-bit architecture support is crucial. Run the following command:
bashsudo dpkg --add-architecture i386
This ensures that your system can install 32-bit dependencies required by Wine.
Step 3: Add the Wine Repository
Wine is available in Ubuntu’s default repositories, but it’s often outdated. To get the latest version, add the official WineHQ repository.
1. Download and Add the WineHQ Key
Run the following command to add Wine’s security key:
bashsudo mkdir -pm755 /etc/apt/keyrings
sudo wget -O /etc/apt/keyrings/winehq-archive.key https://dl.winehq.org/wine-builds/winehq.key
This ensures that Ubuntu can verify the authenticity of the Wine packages.
2. Add the Correct Repository for Your Ubuntu Version
For Ubuntu 22.04 (Jammy Jellyfish), run:
bashsudo wget -NP /etc/apt/sources.list.d/ https://dl.winehq.org/wine-builds/ubuntu/dists/jammy/winehq-jammy.sources
For Ubuntu 20.04 (Focal Fossa), run:
bashsudo wget -NP /etc/apt/sources.list.d/ https://dl.winehq.org/wine-builds/ubuntu/dists/focal/winehq-focal.sources
This step ensures that your package manager can fetch Wine from the official WineHQ repository.
Step 4: Update and Install Wine
Once the repository is added, update your package list:

bashsudo apt update
Now, you have three versions of Wine to choose from:
1. Install Wine Stable (Recommended for Most Users)
bashsudo apt install --install-recommends winehq-stable -y
This installs the most stable and tested version.
2. Install Wine Development (For Newer Features and Testing)
bash
sudo apt install --install-recommends winehq-devel -y
This version includes newer features but might be less stable.
3. Install Wine Staging (For Latest Features and Improvements)
bashsudo apt install --install-recommends winehq-staging -y
Staging builds include experimental features that may not yet be fully stable.
Step 5: Verify the Installation
After installation, check if Wine is properly installed by running:
bashwine --version
If everything is set up correctly, you should see an output like:
wine-9.0
Step 6: Configure Wine
Before running Windows applications, Wine needs to be configured. Run:
bashwinecfg
This will open the Wine Configuration window. The first time you run this command, Wine will prompt you to install Mono (for .NET applications) and Gecko (for applications that need Internet Explorer). Click Install when prompted.
Choosing the Windows Version
Under the “Applications” tab, you can set the Windows version. By default, Wine uses Windows 7, but you can change it to Windows 10 if needed.
Once done, click Apply and OK.
Step 7: Install Windows Applications with Wine
Now that we know how to install Wine on Ubuntu and it is configured, let’s install a Windows application.
Installing a Windows EXE File
Download an .exe file of the application you want to run. Then, navigate to the folder where the file is located and run:
bashwine filename.exe
For example, if you downloaded Notepad++:
bashwine ~/Downloads/npp.8.5.1.Installer.exe
Follow the installation prompts as you would on Windows.
Step 8: Create a Desktop Shortcut for Installed Applications
Once an application is installed, you may not want to run it through the terminal every time. You can create a desktop shortcut.
- Navigate to the Wine installation directory: bash
cd ~/.wine/drive_c/Program\ Files/ - Locate your installed program.
- Use the
winecommand to run the.exefile or create a shortcut manually.
Step 9: Uninstall a Windows Application
If you want to remove an installed application, run:
bashwine uninstaller
This will open the Wine Add/Remove Programs window, allowing you to uninstall programs like you would on Windows.
Step 10: Troubleshooting Common Issues
Here are some common issues users face while using Wine:
1. Wine Command Not Found
If running wine --version gives an error, try:
bash
source ~/.bashrc
Or reinstall Wine.
2. Windows Program Crashes on Startup
Try running:
bashwinecfg
Then set the Windows version to Windows 10 or Windows 8.
3. Missing DLL Errors
If a program complains about missing DLL files, you can install them using Winetricks:
bashsudo apt install winetricks -y
winetricks
Select the missing DLL files and install them.
Conclusion
Wine is an incredibly powerful tool that allows you to run Windows applications seamlessly on Ubuntu. Whether you need it for work, gaming, or other purposes, Wine eliminates the need for a dual-boot system or a Windows virtual machine. By following the steps in this guide, you should know how to install Wine on Ubuntu and run it smoothly on Ubuntu. If you run into issues, the Wine community and forums are great resources for troubleshooting.
FAQs
1. What is Wine, and why am I in need of it?
Wine is a compatibility layer that enables you to use Windows software under Ubuntu and other Linux operating systems. Rather than running a virtual machine or dual-booting Windows, Wine emulates Windows system calls for you by presenting them in a form that’s friendly to Linux, so you can install and use most Windows applications effortlessly.
2. Is Wine an emulator?
No, Wine is not an emulator. As opposed to usual emulators which emulate a complete Windows environment, Wine executes Windows programs directly by translating their system calls into their Linux counterparts. This tends to be more performance-friendly than when using a virtual machine.
3. Can I run games on Wine?
Yes, Wine can run most Windows games, but the performance will be variable. If you’re particularly interested in playing games, you might want to use Proton (from Steam Play) or Lutris, which are both designed for gaming on Linux.