FFmpeg is an open source software utility that offers a collection of libraries and programs for handling multimedia content, such as audio, video, and images. FFmpeg is short for Fast Forward MPEG that shows that its initial focus is on video compression and the MPEG video format. However, over time, FFmeg has evolved into a multimedia framework that supports more than just videos.
This guide is your one-stop solution to learn how to install FFmpeg on Ubuntu.
How to Check if FFmpeg is Installed on Ubuntu
Before you install FFmpeg on Ubuntu, you should check whether it is already on your system or not.
- Check FFmpeg Version
Run the following command on the terminal:
ffmpeg -version
- If FFmpeg is installed, you’ll see an output displaying the installed version and configuration details.
- If FFmpeg is not installed, you’ll see an error like “command not found.”
- Check FFmpeg Installation Path
To check where it is located, run:
which ffmpeg
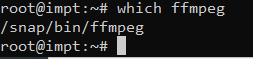
This will return the path of the FFmpeg executable, typically /usr/bin/ffmpeg, if installed.
- Verify with dpkg (For APT-based Systems like Ubuntu/Debian)
If you installed FFmpeg using APT, you can check it’s package status by running the command:
dpkg -l | grep ffmpeg
If FFmpeg is installed, it will display the package details.
- Check with apt (Ubuntu/Debian)
Run:
apt list –installed | grep ffmpeg
If it’s installed, it will appear in the list.
Related Article: How to Install Wine on Ubuntu: A Step-by-Step Guide
How to Install FFmpeg on Ubuntu
FFmpeg is a powerful multimedia framework that is used for processing, converting, and streaming audio/ video files. Here is how you can install FFmpeg on Ubuntu using three different methods:

- Installing FFmpeg from Default Ubuntu Repositories
The first method is to install FFmpeg using Ubuntu’s official package manager.
- Update package lists:
sudo apt update && sudo apt upgrade -y
- Install FFmpeg:
sudo apt install ffmpeg -y
Or
Snap install ffmpeg

- Verify Installation:
ffmpeg -version
This method installs a stable version of FFmpeg, but it might not be the latest release.
- Installing the Latest FFmpeg Version via PPA
For the most recent version, use JonathonF PPA.
- Add the PPA repository:
sudo add-apt-repository ppa:jonathonf/ffmpeg-4
- Update package lists:
sudo apt update
- Install the latest FFmpeg version:
sudo apt install ffmpeg -y
- Check the installed version:
ffmpeg -version
This method provides the latest version, but the PPA may not always be updated immediately.
- Building FFmpeg from Source (Optional)
If you need any custom features or the absolute latest version, you can compile using FFmpeg from the source:
- Install Required Dependencies
sudo apt update
sudo apt install -y build-essential yasm cmake nasm libx264-dev libx265-dev libvpx-dev libfdk-aac-dev libmp3lame-dev libopus-dev libass-dev libfreetype6-dev libvorbis-dev
- Download FFmpeg Source Code
cd /usr/local/src
sudo git clone https://git.ffmpeg.org/ffmpeg.git ffmpeg
cd ffmpeg
sudo git checkout release/6.0 # Replace with the latest release if needed
- Configure and Compile FFmpeg
sudo ./configure –enable-gpl –enable-libx264 –enable-libx265 –enable-libvpx –enable-libfdk-aac –enable-libmp3lame –enable-libopus –enable-libass –enable-libfreetype –enable-libvorbis
sudo make -j$(nproc)
sudo make install
- Verify Installation
ffmpeg -version

This method ensures you have the absolute latest version with custom options, but it requires more time and system resources.
Basic FFmpeg Commands
FFmpeg is a powertool to handle multimedia files. Here are the most essential and frequently used FFmpeg commands:
- Convert Video and Audio Formats
Convert a Video to Another Format
- Convert an MP4 video to AVI:
ffmpeg -i input.mp4 output.avi
- Convert a MOV video to MP4:
ffmpeg -i input.mov output.mp4
Convert an Audio File to Another Format
- Convert a WAV file to MP3:
ffmpeg -i input.wav output.mp3
- Convert an MP3 to AAC:
ffmpeg -i input.mp3 output.aac
- Extract Audio from a Video
- Extract the audio from a video file without re-encoding:
ffmpeg -i input.mp4 -q:a 0 -map a output.mp3
- Extract and convert audio to WAV:
ffmpeg -i input.mp4 -vn -acodec pcm_s16le -ar 44100 -ac 2 output.wav
- Resize and Compress Videos
Resize a Video (Change Resolution)
- Resize a video to 1280×720 (HD):
ffmpeg -i input.mp4 -vf scale=1280:720 output.mp4
- Resize while maintaining the aspect ratio:
ffmpeg -i input.mp4 -vf “scale=1280:-1” output.mp4
Compress a Video (Reduce File Size)
- Lower the bitrate to reduce the file size:
ffmpeg -i input.mp4 -b:v 1M output.mp4
- Use H.265 (HEVC) for better compression:
ffmpeg -i input.mp4 -c:v libx265 -crf 28 output.mp4
Uninstall FFmpeg
If you are no longer using FFmpeg, then you can uninstall it using the method that correlates with how you installed it.
- Uninstall FFmpeg from Default Ubuntu Repositories
If you installed FFmpeg using apt, remove it with:
sudo apt remove –purge ffmpeg -y
sudo apt autoremove -y
- Uninstall FFmpeg Installed via PPA
Remove the package first, if you used PPA to install FFmpeg on Ubuntu:
sudo apt remove –purge ffmpeg -y
Then, remove the PPA:
sudo add-apt-repository –remove ppa:jonathonf/ffmpeg-4
Finally, update the package list:
sudo apt update
- Uninstall FFmpeg Built from Source
If you used source to compile FFmpeg, navigate to the build directory and run:
cd /usr/local/src/ffmpeg
sudo make uninstall
Remove all related files by running the command:
sudo rm -rf /usr/local/bin/ffmpeg /usr/local/bin/ffprobe /usr/local/lib/libav*
Wrapping Up – Install FFmpeg on Ubuntu
To install FFmpeg on Ubuntu, you can use any of the three methods listed above. All methods are super easy to follow and you can also easily uninstall the package if needed!
Frequently Asked Questions
1. What is the easiest way to install FFmpeg on Ubuntu?
The simplest way is using APT:sudo apt update && sudo apt install ffmpeg -y
2. Can I use FFmpeg on a server without a GUI?
Yes, FFmpeg is a command-line tool and works perfectly on Ubuntu servers without a graphical interface.
3. Does FFmpeg work on all Ubuntu versions?
Yes, FFmpeg supports all Ubuntu versions, including Ubuntu 22.04, 20.04, and 18.04. However, older versions may have outdated FFmpeg builds in their default repositories.