
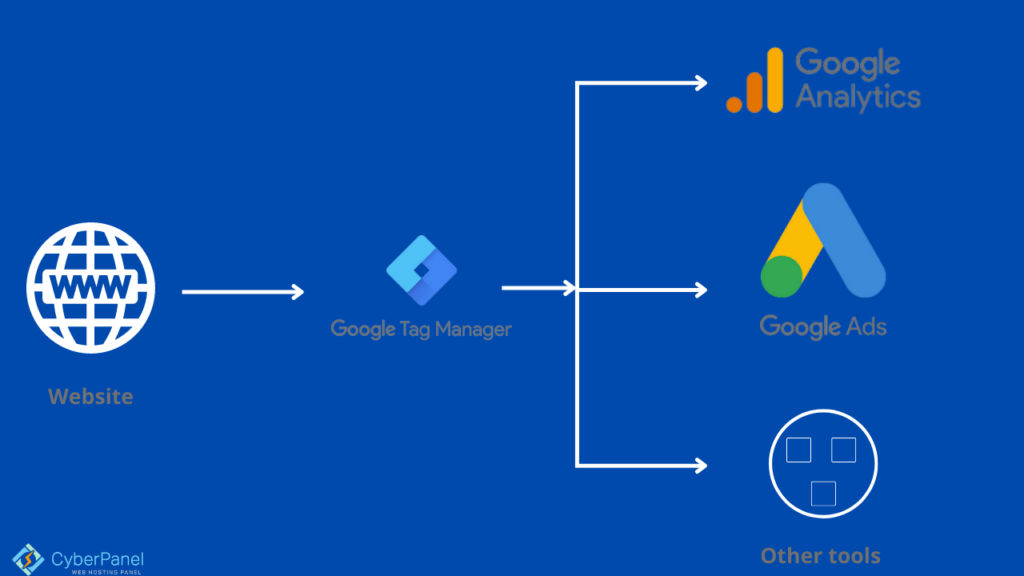
Adding various code snippets to track conversions, traffic, and other analytical data is common for website owners. You can quickly add and administer all of these scripts using Google Tag Manager from an unified dashboard.
Tag layouts for Google Analytics, Adwords, DoubleClick, and other services are included. Tag management also integrates with a number of third-party tracking and analytics solutions. Aside from just that, you can utilize custom HTML to insert your own tracking code or any other code you like.
This eliminates the need to manually add and remove tags from your code and instead allows you to manage it from a simple interface. Furthermore, all of these scripts are integrated into a single script.
What is Google Tag Manager?
Google Tag Manager is an unlimited access tag management system that lets you manage and deploy marketing tags (code snippets or tracking pixels) on your site (or mobile app) without modifying the code.

Tag Manager has the advantage of allowing you, the marketer, to update the code yourself.
Marketers and webmasters can deploy website tags all in one place using Google Tag Manager, making tag administration simple, easy, and trustworthy.
Before You start with Google Tag Manager
Without some technical know-how or training, Google Tag Manager is not “simple” to use.
If you want to use Google Tag Manager to track events, you’ll need to understand what “events” are, how Google Analytics works, what information you can track with events, how Google Analytics reports appear, and how to identify your categories, actions, and labels.
Google Tag Manager is divided into three sections:
- Tags: Javascript snippets or tracking pixels
- Triggers: Google Tag Manager uses triggers to determine when, where, and how to fire a tag.
- Variables: GTM may require more information in order for the tag and trigger to function properly.
What are Tags, Triggers and Variables?
Tags
Tags are code snippets or tracking pixels by third-party applications. Google Tag Manager is told what to perform by these tags.
Triggers
Triggers allow you to activate the tag you’ve created. They instruct Tag Manager on when, where, and how to carry out your instructions.
Variables
Variables are extra pieces of information that GTM may require in order for your tag and trigger to function properly.
How Google Tag Manager Works?
A tag manager is essentially a platform that allows marketers to manage many tags on their website. A developer is not required to alter the code that is used to construct tags.
The best aspect is that Tag Manager simply requires rudimentary technological expertise. The Google Tag Manager’s operation is mainly reliant on a data layer that passes data from the page to the Tag Manager.
The GTM data layer’s information could then be used to deploy or fire desired tags. The Google data layer, for example, will connect the tag’s data with Google Analytics.
As a result, Google Analytics may now evaluate the data to establish the Google Analytics tag’s conversion rate.
Advantages of Google Tag Manager
1. It is simple to use.
One of the most significant advantages of Google Tag Manager is that it does not require any programming skills. Without needing to undertake difficult website coding, almost anyone can easily make adjustments, add new tags, test each change, and deploy tags. This gives you and your team more control and streamlines your process, resulting in faster launch times and more time for your IT department to focus on more essential issues, such as why your website is so slow.
2. Auto-Event Tracking is a feature that allows you to keep track of events without having to
GTM includes an auto-event tracking function that tracks events (such as clicks, form submits, and hours invested on page) without the need for specific JavaScript code. It takes some setup and isn’t as simple as clicking a button, but after you’ve enabled specific triggers, GTM will begin listening for specific website behaviors automatically.

3. It’s completely free.
GTM is a free service that is ideal for start – ups and small businesses. In Tag Manager 360, big firms can consider upgrading to the premium GTM version.
4. Controlling the version of a document.
GTM saves an archived version of every update you make. When you really need to wind back some changes, recover an older version, or if you unintentionally published a load of adjustments to a live site first before tags were finished, this makes life easier. Version control allows you to switch back and forth through fear of causing irreversible damage.
5. Management of users and permissions.
You have complete control over who can perform what modifications using GTM. You may completely control who has the rights to make changes (such as establishing tags, macros, and rules) to the website, from no access to read-only to editing to publishing rights.
6. It helps you save a lot of time.
GTM helps you save time by generating various tracking codes on your own. You don’t require a marketer to send tracking code to a developer, only to have it implemented a week later due to the developer’s busy schedule. Whenever you need to track more events throughout that week, you won’t have to send an email back and forth. The GTM platform allows you to add, amend, and remove all tracking code (also known as tags).
7. Everything is in one convenient location.
It is all in one place with GTM. The days of locating the numerous JavaScript code snippets in a website or app’s source code in order to make additions, modifications, or deletions are long gone. Now everything’s in one location, human errors such as missing codes and erroneous data are no longer a problem.
8. It’s a lot easier to troubleshoot.
It’s easy to troubleshoot and resolve tag issues because its in one place—even before they’re published. GTM’s Preview Mode will automatically appear which tags are active and which are not, as well as information regarding triggers and comprehensive data within tracking tags. Tag Assistant and Datalayer Checker are two other useful GTM tools.
9. Templates can be created.
GTM allows you to export all of your tags, triggers, and variables into a single file, which you can then use to construct your own code templates. This is useful if you want to use the same Google Analytics occurrence across many clients.
GTM also comes with a number of built-in tags for things like Google Ads conversions and retargeting. This enables team members with no coding skills to modify tags without having to learn complex code or rely on the assistance of a developer.
10. Mindfulness.
All tracking scripts are automatically scanned by Google, and those that resemble any sort of malicious programs are instantly paused.
How To Install Google Tag Manager In WordPress?
I assume that you already have a running WordPress site. I have created my WordPress site using CyberPanel
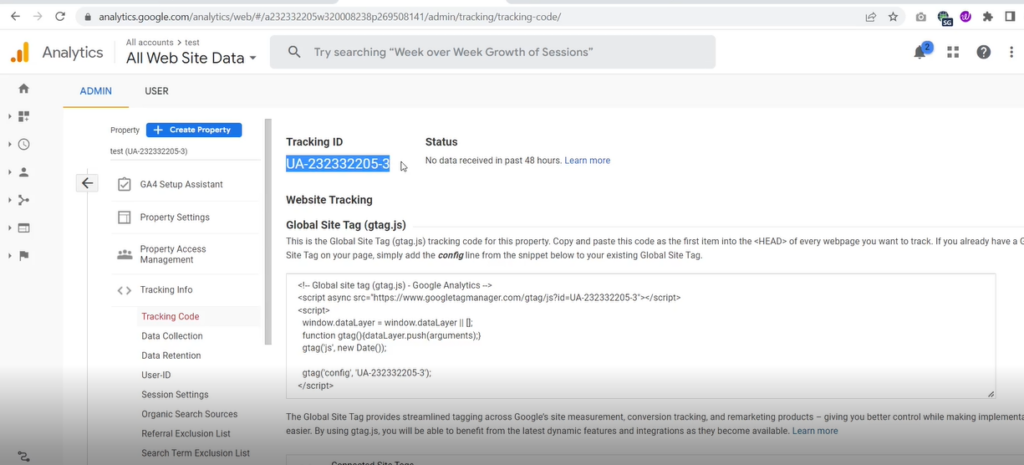
- First of all create a Google Analytics account (Universal Analytics) and make sure to remember the Tracking ID.
- Your Tracking ID is a unique code that Google uses to identify your website. Getting into your Google Analytics Dashboard and going to the Admin tab will give you this ID.
- Select your site’s account and property, then tap on tracking data to enlarge it. The tracking code link will be visible here, copy this for your usage.
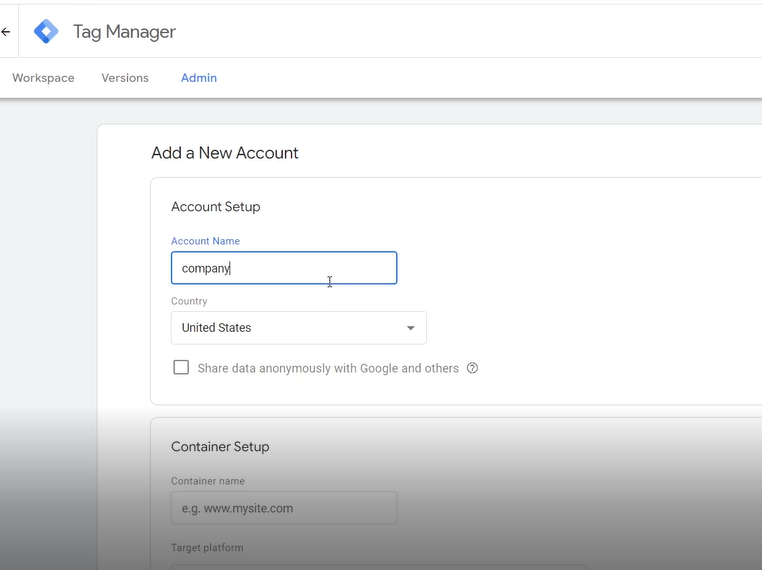
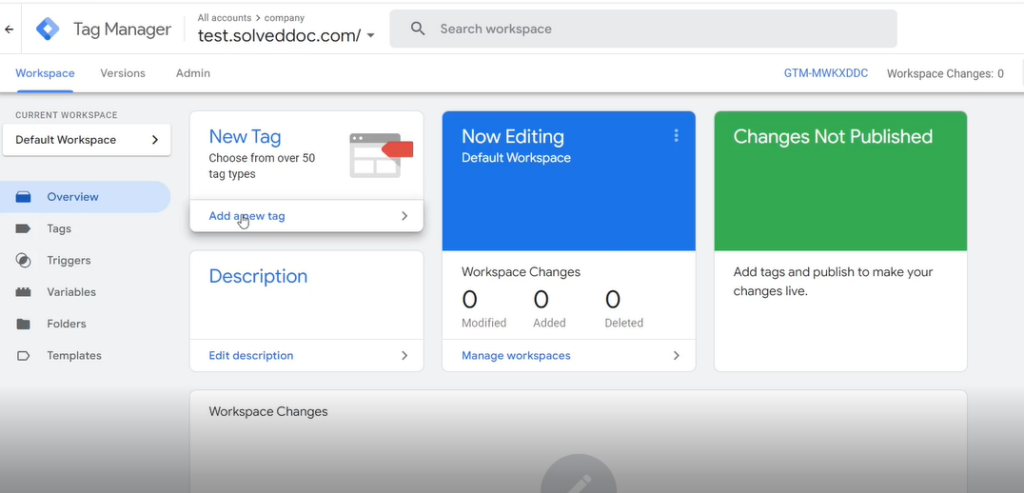
- Once that is done, go to tagmanager.google.com, you need to start setting up the container and for that, Click on Setup Container.
- Enter the container name, where to use the container and then click Create
- Click on New Tag -> Add New Tag to add the new tag in Tag Manager
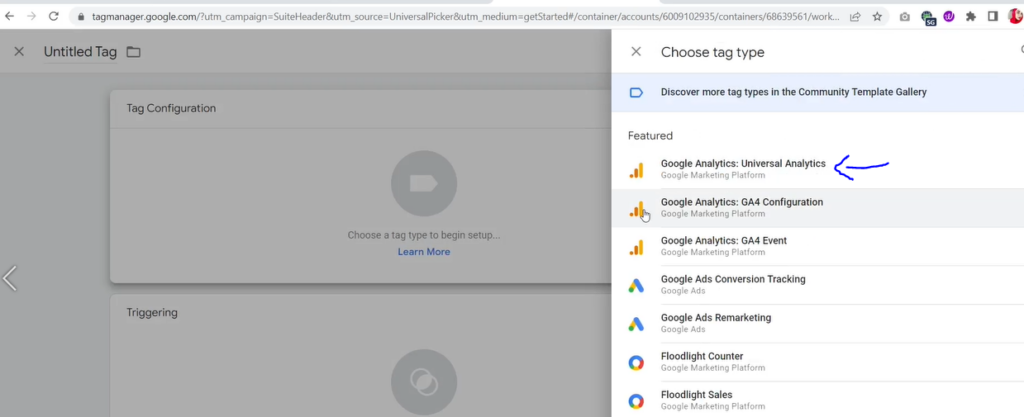
- Choose your Product -> Google Analytics (Universal Analytics). This is important because this will give you your Tracking ID
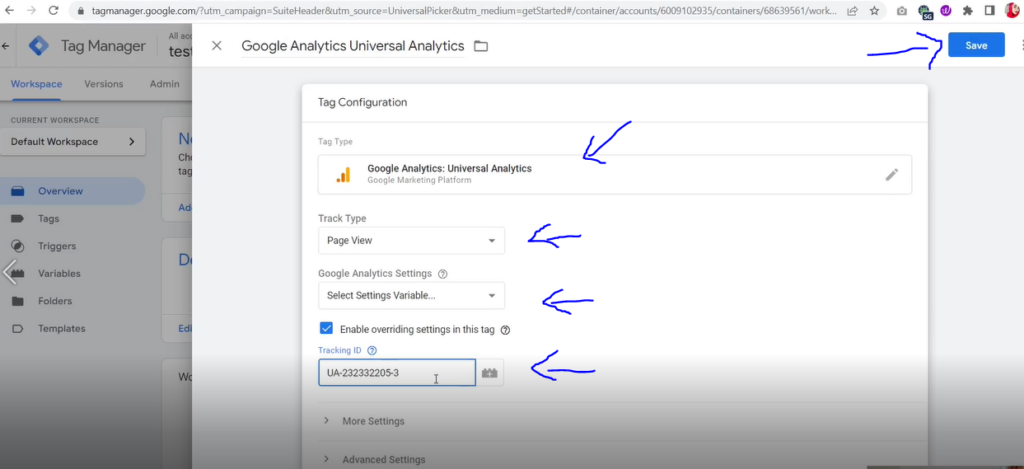
- Enter the following information. Configure Tag ->Enter your Tracking ID and Tracking Type should be Page View
- Fire on -> All Pages (so it is applicable on all pages of our website)
- Click Create Tag to create your very own Tag in Tag Manager
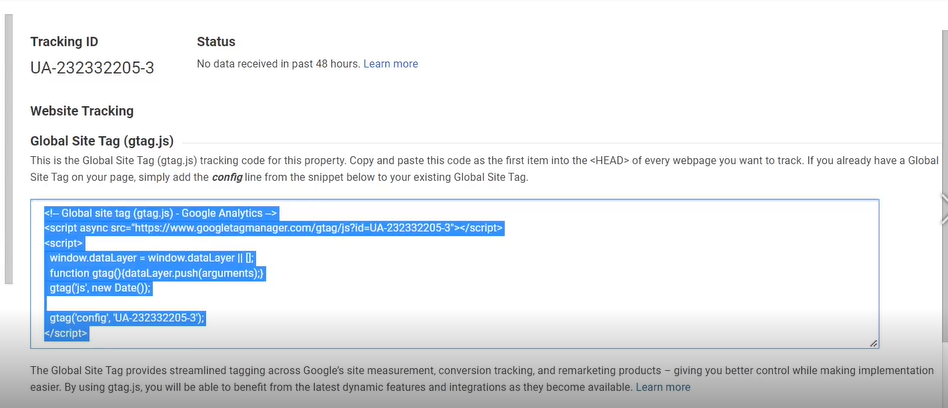
- Copy the code snippet from the Google Analytics page. This is right underneath the Tracking ID on Google Analytics.
- Now let us add the code in the header on your WordPress site. Go to your WordPress Dashboard
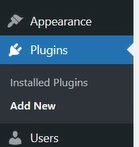
- Click on Plugins -> Add New from the left hand side menu
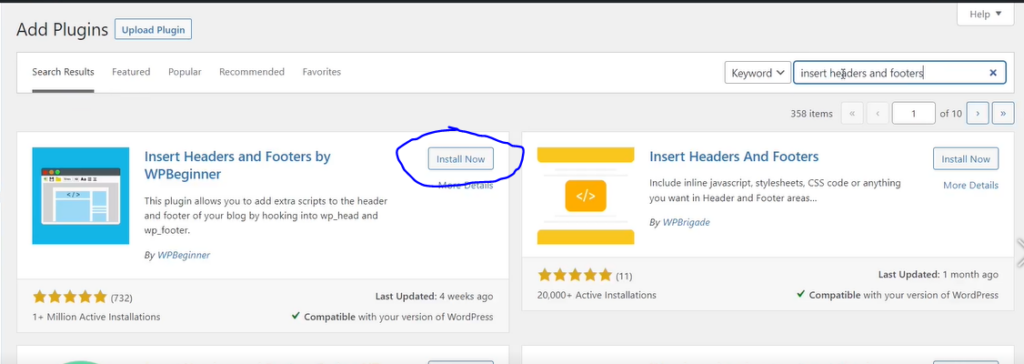
- Search for Insert Headers and Footers and Install and activate the plugin
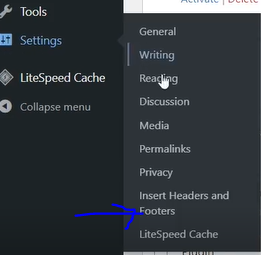
- Click on Settings -> Insert Headers and Footers from the left hand side menu
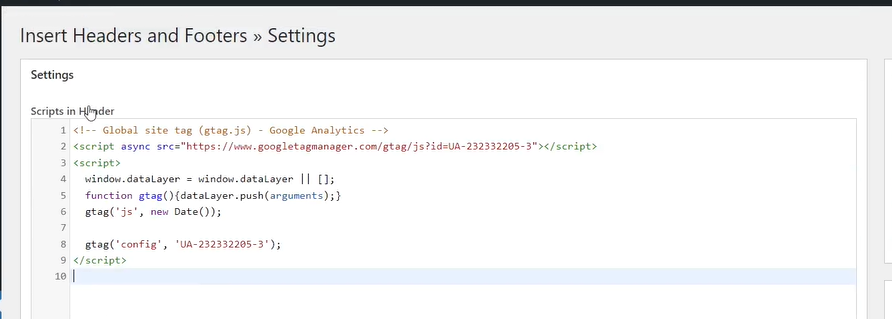
- Paste the code you copied from Google Analytics and click Save. This will help install Google tag Manager in wordpress
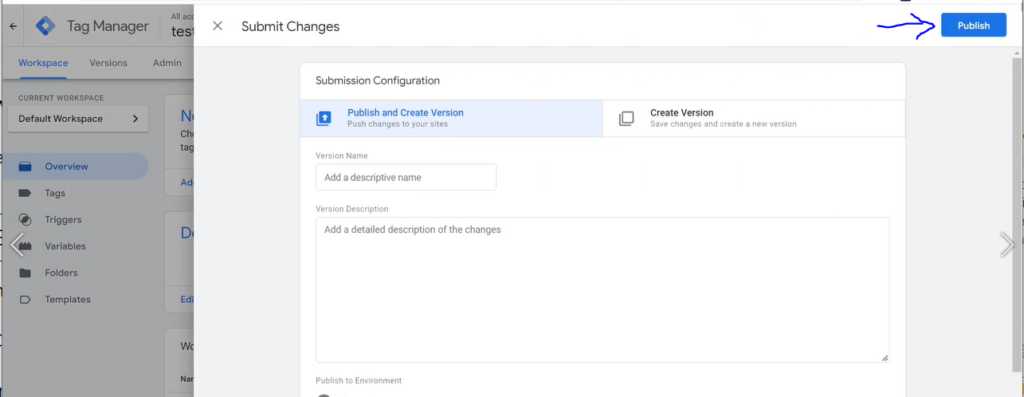
- Now finally, Go back to Tag manager page and click Publish from the top right corner and that is it you have successfully install Google Tag manager in WordPress
Conclusion
Google Tag Manager is an excellent tool to utilize if you want to connect multiple statistics and marketing services for your WordPress site. It makes it simple to add and modify different tracking tags on your website.
Google Tag Manager, on the other hand, has a steep learning curve. You’d have to put in some effort to learn how to use the tool. However, we’ll also go through a simpler solution that makes advanced tracking a breeze to set up.
If you really are keen to learn how to use Google Tag Manager, it will undoubtedly make your life easier. Google Tag Manager (GTM) can help you enhance your marketing by allowing you to see what’s causing an increase (or drop) in website traffic.
