Controlling traffic between pods in Kubernetes is crucial for securing your workloads today. That’s where Kubernetes Network Policy comes in. If you’re looking to manage traffic flow at the IP address or port level (OSI layers 3 or 4), NetworkPolicies allow you to define rules governing traffic flow within your cluster, as well as between Pods and external networks.
Sounds Technical, Right?
Relax, I’m here to break down everything about network policy in Kubernetes concepts with real-world YAML examples to make implementing them easy, especially for beginners.
What is a Network Policy in Kubernetes?
Kubernetes Network Policy is a set of rules that dictate how different groups of pods can interact with one another. They serve as a network segmentation layer, outlining which pods are permitted to send and receive traffic from others, depending on labels, namespaces, and other factors. These policies are crucial for securing your applications, enforcing communication guidelines, and ensuring a strong network structure within your Kubernetes cluster.
There are three distinct methods to pinpoint target endpoints:
- Specific Pods (Pods that match a label are permitted)
- Specific Namespaces (all Pods within the namespace are permitted)
- IP address blocks (endpoints that have an IP address within the block are permitted)
How Kubernetes Network Policies Work
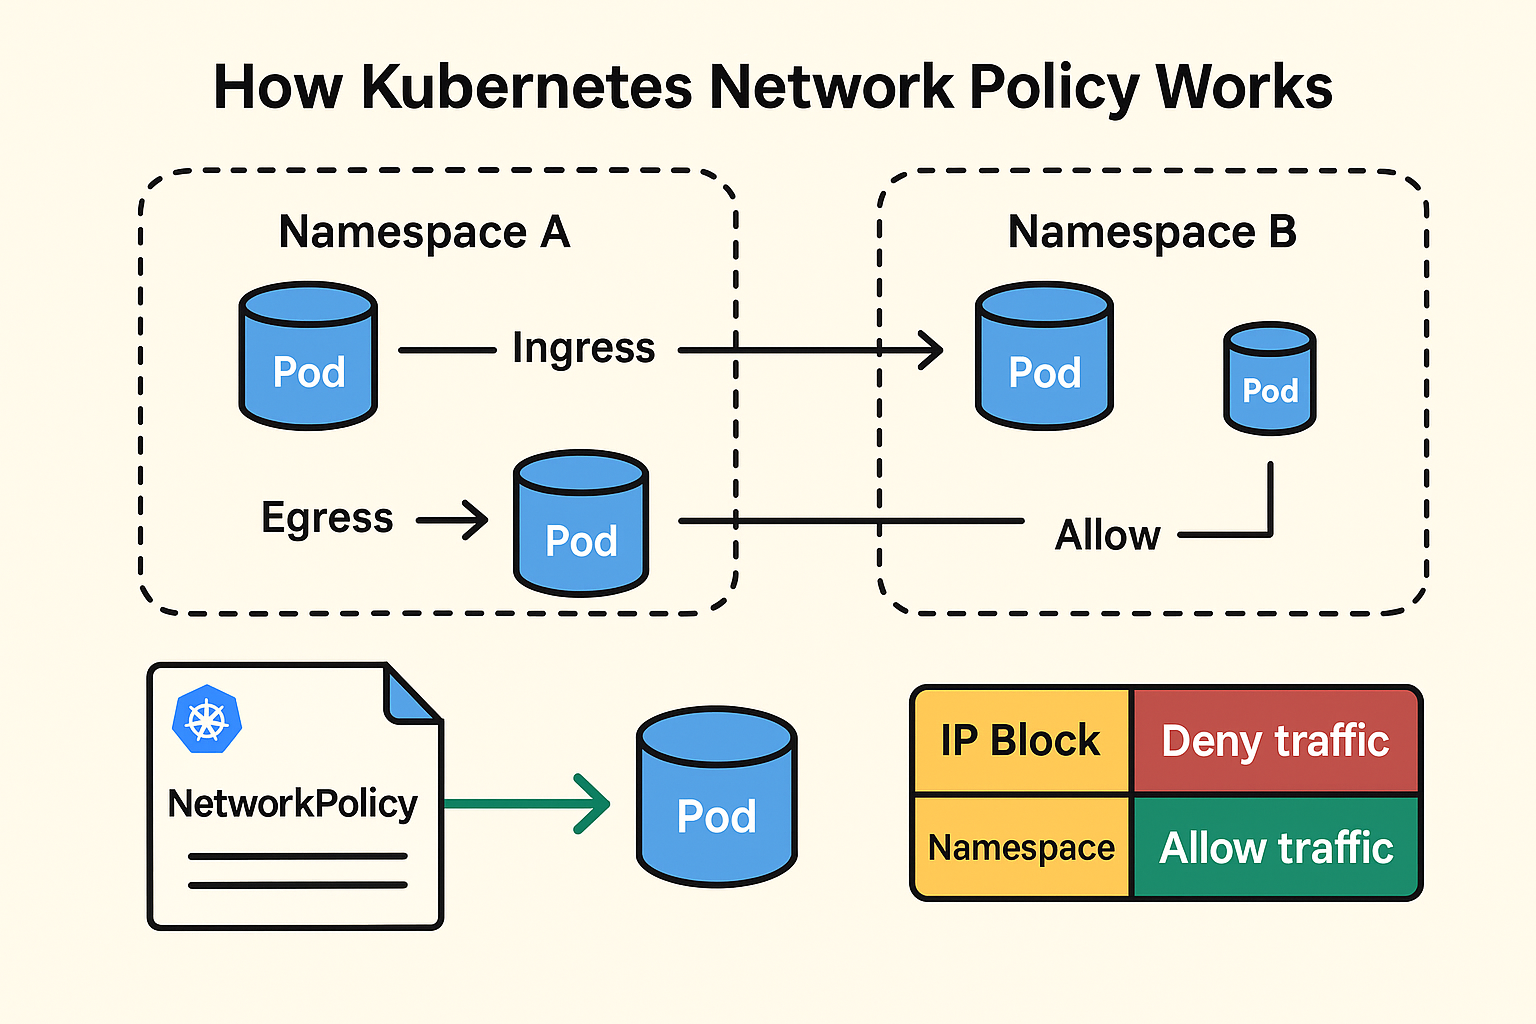
A Kubernetes Network Policy allows for the configuration of allowed targets for Ingress and Egress rules, enabling users to block all communications for a Pod or restrict traffic to specific ports. These policies are additive, meaning multiple policies can apply, with the combined “allow” rules governing traffic.
However, there are limitations, such as the lack of logging for blocked events, no explicit deny policies, and an inability to manage loopback or incoming host traffic. For more advanced features, integrating a service mesh may be necessary alongside Network Policies.
Network Policies let you set different allowed targets for Ingress and Egress rules, and they can either block all communications for a Pod or limit traffic to certain ports. They’re additive, which means you can have multiple policies applying to a Pod, and if there’s a ‘deny’ policy in place, traffic from sources that don’t match any ‘allow’ rules gets blocked. These policies work at layer 3/4 of the OSI model, using IP addresses and port numbers to manage network flows.
Network Policies depend on a Container Network Interface (CNI) plugin to handle traffic, and while most plugins support basic features, some advanced ones need specific plugins. For Network Policies to work, a CNI plugin has to be in place since Kubernetes networking depends on it.
Benefits of Using Network Policies in Kubernetes
- Security: Restrict the communication between pods and external IPs.
- Isolation: Implement multi-tenancy and enforce namespace boundaries.
- Compliance: Adhere to data protection laws and regulatory standards.
- Control: Adjust app-to-app traffic according to real needs.
Kubernetes Network Policy YAML Syntax Explained
apiVersion: networking.k8s.io/v1<br>kind: NetworkPolicy<br>metadata:<br> name: example-policy<br> namespace: default<br>spec:<br> podSelector:<br> matchLabels:<br> app: myapp<br> policyTypes:<br> - Ingress<br> ingress:<br> - from:<br> - podSelector:<br> matchLabels:<br> role: backend<br> ports:<br> - protocol: TCP<br> port: 80<br>Kubernetes NetworkPolicy Overview
- The NetworkPolicy specification outlines the network policy for a particular namespace.
- The policy features a podSelector element to choose a group of pods.
- Required fields consist of apiVersion, kind, and metadata.
- The PolicyTypes field indicates whether the policy is applicable to Ingress, Egress, or both.
- By default, it is set to Ingress, while egress rules pertain to egress traffic.
- Ingress rules define the ingress traffic that the policy permits.
- Egress rules detail the traffic allowed based on specific ports and elements.
Top Kubernetes Network Policy Examples
Example 1: Allow Ingress Only from a Specific Namespace
In this case, your Egress Network Policy focuses on multiple namespaces by using their label names. To make this effective, you must label the target namespaces. For instance:
apiVersion: networking.k8s.io/v1<br>kind: NetworkPolicy<br>metadata:<br> name: allow-from-namespace<br>spec:<br> podSelector:<br> matchLabels:<br> app: internal<br> ingress:<br> - from:<br> - namespaceSelector:<br> matchLabels:<br> name: frontend<br>Example 2: Allow All Traffic to a Pod
apiVersion: networking.k8s.io/v1<br>kind: NetworkPolicy<br>metadata:<br> name: network-policy<br>spec:<br> podSelector:<br> matchLabels:<br> app: demo<br> policyTypes:<br> - Ingress<br> - Egress<br> ingress:<br> - {}<br> egress:<br> - {}<br>Example 3: Deny All Ingress Traffic
You can set up a “default” policy for a namespace in Kubernetes that blocks all ingress AND egress traffic by creating the following NetworkPolicy in that namespace.
service/networking/network-policy-default-deny-all.yaml
Copy service/networking/network-policy-default-deny-all.yaml to clipboard
---
apiVersion: networking.k8s.io/v1
kind: NetworkPolicy
metadata:
name: default-deny-all
spec:
podSelector: {}
policyTypes:
- Ingress
- Egress
This guarantees that even pods not selected by any other NetworkPolicy will be denied ingress or egress traffic.
Example 4: Restrict Egress to a Specific CIDR Range
apiVersion: networking.k8s.io/v1<br>kind: NetworkPolicy<br>metadata:<br> name: restrict-egress-cidr<br> namespace: default<br>spec:<br> podSelector:<br> matchLabels:<br> app: secure-backend<br> policyTypes:<br> - Egress<br> egress:<br> - to:<br> - ipBlock:<br> cidr: 192.168.1.0/24<br>This Kubernetes network policy allows pods labeled app=secure-backend to only send outbound traffic to IP addresses with 192.168.1.0/24. All other egress traffic is blocked.
Example 5: Policy to Allow Traffic Between Specific Pods Only
apiVersion: networking.k8s.io/v1<br>kind: NetworkPolicy<br>metadata:<br> name: pod-to-pod-communication<br>spec:<br> podSelector:<br> matchLabels:<br> app: db<br> ingress:<br> - from:<br> - podSelector:<br> matchLabels:<br> app: app-server<br>Example 6: Target multiple namespaces by label
In this case, your Egress NetworkPolicy targets multiple namespaces by using their label names. To make this work, you must label the target namespaces. For instance:

kubectl label namespace frontend namespace=frontend<br>kubectl label namespace backend namespace=backend<br><br>Add the labels under namespaceSelector in your NetworkPolicy document. For example
apiVersion: networking.k8s.io/v1<br>kind: NetworkPolicy<br>metadata:<br> name: egress-namespaces<br>spec:<br> podSelector:<br> matchLabels:<br> app: myapp<br> policyTypes:<br> - Egress<br> egress:<br> - to:<br> - namespaceSelector:<br> matchExpressions:<br> - key: namespace<br> operator: In<br> values: ["frontend", "backend"]Note:
It is not possible to directly specify the name of the namespaces in a NetworkPolicy. You must use a namespaceSelector with matchLabels or matchExpressions to select the namespaces based on their labels
Some Troubleshooting Tips For Network Policy Kubernetes Issues
Check Network Plugin: Make sure your CNI plugin is compatible with Network Policies.
Pod Labels: Confirm that the pod labels align with the selectors in your Network Policy.
Policy Types: Verify that you have indicated the right policy types (Ingress, Egress).
Logs and Events: Review the logs and events for any errors associated with Network Policies.
Conclusion: Simplify Kubernetes Networking with Policies
Kubernetes Network Policies help as an effective means to enhance the security of your cluster by regulating pod interactions. They give you the fine-grained control over your traffic in and out of your Pods.
Try out and master the 6 YAML Kubernetes Network Policies in your cluster to guarantee that your applications operate within a safe and managed setting.
FAQ’s
1. What occurs if I don’t implement a Kubernetes network policy?
A: Pods can interact without any limitations.
2: Is a specific CNI plugin required for network policies in Kubernetes?
A: Yes, not all plugins support them. Calico, Cilium, and Antrea are solid choices.
3: Can network policies prevent internet access?
A: Yes, by limiting egress rules and steering clear of IP blocks like 0.0.0.0/0.
4: Do Kubernetes network policies impact services?
A: Services aren’t directly blocked; the traffic to the underlying pods is managed.