
MySQL stands as an open-source relational database management system (RDBMS). It plays a pivotal role in the management and organization of extensive sets of structured data, rendering it an indispensable asset across various applications and websites. Installation and uninstalling MySQL is always an issue for users so here we will take care of uninstallation. Via MySQL, users can perform actions such as data creation, updates, retrieval, and manipulation within a structured framework, facilitated by a language known as SQL (Structured Query Language).
Originally developed by the Swedish company MySQL AB, MySQL has garnered acclaim for its reliability, swiftness, and user-friendliness. It’s a prevalent choice for an array of applications including web applications, content management systems (CMS), e-commerce platforms, data warehousing, and other contexts demanding efficient data storage and management.
The method of uninstalling MySQL varies based on the operating system. The following sections outline the steps to uninstall MySQL on Windows, macOS, and Linux along with instructions for removing all related data.
Purpose of MySQL Uninstallation
MySQL, a widely used open-source relational database management system (RDBMS), serves as a backbone for numerous applications and websites. However, there are scenarios where the need arises to uninstall MySQL, each with its specific purpose. Understanding the motivations behind uninstalling MySQL can shed light on its significance and relevance in various contexts.
Resolution of Issues:
Uninstalling MySQL can be a solution to address persistent technical problems or glitches. In some cases, when troubleshooting measures fail to rectify issues, a clean uninstallation followed by a fresh installation might be the most effective path to restoring functionality.
Transition to Other Database Systems:
Businesses and developers often evolve, and with that evolution may come the decision to migrate to a different database system. Uninstalling MySQL becomes a preparatory step in transitioning to an alternative solution that better aligns with evolving requirements.
System Optimization:
Over time, databases can accumulate unnecessary data, resulting in inefficiencies. Uninstalling MySQL offers an opportunity to reset the system, eliminate redundant data, and enhance overall performance.
Security Concerns:
In instances where a MySQL installation becomes vulnerable to security breaches or is no longer supported with updates, uninstallation might be necessary to mitigate potential risks.
Testing and Development:
For developers and testers, the need to simulate different environments is common. Uninstalling MySQL provides a clean slate for testing various configurations, ensuring accurate results without the influence of prior installations.
Resource Management:
MySQL installations consume system resources. Uninstalling MySQL when it’s no longer needed can free up valuable space and computing power.
Version Upgrades or Downgrades:
Upgrading to a newer version of MySQL might require uninstalling the current version. Similarly, downgrading to a previous version could necessitate removal before installation.
Clean System State:
Some users prefer a clutter-free system environment. Uninstalling MySQL contributes to maintaining a lean system with only essential components installed.
Temporary Removal:
Temporarily uninstalling MySQL might be necessary during system maintenance or to address specific system-wide issues. The intent is to reinstall it once the situation is resolved.
Compliance and Regulations:
Organizations adhering to specific data protection regulations or compliance standards might uninstall MySQL to ensure conformity and data integrity.
Uninstalling MySQL from Linux
In this guide, our focus will be on Ubuntu; however, we’ve also included instructions for other distributions.
Proceed with the steps below:

Stop the MySQL
Launch a terminal window and halt the MySQL service along with any associated processes by executing the following commands:
sudo service mysql stop
sudo killall -KILL mysql mysqld_safe mysql
Based on the Linux distribution and package manager you utilize, execute one of the subsequent commands to uninstall MySQL:
For Ubuntu and Debian run this:
sudo apt remove mysql-client mysql-server -y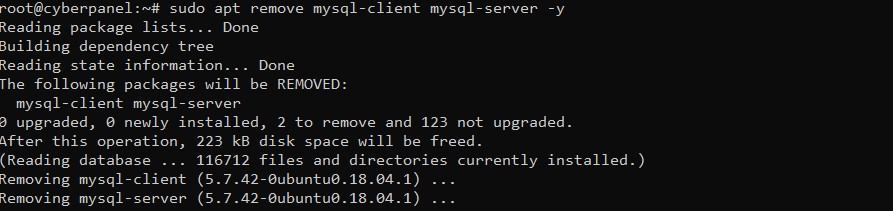
Execute the auto-remove and auto-clean commands to eliminate redundant packages and clear the package cache:
sudo apt autoremove -y
sudo apt autoclean -y
For Fedora run the below command:
sudo dnf remove mysql-client mysql-server -yFor CentOS, Rocky Linux, and RedHat run the below command:
sudo yum remove mysql-client mysql-server -y
Remove Residual Data
Following the uninstallation of MySQL, the subsequent action involves clearing residual data. If you intend to retain the data, it’s advisable to create a backup before proceeding with deletion, or you can opt to rename the directory.
Change the name of the /var/lib/mysql directory to retain the data for potential future use:
sudo mv /var/lib/mysql /var/lib/mysql_directory_backupAlternatively, remove MySQL-related directories by running:
sudo rm -rf /etc/apparmor.d/abstractions/mysql /etc/apparmor.d/cache/usr.sbin.mysqld /etc/mysql /var/lib/mysql /var/log/mysql* /var/log/upstart/mysql.log* /var/run/mysqld
Removing MySQL User and MySQL Group:
Eradicate the mysql user and, if present, delete the mysql group. Execute the following command:
sudo deluser --remove-home mysql
sudo delgroup mysql
The below output will appear:

With the steps outlined above completed, you have effectively carried out the uninstallation of MySQL from your Linux system.
Perform MySQL Uninstallation on Windows
Proceed with the instructions below to uninstall MySQL from a Windows operating system:
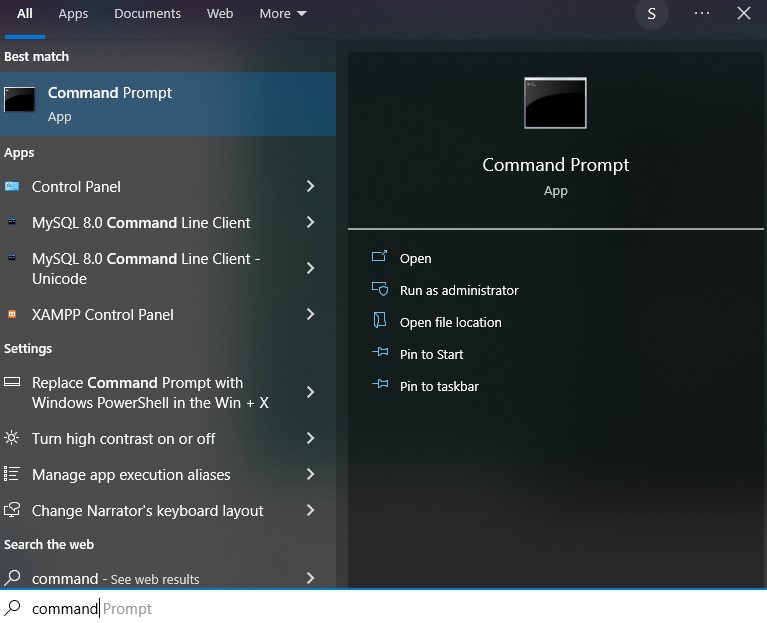
Utilize the Windows key to search for the command prompt. Launch the application with administrator privileges.
Before proceeding with the uninstallation, ensure that the MySQL server is stopped. The simplest approach to stopping it involves employing the mysqladmin command, which is automatically installed during the MySQL setup. In the command prompt, navigate to the bin directory within the MySQL installation folder. As an illustration, the default path is:
cd C:\Program Files\MySQL\MySQL Server 8.0\bin
Now run the below command, it will prompt you for the password and subsequently shut down the active server upon receiving confirmation.
mysqladmin -u root -p shutdown
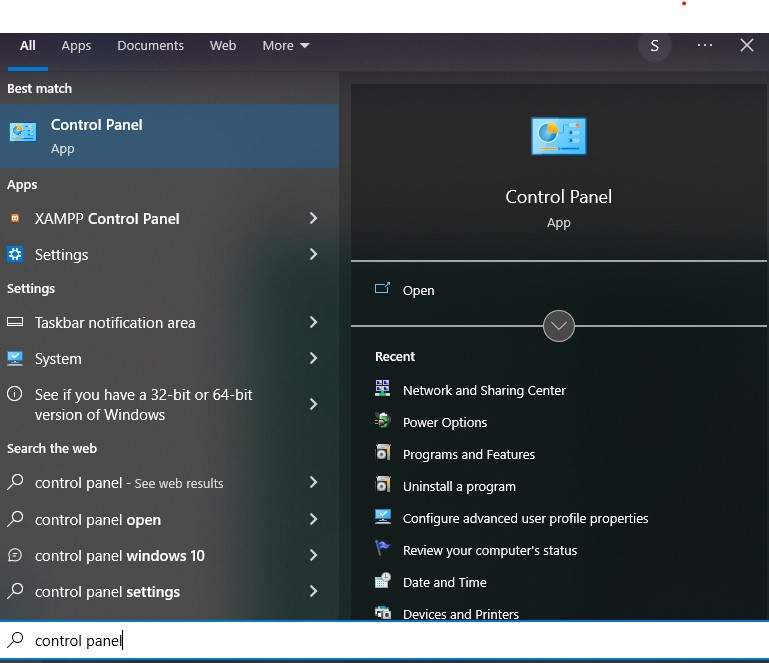
Subsequently, access the Control Panel. Utilize the Windows key to search for “control panel,” then hit Enter to launch the application.
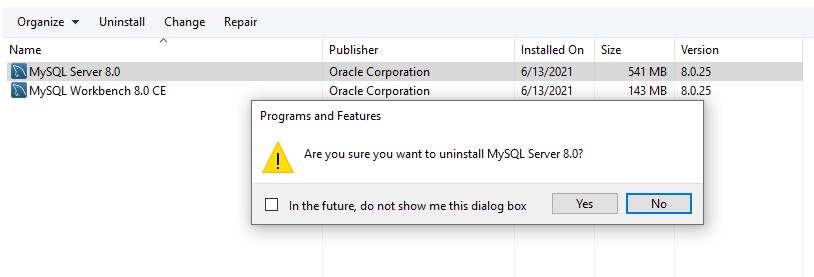
Access the “Programs and Features” section.

Within the roster of installed programs, identify MySQL and any associated applications. For each item, click individually and opt for the “Uninstall” selection. For each prompt, click on “Yes” and await the wizard’s completion.

Once you’ve uninstalled all MySQL components, proceed to remove any residual data directories. Keep in mind that one of these directories might be hidden, requiring you to enable the “Hidden items” option in your folder settings. To accomplish this, open any folder using File Explorer, navigate to the View tab, and mark the “Hidden items” option, it should show the folder is empty.

The directories that require removal include:
- C:\Program Files\MySQL
- C:\Program Files (x86)\MySQL
- C:\ProgramData\MySQL
- C:\Users\[YourUsername]\AppData\Roaming\MySQL
Once you’ve uninstalled all the components and removed the remaining directories, perform a computer restart to ensure the changes are applied.
Perform MySQL Uninstallation on macOS
Proceed with the instructions provided below to uninstall MySQL on a macOS system:
- Access System Preferences and select MySQL. Click on the Uninstall button to initiate the removal of MySQL from the system.
- Click on the Launchpad icon located in the Dock, and in the search field, type “Terminal.” Select Terminal from the search results to open a new terminal window.
- When you delete MySQL, all associated databases will be removed as well. If you have important data stored within MySQL, it’s crucial to create backups of your files prior to proceeding.
To create backups of your databases as text files, utilize the mysqldump command. Execute the following command and the output will be directed to the file named mysqlbackup.sql.:
./mysqldump -u root -p --all-databases > mysqlbackup.sql4. Verify the presence of active MySQL processes by executing the subsequent command:
ps -ax | grep mysqlCease the currently active processes using the provided syntax:
kill [process_id]
As an illustration, to terminate the ttys001 process as shown in the image above, execute:
kill 970915. Erase the default MySQL directory along with any residual directories and files. The act of removing all directories holds significant importance, particularly when considering the installation of an older MySQL version. Execute these commands:
sudo rm /usr/local/mysql
sudo rm -rf /usr/local/mysql
sudo rm -rf /usr/local/var/mysql
sudo rm -rf /Library/StartupItems/MySQLCOM
sudo rm -rf /Library/PreferencePanes/MySQL*
sudo rm -rf /Library/Receipts/mysql*
sudo rm -rf /private/var/db/receipts/mysql
6. Utilize a text editor to access the /etc/hostconfig file and eliminate the subsequent line:
MYSQLCOM=-YES-If your macOS version lacks the /etc/hostconfig file, feel free to omit this step if the file isn’t present on your system. Having completed the instructions outlined above, you have effectively uninstalled MySQL from your macOS system and efficiently cleared out superfluous files.
FAQs – Uninstalling MySQL
Where is MySQL commonly used?
MySQL finds its application in various contexts, including web applications, content management systems (CMS), e-commerce platforms, and data warehousing. It’s chosen when efficient data storage and management are essential.
Is data backup important before uninstalling MySQL?
Yes, data backup is crucial before uninstalling MySQL. Uninstallation may lead to data loss, and having backups ensures that your important data remains intact for potential future use or migration.
Can I reinstall MySQL after uninstalling it?
Yes, you can reinstall MySQL after uninstalling it. Keep in mind that reinstalling MySQL might involve setting up configurations, importing data from backups, and ensuring compatibility with your applications.
Does uninstalling MySQL guarantee complete removal?
Uninstalling MySQL typically removes the software components, but configuration files and data directories might remain. Ensure you follow the appropriate steps to remove residual data for a complete uninstallation.
What considerations should be taken before uninstalling MySQL?
Before uninstalling MySQL, consider the need for data backup, the impact on applications using MySQL, plans for future installations or transitions, and the importance of system configuration files.
Is MySQL uninstallation reversible?
Uninstalling MySQL is generally reversible by reinstalling the software and restoring data from backups. However, it’s essential to plan the reinstallation process carefully to avoid data loss or compatibility issues.
Conclusion
In this comprehensive tutorial, we have explored the step-by-step process of effectively uninstalling MySQL from diverse operating systems, including Linux, Windows, and macOS. The tutorial provides a detailed walkthrough for each platform, ensuring that users can seamlessly remove MySQL from their systems without any hitches. By following these instructions, users can confidently navigate the intricacies of MySQL uninstallation and make informed decisions based on their specific requirements. Whether you’re a Linux enthusiast, a Windows user, or a macOS aficionado, this tutorial equips you with the knowledge to smoothly carry out the uninstallation process and pave the way for potential transitions, optimizations, or system enhancements.