
Vesta CP, commonly known as Vesta Control Panel, is an open-source control panel built for web server management. It presents an intuitive, web-based interface that streamlines the setup and administration of web hosting environments. With capabilities catering to both server administrators and website owners, VestaCP streamlines tasks encompassing website hosting, email management, database handling, and more.
Key features of VestaCP
The key features of VestaCP include:
Web Hosting Management:
VestaCP allows users to set up websites, manage domains, configure web server settings, and handle SSL certificates.
Email Management:
Users can create and manage email accounts, forwarders, and mailing lists. VestaCP supports popular email protocols like POP3, IMAP, and SMTP.
DNS Management:
VestaCP provides tools to manage domain names and their associated DNS records, helping users control how their websites are accessed.
Database Management:
The control panel offers support for various database systems like MySQL and PostgreSQL, enabling users to create, manage, and configure databases for their applications.
Security Features:
VestaCP includes security options like SSL/TLS support, Let’s Encrypt integration for easy SSL certificate setup, and firewall management to enhance server security.
File Management:
Users can upload and manage website files through File Transfer Protocol (FTP) connections or a built-in File Manager.
Backup and Restore:
VestaCP allows users to schedule backups of their websites, databases, and configurations. This feature ensures data recovery in case of any unexpected issues.
User Management:
For multi-user environments, VestaCP supports the creation of user accounts with specific permissions, making it suitable for hosting multiple websites or clients.
Resource Monitoring:
The control panel provides insights into server resource usage, helping users track system performance and allocate resources effectively.
A step-by-step guide to set up VestaCP on a Dedicated Server
Install Vesta
To install Vesta, you should navigate to the installation page: https://vestacp.com/install/, where you’ll generate the installation commands. Choose your desired software options and then generate the installation command.
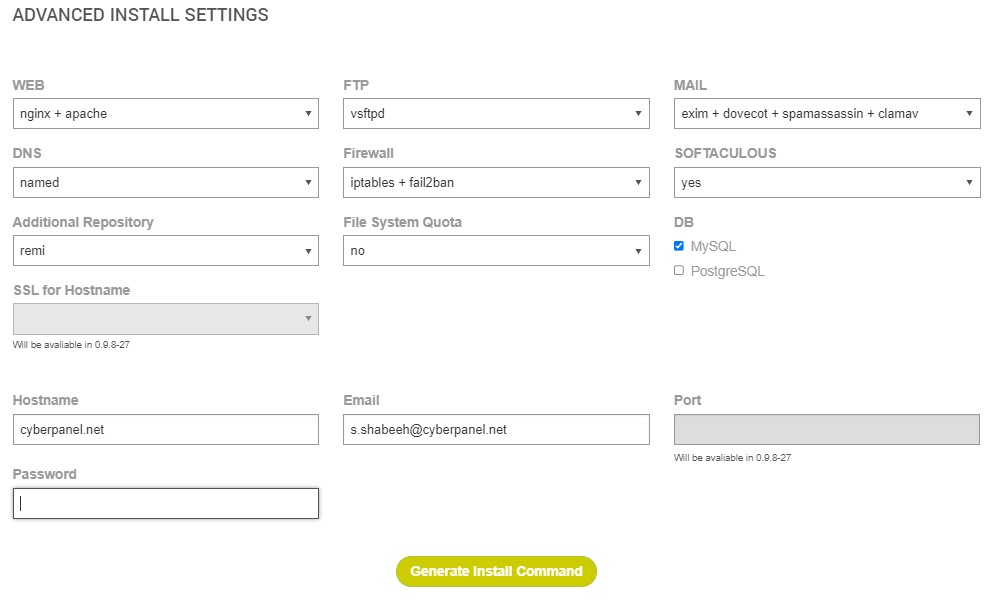
Upon clicking Generate install Command this will appear.
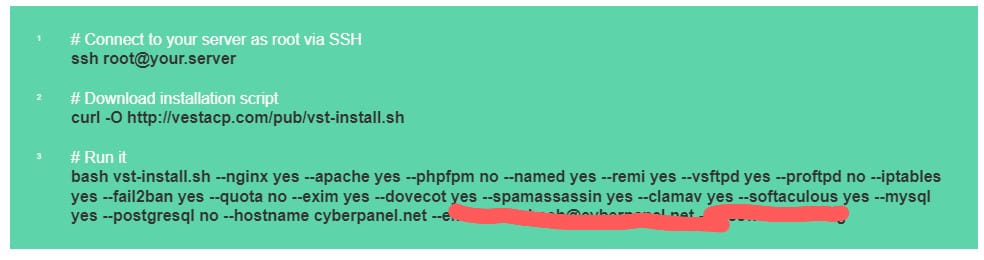
Now log in to your desired server and enter the above commands.
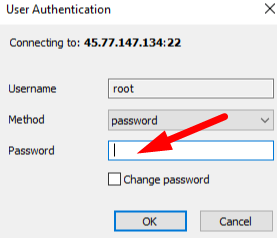
Log in to SSH Server
Enter your host, port, and username information. Choose the password from the dropdown menu labeled “Initial Method,” then advance by selecting the “login” choice. A password prompt will appear, enabling you to input your SSH password.
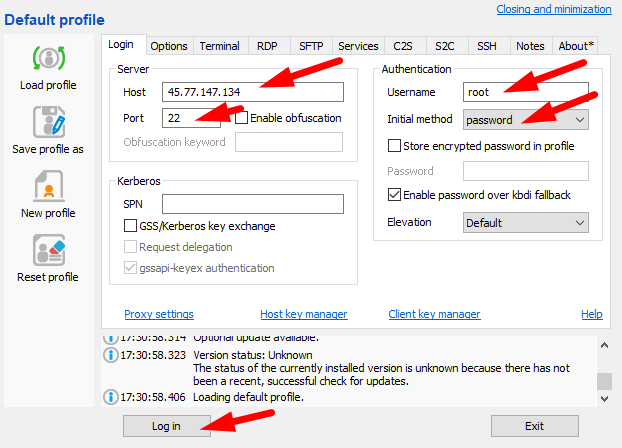
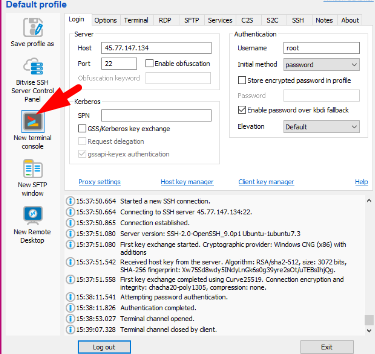
After successfully logging in, choose “New Terminal Console,” which will result in the immediate appearance of a terminal window.

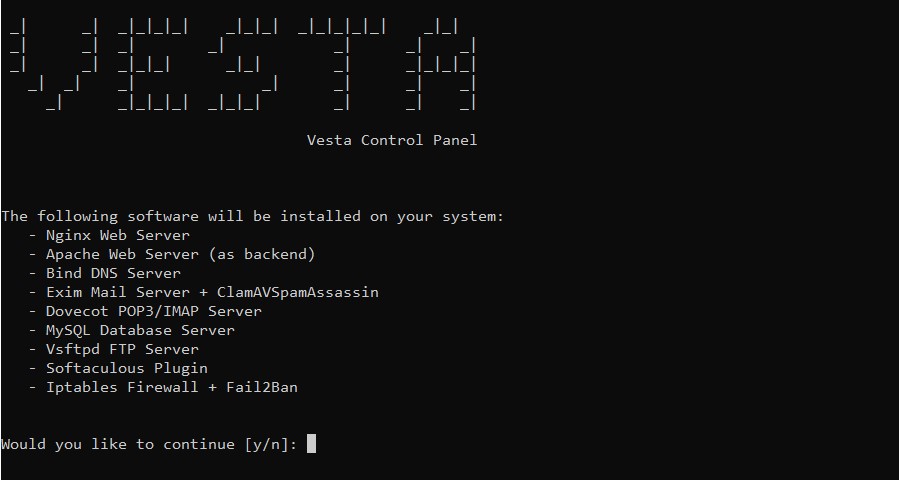
Upon running the above first command below output will appear.

Now run the second command, and the below output will appear. Enter ‘Y’ and then press enter key. This will start the Vesta Installation. The installation will take 10 to 15 minutes.
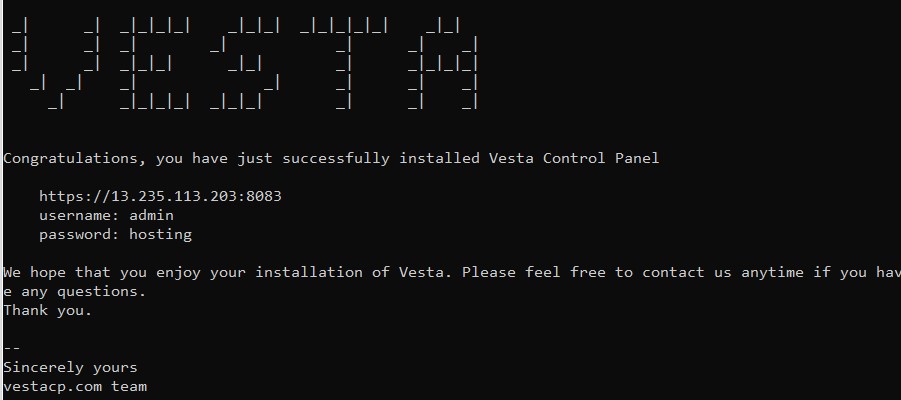
After successful installation below prompt will appear in the terminal window.
How to Set Up WordPress on Vesta Control Panel (VestaCP)?
Here’s a guide on how to install WordPress on VestaCP.
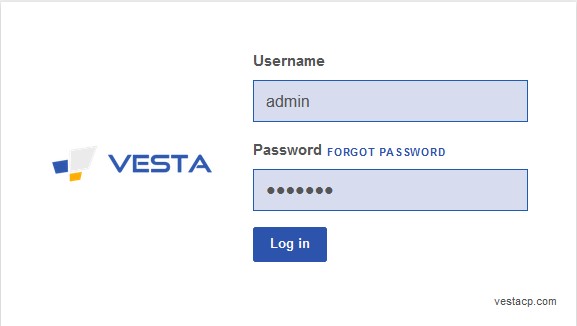
Log in on Vesta
Enter the IP address provided by the server after Vesta installation into your web browser.
Now a pop-up will appear where you will enter your Username and Password provided by the server and enter login.
Activating SSL
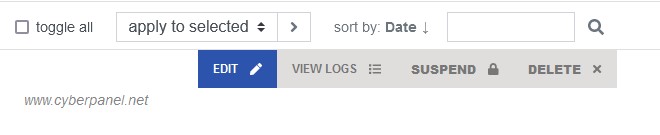
Upon logging in, navigate to the top of the page and select ‘WEB‘.

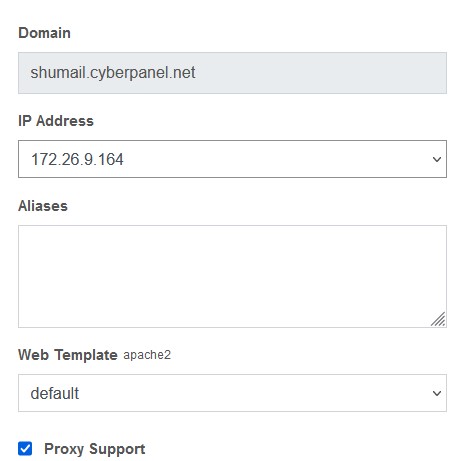
Subsequently, choose ‘Edit‘ by moving the cursor near the right side of the hostname.
Keep the ‘Aliases‘ field empty. Mark the checkbox for ‘SSL Support‘. Also, check the ‘Let’s Encrypt Support‘ option. If you wish to incorporate web statistics for website monitoring, opt for ‘awstats‘ from the dropdown under ‘Web statistics‘.
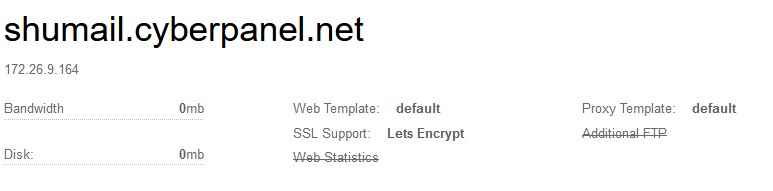
Click ‘Save‘ to proceed. Visit the ‘WEB‘ section, and you will find that your SSL certificate is now in place. To view your SSL expiration date, click ‘Edit‘ once more.
Incorporating a Database into Your Website
At the top of the VestaCP page, you’ll find sections like USER, WEB, DNS, MAIL, and more. Navigate to the ‘DB’ section and select it. Look for the blue ‘+’ circle icon and click on it.


Fill out the provided form for adding a database. Make sure to copy the password that gets generated. Once done, click the ‘Add‘ button. With these steps completed, you have successfully added the database to your setup.
Set Up FTP Software (FileZilla)
To begin, launch your web browser and enter https://filezilla-project.org/ in the address bar. Next, select the option to download FileZilla Client, which will take you to a different page.

On this page, locate the green button labeled ‘Download FileZilla Client‘ and click on it. A pop-up window will appear; simply press the ‘Download‘ button to initiate the download process.
Once the download is underway, access the installation file and proceed with the installation by clicking ‘Next‘ and eventually ‘Finish‘.
Establish Server Connection:
To initiate, launch FileZilla. Then, input the hostname, username, and password. Click on ‘Quickconnect‘.

Lastly, respond with ‘OK‘ to the ‘Insecure FTP Connection‘ popup. You have now successfully connected to the server.
WordPress Installation Process:
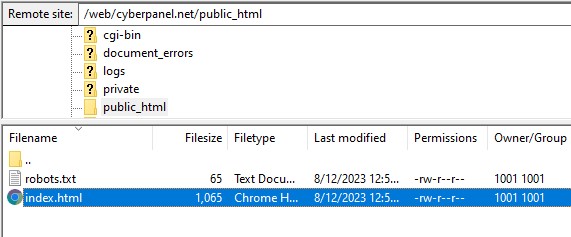
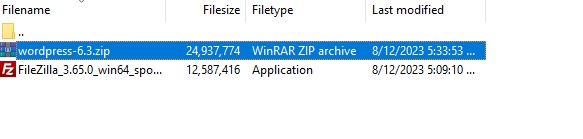
Begin by opening your web browser and navigating to wordpress.org. Click on the ‘Get WordPress’ button. Select ‘Download WordPress 6.3’ to initiate the download. Once downloaded, head to your download folder and extract the recently downloaded file. Return to FileZilla and confirm that the remote site displays as follows: /web/yourdomain/public_html.
Next, access the downloads folder in FileZilla and open the WordPress folder. Highlight all files within the WordPress folder, right-click, and opt for ‘upload‘. This action transfers the WordPress files into the public HTML directory.
Upon completion of the file transfer, access your domain name via your browser. You will observe your WordPress setup on your webpage, confirming the successful completion of the WordPress installation.

WordPress Setup Process:
Retrieve your database name from VestaCP and input it into the corresponding field on the WordPress page. Subsequently, enter the password that was recently generated in VestaCP.
Click ‘Submit’. Select ‘Run the installation’. Following that, complete the ‘Information Needed’ form and click ‘Install WordPress’. At this point, your WordPress installation is successful.
Click ‘Login’, and you’ll be directed to the WordPress login page. Now you can begin editing your website using WordPress.
FAQs – Vesta CP Installation Guide
What security features does VestaCP offer?
VestaCP stands as a vanguard of security in the web hosting landscape, fortified by a multifaceted array of security features. Among these attributes is its steadfast support for SSL/TLS, empowering users to establish secure and encrypted connections, thereby safeguarding sensitive data during transmission. The integration of Let’s Encrypt seamlessly simplifies the SSL certificate setup, enhancing accessibility for users seeking robust security measures. Additionally, VestaCP affords adept firewall management capabilities, bolstering server security by controlling incoming and outgoing network traffic.
Does VestaCP provide Backup and Restore options?
Indeed, VestaCP empowers users with the pivotal ability to safeguard their digital assets through its robust Backup and Restore functionalities. Users can effortlessly schedule automated backups for websites, databases, and configurations, ensuring the preservation of critical data in the event of unforeseen contingencies. This comprehensive approach to data security promotes peace of mind, enabling swift and effective data recovery to maintain the continuity of online operations.
Can I effectively manage email accounts with VestaCP?
Absolutely, VestaCP empowers users with robust capabilities to meticulously manage their email ecosystem. This includes the facile creation, meticulous management, and seamless oversight of email accounts, the configuration of forwarders for efficient email routing, and the administration of mailing lists to ensure streamlined communication. Moreover, VestaCP adeptly supports popular email protocols, comprising the efficient handling of incoming and outgoing emails through POP3, IMAP, and SMTP.
Is VestaCP suitable for multi-user environments?
Absolutely, VestaCP proves its versatility and adaptability by excelling in multi-user environments. By supporting the creation of user accounts with granular permissions, the control panel becomes an ideal solution for collaborative settings, hosting multiple websites, or serving diverse clients. This capacity empowers administrators to allocate specific roles and responsibilities, promoting efficient teamwork while maintaining stringent access controls.
Does VestaCP cater to Database Management?
Certainly, VestaCP emerges as a stalwart ally in the sphere of database management. Its multifaceted support extends to various database systems, such as the widely used MySQL and PostgreSQL. Users can harness this capability to orchestrate the creation, deft management, and meticulous configuration of databases tailored to their applications’ unique requirements. This capacity ensures the effective storage and retrieval of critical data while adhering to established industry best practices.
Conclusion
In summary, Vesta Control Panel (VestaCP) offers a comprehensive toolkit for streamlined web hosting management. From website creation and domain management to email and database handling, VestaCP’s features ensure efficient operations. Its robust security measures, versatile file management, user customization, and resource monitoring capabilities make it an essential solution for both single-site and multi-user environments. With its user-friendly interface, VestaCP simplifies complex tasks, empowering users to establish and maintain secure and efficient web hosting setups effortlessly.
Related Content
Mastering Server Management: A Comprehensive Guide for Optimal Performance
How to Add a Subdomain in Cloudflare for Enhanced Website Management – Guide 2023
