

In this guide will find the answer to How To Use Apache As a Reverse Proxy. A reverse proxy server is a powerful tool that acts as an intermediary between clients and backend servers, such as web servers or application servers. Unlike a traditional forward proxy, which sits between clients and the internet, a reverse proxy sits between clients and one or more servers.
When a client makes a request, the reverse proxy server forwards that request to the appropriate backend server on behalf of the client. It then takes the response from the backend server and sends it back to the client. This process effectively hides the backend server’s identity and internal structure from the clients.
Residential Proxies offer several benefits, including enhanced security by protecting the backend servers from direct exposure to the internet, load balancing to distribute client requests across multiple servers, and caching to improve performance by serving cached content to the clients.
Distinguishing Between Forward Proxy and Reverse Proxy
- Direction of Proxying:
- Forward Proxy: Handles client requests to access resources on the internet. It sits between clients and the internet, forwarding client requests to external servers.
- Reverse Proxy: Manages client requests to access resources within an organization’s network. It sits between clients and backend servers, forwarding client requests to the appropriate backend server.
- Client Perspective:
- Forward Proxy: Clients are typically unaware of the forward proxy’s existence. The client’s request is sent to the proxy server, and the destination server receives the request as if it came directly from the client.
- Reverse Proxy: Clients send requests directly to the reverse proxy, not the backend servers. The reverse proxy then forwards the requests to the backend servers on behalf of the clients.
- Use Case:
- Forward Proxy: Often used for content filtering, access control, and anonymizing client requests by hiding the clients’ IP addresses.
- Reverse Proxy: Primarily used for load balancing, SSL termination, caching, and providing a secure gateway to backend services.
- Server Perspective:
- Forward Proxy: The destination server sees the request coming from the forward proxy, not the original client. It is not aware of the actual client making the request.
- Reverse Proxy: Backend servers see the reverse proxy as the client making the request. They are unaware of the real clients making the original request.
- Security Implications:
- Forward Proxy: Enhances client privacy by masking the clients’ IP addresses. It can also provide additional security layers by filtering malicious content before it reaches the clients.
- Reverse Proxy: Acts as a shield for backend servers, keeping their internal structure hidden from external clients. It helps protect against direct exposure to the internet and potential attacks.
- Deployment Location:
- Forward Proxy: Deployed within the client’s network or on the client’s device to control outbound internet access.
- Reverse Proxy: Deployed on the organization’s network edge, between the internet and the backend servers, managing inbound client requests.
Exploring the Various Use Cases of Reverse Proxies
Reverse proxies offer a wide range of use cases that enhance the performance, security, and scalability of web applications and services.
Some of the key use cases of reverse proxies include
- Load Balancing: Reverse proxies can distribute incoming client requests across multiple backend servers. This helps distribute the load, prevent server overloading, and ensure better resource utilization. Load balancing enhances the overall performance and responsiveness of the application.
- SSL Termination: Reverse proxies can handle SSL/TLS encryption and decryption on behalf of backend servers. This offloads the resource-intensive SSL processing from backend servers, reducing their workload and simplifying certificate management.
- Caching: Reverse proxies can store frequently requested resources in cache memory. When clients request the same resources, the reverse proxy serves the cached content directly, reducing server load and improving response times.
- Web Acceleration: By caching static content and compressing data, reverse proxies can accelerate the loading of web pages for clients, resulting in a smoother user experience.
- Security and DDoS Protection: Reverse proxies act as a protective barrier between the internet and backend servers. They can filter and block malicious traffic, protect against Distributed Denial of Service (DDoS) attacks, and hide the backend server’s real IP address to prevent direct attacks.
- Web Application Firewall (WAF): Reverse proxies can act as a WAF, inspecting incoming traffic for potential threats, such as SQL injection, cross-site scripting (XSS), and other malicious activities. They help in safeguarding web applications from common vulnerabilities.
- Single Point of Entry: Reverse proxies provide a single entry point for external clients to access multiple backend servers. This simplifies the network architecture and allows for easier management and scaling of services.
- Protocol Conversion: Reverse proxies can translate requests from one protocol to another. For example, they can convert HTTP requests to WebSocket or other application-specific protocols, facilitating communication between clients and servers.
- Content Compression and Optimization: Reverse proxies can compress outgoing content before sending it to clients, reducing data transfer size and improving page load times.
Prerequisites – Configure Apache as a Reverse Proxy
Install Bitwise SSH Client
- Search Bitwise SSH Client in your browser. Click the link https://www.bitvise.com/ssh-client-download and start the installation


2. After installation of the setup open the .exe file from your computer and complete Bitvise SSH Client Installation.
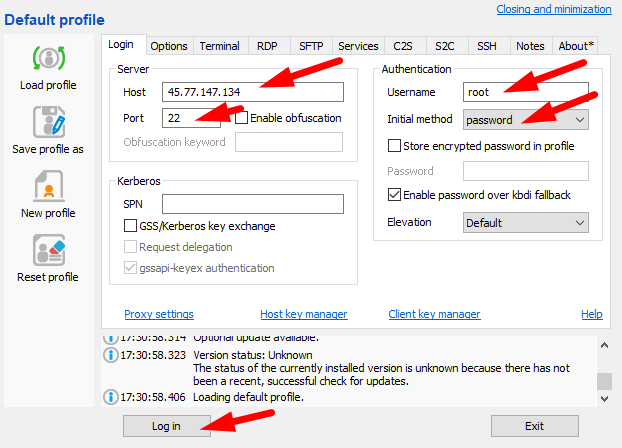
How to log in to the server SSH using bitwise?
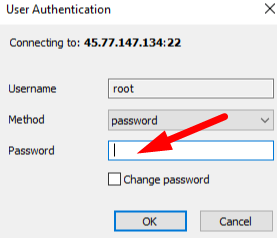
- After installation is done, the below window will appear. Enter your host, port, and username, select the password from the Initial Method dropdown, and then click on login. A pop-up will appear to enter a password. Enter your SSH password.
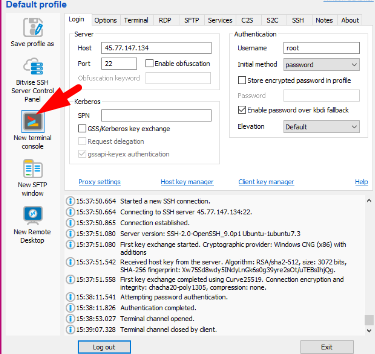
2. Once you’re logged in, click on “New Terminal Console,” and a terminal will promptly appear.
Step 1 – Install Apache
Connect Server
Now, to establish a connection to your server and refresh the local package index using APT repositories enter the below command in the terminal and press enter:
apt update
Updates will take some time to complete meanwhile wait for its completion.

How to Install Apache on Ubuntu?
- Install Apache on Ubuntu
Now, to install Apache from Ubuntu enter the below command and press enter
apt install -y apache2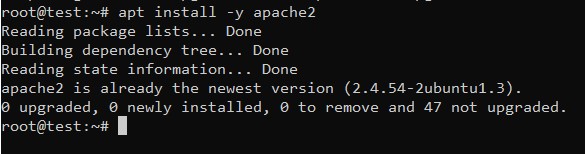
2. Verify Apache Version
After installation, you have the option to verify the Apache version using

apache2 -version
3. Verify Apache Status
You also have the option to verify the status of Apache2 using the below command. This helps you quickly determine if the server is running, and if there are any issues that need attention.
systemctl status apache2
As you observe, the (END) status displayed on your screen is a clear indication of a successful Apache2 installation. This outcome confirms that the installation process has been completed without any errors or issues.
4. Enable Apache
To enable Apache2 at Ubuntu use the command:
systemctl enabled apache25. Start Apache
If you want to restart Apache2 at Ubuntu use the below command in the terminal:
systemctl start apache2How to install Apache at Almalinux?
- Check Available Updates
To install Apache2 at Almalinux, check for available updates by running the “dnf check-update” command.
dnf check-updateIn case updates are found, proceed to update your Linode with “dnf update”. Additionally, if any kernel components are updated during the process, remember to reboot the Linode with “reboot” to apply the changes.
- Install Apache
Now proceed with the installation of the required Apache packages.
dnf install httpd httpd-tools- Start Apache
After installing Apache, it doesn’t start automatically. To initiate and enable it, utilize the systemctl utility.
systemctl start httpd- Enable Apache
To ensure that Apache restarts automatically every time the system reboots, enable it.
systemctl enable httpd- Check Apache Status
Check the status of Apache by using the “systemctl status” command. It should show as active and running.
systemctl status httpdStep 2 – Enable Apache Modules for Reverse Proxy
How to enable it on Ubuntu?
To effectively utilize a reverse proxy with Apache Web Server, you must enable specific Apache modules that are crucial for supporting the additional functionality required by reverse proxy servers.
- Identify Required Modules
mod_proxy: Serving as the primary proxy module for Apache, mod_proxy efficiently handles connections and redirections. It empowers Apache to function as a gateway to underlying backend servers, making it an indispensable module for all reverse proxy setups.
mod_proxy_http: This module relies on mod_proxy and is indispensable for supporting HTTP and HTTPS requests in a proxy server environment. It enables Apache to proficiently handle the proxying of web applications using the HTTP/HTTPS protocols.
mod_ssl: Providing essential functionality, mod_ssl equips the Apache HTTP server with support for SSL v3 and TLS v1.x protocols. This module is crucial for establishing secure, encrypted connections, ensuring data integrity, and enhancing the security of the web server.
2. Enable Modules
Now, we will activate these modules using the a2enmod command:
sudo a2enmod proxy

sudo a2enmod proxy_http

 sudo a2enmod ssl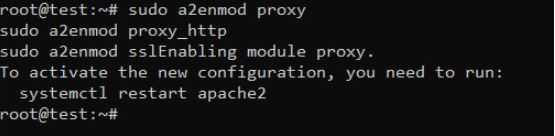
- Restart Apache2 Server
After enabling any new Apache modules, it is imperative not to overlook the crucial step of restarting the apache2 server. This step ensures that the changes take effect and allows the newly activated modules to be fully integrated into the Apache server’s configuration.
sudo systemctl restart apache2
- Verify Modules
You can confirm the active status of these modules by employing the following command:
sudo apachectl -M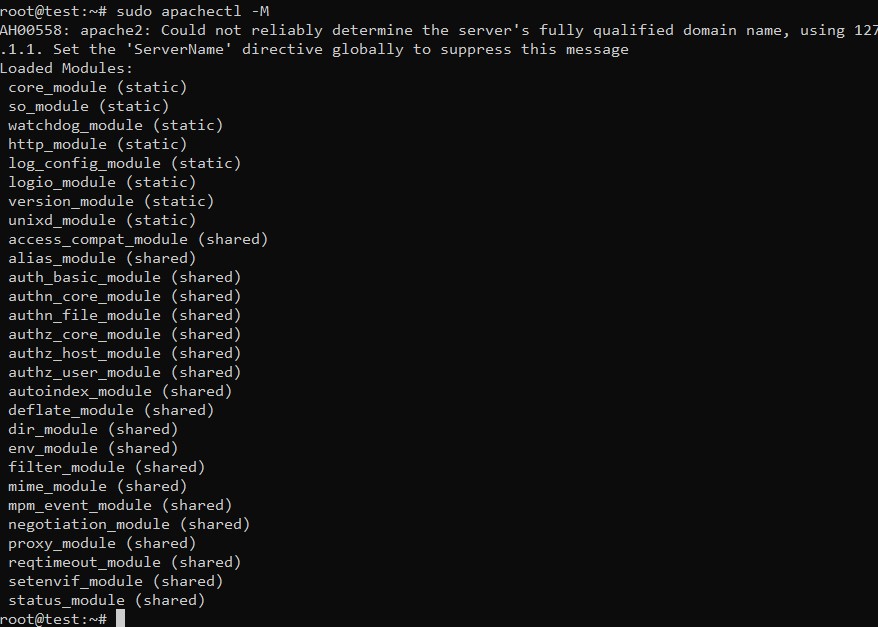
Step 3 – Apache Reverse Proxy Configuration
Now, configure the Apache reverse proxy to accept requests from the internet and effectively forward them to your chosen resource.
- Disable default Apache
To begin, you will disable the default Apache virtual host configuration file. This can be achieved using the following command:
a2dissite 000-default.conf
- Create a new Configuration File
Creating a new virtual host configuration file is a fundamental step in customizing Apache to serve different web applications or websites on the same server. A virtual host allows Apache to manage multiple domains or subdomains, each with its own unique configuration and settings.
To create a new virtual host configuration file, follow these general steps:
Choose a Name: Select a descriptive name for your virtual host file, typically ending with the “.conf” extension. For example, “example.com.conf” or “cyberpanel.conf”.
Navigate to Apache’s Configuration Directory: In most Linux distributions, Apache’s configuration files are stored in the “/etc/apache2/sites-available/” directory. For instance:
cd /etc/apache2/sites-available/
Create the Virtual Host File: Use a text editor, such as nano or vi, to create the new configuration file. For instance:
sudo nano example.com.confUpon entering the above command below file will appear:

Configure the Virtual Host: Within the file, use the <VirtualHost> directive to define the IP address and port to accept requests for the specific virtual host. For a basic example, allowing all IP addresses on the default HTTP port (port 80), use the following:
<VirtualHost *:80>

    ServerName site1.com

    ServerAlias www.site1.com

    ServerAdmin [email protected]

    ErrorLog ${APACHE_LOG_DIR}/error.log

    CustomLog ${APACHE_LOG_DIR}/access.log combined

    ProxyPass / http://127.0.0.1:8080/

    ProxyPassReverse / http://127.0.0.1:8080/

    ProxyRequests Off

</VirtualHost>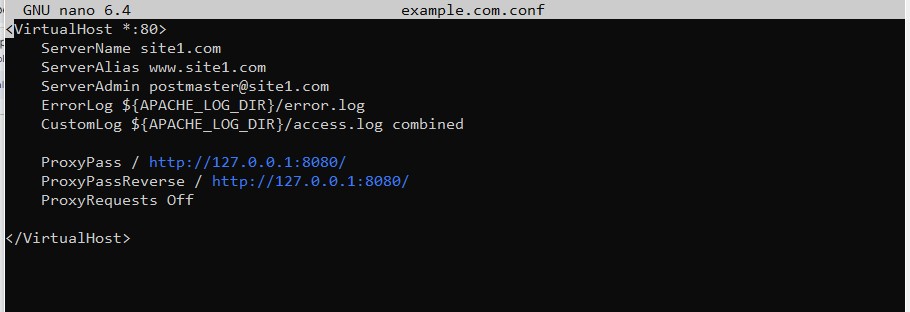
The configuration process commences by defining the virtual host with the <VirtualHost> command, specifying the accepted IP address and port number for Apache. In this instance, the wildcard character * is employed, allowing acceptance of all IP addresses, while the port number is set to 80, representing the default HTTP port. Following this, the configuration further includes the following items:
- ServerName: This directive specifies the domain name associated with the server.
- ServerAlias: With ServerAlias, you can define additional names that the server will accept.
- ServerAdmin: The ServerAdmin directive sets the contact email address that the server includes in error messages returned to clients.
- ErrorLog: ErrorLog sets the name of a file where Apache stores encountered errors.
- CustomLog: CustomLog sets the name of a file where Apache logs client requests to the server.
- ProxyPass: ProxyPass maps remote servers into the local server’s space and defines the target address for traffic redirection. It allows Apache to act as a reverse proxy, forwarding requests to backend servers and enhancing application performance and load distribution.
- ProxyPassReverse: ProxyPassReverse is vital for a proxy server since it rewrites the original location, content location, and URI HTTP response headers of the backend server with the proxy server’s information. This ensures that the reverse proxy is correctly handling the responses and prevents the backend servers from being exposed to direct Internet access.
- ProxyRequests: ProxyRequests prevent the Apache HTTP server from being used as a forward proxy, enhancing security. It should typically be set to “off” when using ProxyPass to avoid misuse of the server as an open proxy and protect against potential security risks.
Save and Exit: Save the changes and exit the text editor.
Enable the Virtual Host: Use the a2ensite command to enable the new virtual host configuration:
sudo a2ensite example.com.confReload Apache: To apply the changes, reload Apache to activate the new virtual host:
sudo systemctl reload apache2With these steps completed, the new virtual host is now active and ready to serve its designated website or application. It’s important to note that the changes will only take effect after the virtual host has been enabled and Apache has been reloaded. Additionally, you can place your website’s files in the directory specified by the “DocumentRoot” directive to ensure Apache serves the content correctly for this particular virtual host.
Verify Configuration: Ensure that the reverse proxy configuration is working as expected. Visit the designated domain name (e.g., “reverse-proxy.example.com”) in a web browser, and Apache should properly forward the requests to the backend server.
Keep in mind that you may need to configure additional settings based on your specific use cases, such as handling SSL certificates, load balancing, or WebSocket proxying. Regularly monitor the server’s performance and security to ensure smooth operation.
How to use Apache as a reverse proxy in Cyberpanel
In Cyberpanel the integration of Apache with OpenLiteSpeed on the backend offers the best of both worlds, combining the speed advantages of OpenLiteSpeed with the feature-rich capabilities of Apache. Notably, utilizing Apache as a reverse proxy does not compromise the performance of the ls cache; you will maintain the same level of performance as with OpenLiteSpeed alone. In this configuration, OpenLiteSpeed remains responsible for passing on frontend traffic to Apache, which handles the requests from the backend. Additionally, this integration is supported on both AlmaLinux and Ubuntu operating systems. By following this article, users can take full advantage of the benefits offered by combining Apache and OpenLiteSpeed in a reverse proxy setup.
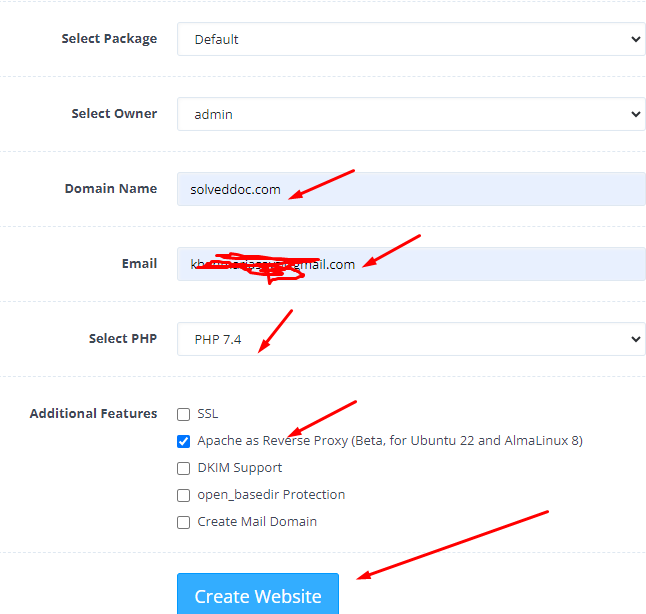
Login to your Cyberpanel dashboard.

Go to the Website Option Click On Create Website

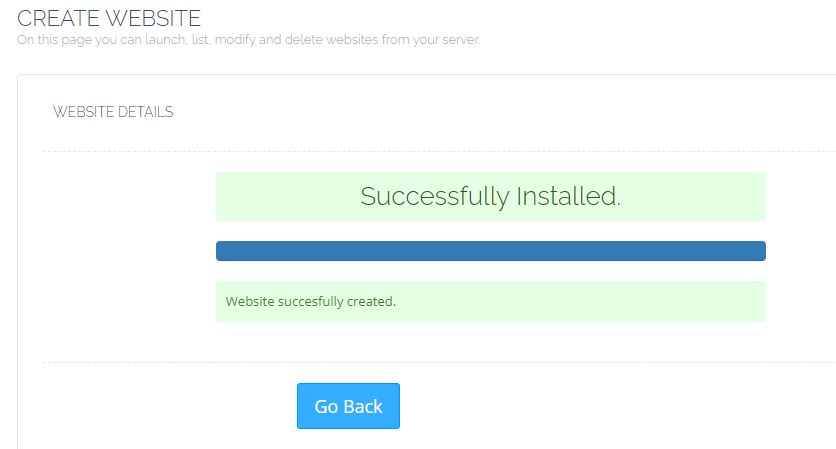
Enter Your domain name, Email address, and PHP version, and select Apache as a reverse proxy. After entering the details click on Create Website. It may take some time and then it will be created
This website will work in Apache as a reverse proxy mode. In the front end, Openlitespeed will be working, and at the back end Apache. So all of your htaccess rules will work like they used to work whether you are using Cpanel or any other control panel
You can see the site will be created successfully.
For this site, you can manage the Apache configuration for this site in our website manager. Click on Manage

Once you are here Click on Apache Manager

And even you can then switch to pure Openlitespeed as well. So let’s say you want to decide you do not want to use Apache on the backend with this website. If you want to switch to pure Openlitespeed then select the PHP version and click on switch to pure Openlitespeed. It can be converted to use Apache as well if it is using OpenLitespeed

These are Apache Configurations. You can easily edit if you want to edit something but make sure you know what you are doing because something is wrong here and your website will stop working

In Our Apache Configurations, we are using PHP-FPM, so these are PHP- FPM configurations that you are using

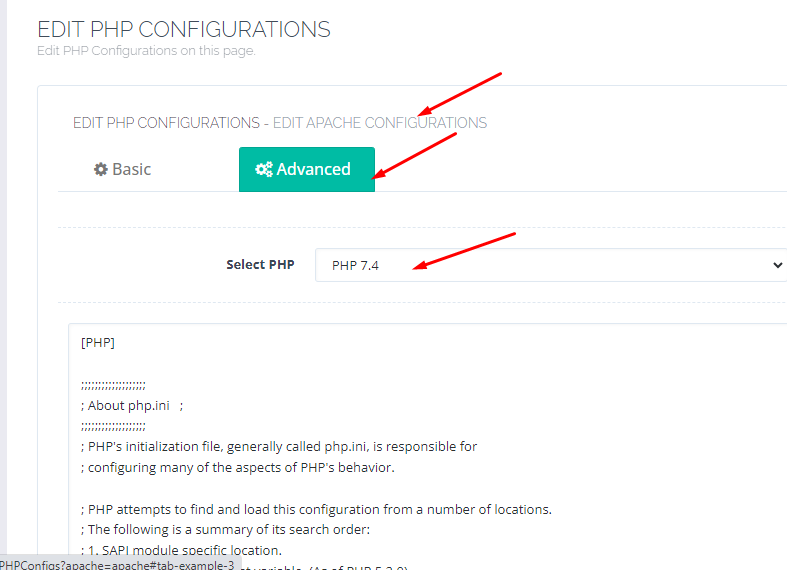
For Php Configurations Go to PHP and click on edit PHP Configs. If you want to edit the PHP configurations.
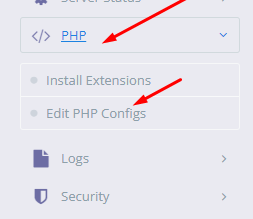
If you are using Apache then you also need to edit Php configurations as well so for that if you have Apache installed You will see this URL.
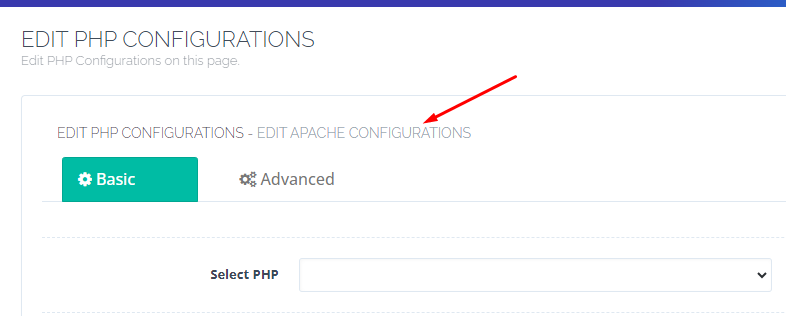
By default, you will be able to edit configurations for Litespeed Php. If you want to edit configurations for Apache also click on EDIT APACHE CONFIGURATIONS
After clicking on EDIT APACHE CONFIGURATIONS then you can do whatever use to with Litespeed configurations Like post_max_size, upload_max_filesize, max_execution_time or whatever.

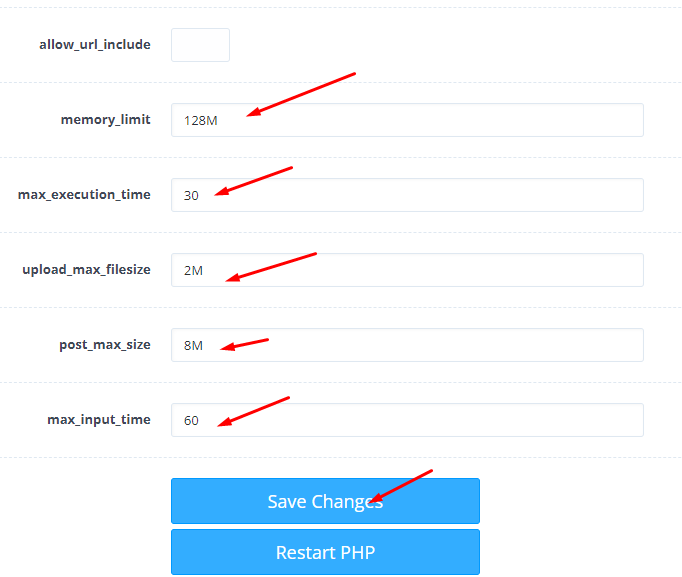
Make sure after editing the configurations Click on Save changes
Similarly, you can use Advanced Edit as well
Similarly, you can install PHP Extensions for Apache. Just Click on PHP->Install extensions

If you are using Apache then you also need to MANAGE APACHE EXTENSIONS as well so for that if you have Apache installed You will see this URL.
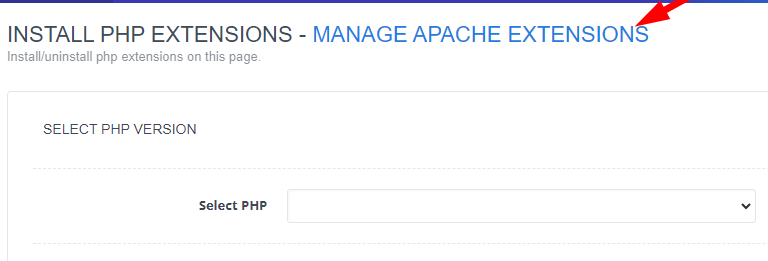
By default, you will be able to Install Extensions for Litespeed Php. If you want to Install extensions for Apache also click on MANAGE APACHE EXTENSIONS
FAQs
How do forward proxies and reverse proxies differ?
Forward proxies handle client requests to access resources on the Internet and sit between clients and the Internet, forwarding requests to external servers. Reverse proxies, on the other hand, manage client requests to access resources within an organization’s network. They sit between clients and backend servers, forwarding client requests to the appropriate backend server.
How to switch between Apache and OpenLiteSpeed in CyberPanel?
In CyberPanel, you can easily switch between using Apache or OpenLiteSpeed as the web server for your website. If you want to switch to Apache as a reverse proxy, you can select the PHP version and click “switch to pure OpenLiteSpeed.” Similarly, you can switch back to pure OpenLiteSpeed if needed. Keep in mind that after making such changes, you should verify the website’s functionality and configurations.
Can Apache act as a reverse proxy for different backend servers simultaneously?
Yes, Apache can act as a reverse proxy for multiple backend servers concurrently. By defining separate virtual host configurations for each backend server, Apache can efficiently route requests to the appropriate destinations.
How do I troubleshoot common issues when setting up Apache as a reverse proxy?
If you encounter issues, first check the Apache error logs for any error messages. Ensure that the proxy settings in the virtual host configuration are correct and that the backend servers are reachable. Test the configuration step by step and consult Apache’s documentation or community forums for specific troubleshooting tips.
Related Content
You can also check out our guide on Apache vs NGINX Who WINS in terms of Performance?

4 Responses