Laravel is an excellent choice for those diving into web development and planning to use it.
Laravel is one of the most popular PHP frameworks, loved for its simplicity, elegance, and power. When you install Laravel, it simplifies web development by providing tools such as Blade for templating, Eloquent for database management, and Artisan for command-line operations. It follows the Model-View-Controller (MVC) architecture, ensuring the code remains organized and manageable.
A web framework that caters to both beginners and seasoned developers. Whether you’re just starting ( building small apps or enterprise-level projects to improve your skills, we are here to help you.
This guide will help you install Laravel via Composer, breaking it down step by step so you can get started smoothly.
What is Laravel? Basic Overview!
Before jumping into the installation, let’s make sure you have the following ready:
Laravel stands out as one of the leading PHP frameworks, celebrated for its clean syntax and user-friendly tools. The newest release, Laravel 11, brings a host of exciting features and enhancements.
Get exclusive access to all things tech-savvy, and be the first to receive
the latest updates directly in your inbox.
One of its standout aspects is the MVC (Model, View, Controller) architecture. Laravel strikes a balance between accessibility and power, equipping developers with the essential tools for creating large, robust applications. With an excellent inversion of the control container, a clear migration system, and seamless unit testing support, it provides everything you need to tackle any application development challenge.
- Clear Syntax: Laravel has a simple and clear syntax, which is friendly for newcomers.
- MVC Structure: Laravel uses the Model-View-Controller (MVC) framework, aiding in code organization and logic separation.
- Blade Templating: Laravel features Blade, a strong templating engine that makes it easier to build dynamic web pages.
Why Use Composer for Laravel Installation?
Composer is a tool for managing PHP applications that helps organize and handle the libraries and dependencies needed for PHP programs. It was developed by Nils Adermann and Jordi Boggiano, who continue to oversee its development.
It helps manage dependencies and libraries for PHP projects, enabling users to build projects that meet their specific needs. It makes it easy to install third-party libraries and keeps track of their dependencies while generating a class map for the components that have been downloaded.
Following the DRY (Don’t Repeat Yourself) principle, Composer saves time and promotes clean code, which is especially useful for projects involving multiple developers.
After installation, it is accessible system-wide, enhancing the overall development workflow.
Prerequisites Before You Install Laravel!
Before we get started, please ensure that you have the following installed on your system:
- PHP: Laravel 11 needs PHP version 8.1 or above.
- Composer: Composer is a tool for managing PHP dependencies, and Laravel relies on it to handle its packages and dependencies.
When selecting a version of Laravel, keep these points in mind:
- Stable versus latest versions: Decide according to your project’s requirements. Stable versions provide reliability, whereas the latest versions come with new features and enhancements.
- Check for compatibility: It’s important to confirm that your selected Laravel version works well with other libraries and PHP versions to ensure seamless integration with your project’s dependencies.
To check your PHP version, run:
<strong>php -v</strong>If you don’t have PHP installed, you can get it from php.net or consider using tools such as XAMPP or WAMP.
Composer Set Up
Composer is a tool for managing dependencies in PHP, and it’s crucial for setting up Laravel.
To see if Composer is already on your system, run:
composer --versionIf you find it’s not installed, you can get it from, here.

Now, You’ll need a local development server, and some popular choices are XAMPP, MAMP, Laragon, and Laravel Valet.
Laravel usually works with MySQL or MariaDB for handling databases, so make sure you have one of those set up if your project needs it.
Grab a code editor like Visual Studio Code, it’s good to have some basic command line skills; using Git for version control is up to you.
Step 1: Setting Up Your Development Environment
First things first, you install Laravel via Composer. Just like mentioned above.
Choose a location for your Laravel project. It’s advisable to keep your projects organized in a specific folder, such as Projects or WebDev.
Step 2: Installing Laravel Using Composer
To install Laravel using Composer, you can execute the following command in your terminal:
composer create-project –prefer-dist laravel/laravel blog
In this case, “blog” is the name of the directory where your new Laravel application will be created.
If you prefer to install Laravel directly in your selected directory (without creating a subfolder), use the same command but omit the folder name:
composer create-project –prefer-dist laravel/laravel
laravel new laravel11Ensure you run this command in your desired project directory, such as C:\xampp\htdocs. Depending on your needs, choose either the first or second command.
This guide assumes you have Composer installed correctly, as outlined on their official site.
If you encounter a “failed to open stream” error, avoid using folder names with spaces in your command, as this is not the source of the error.
Verify that your server meets the Laravel requirements. The “failed to open stream” error often occurs when the OpenSSL PHP Extension is not enabled.
To start your new Laravel project, first, create a new directory anywhere on your system. Once you’ve done that, navigate to the location of the new directory and enter the following command to install Laravel.
Requirements include:
- PHP >= 5.6.4
- OpenSSL PHP Extension
- PDO PHP Extension
- Mbstring PHP Extension
- Tokenizer PHP Extension
- XML PHP Extension
To check if Composer has been installed properly, open the Command Prompt and enter this command:
composer --versionStep 3: Configuring Laravel
Configure the .env File
The .env file in Laravel is essential for setting up your application’s configurations, such as the database connection. Open the .env file in your code editor and make any necessary adjustments.
Environment variables are essential for supplying your web application with a list of web services. These variables are defined in the .env file, which contains the necessary parameters for setting up the configuration.
To Configure your Database, e.g using MySQL update these field in the .env file.
DB_CONNECTION=mysql<br>DB_HOST=127.0.0.1<br>DB_PORT=3306<br>DB_DATABASE=your_database_name<br>DB_USERNAME=your_username<br>DB_PASSWORD=your_passwordTypically, the .env file includes the following parameters:
- APP_ENV = local
- APP_DEBUG = true
- APP_KEY = base64:ZPt2wmKE/X4eEhrzJU6XX4R93rCwYG8E2f8QUA7kGK8 =
- APP_URL = http://localhost
- DB_CONNECTION = mysql
- DB_HOST = 127.0.0.1
- DB_PORT = 3306
- DB_DATABASE = homestead
- DB_USERNAME = homestead
- DB_PASSWORD = secret
- CACHE_DRIVER = file
- SESSION_DRIVER = file
- QUEUE_DRIVER = sync
- REDIS_HOST = 127.0.0.1
- REDIS_PASSWORD = null
- REDIS_PORT = 6379
- MAIL_DRIVER = smtp
- MAIL_USERNAME = null
- MAIL_PASSWORD = null
- MAIL_ENCRYPTION = null
- MAIL_HOST = mailtrap.ioMAIL_PORT = 2525
The .env file shouldn’t be added to the source control for the app because every developer or user has their own specific environment settings for the web app.
To keep things backed up, the dev team should provide a .env.example file that has the default settings.
Step 4: Testing Your Laravel Installation
When you install Laravel you can then test your Laravel by running the development server.
In your terminal, start Laravel’s built-in server:
php artisan serveOnce you run the command mentioned above, a screen will appear like the one shown below.
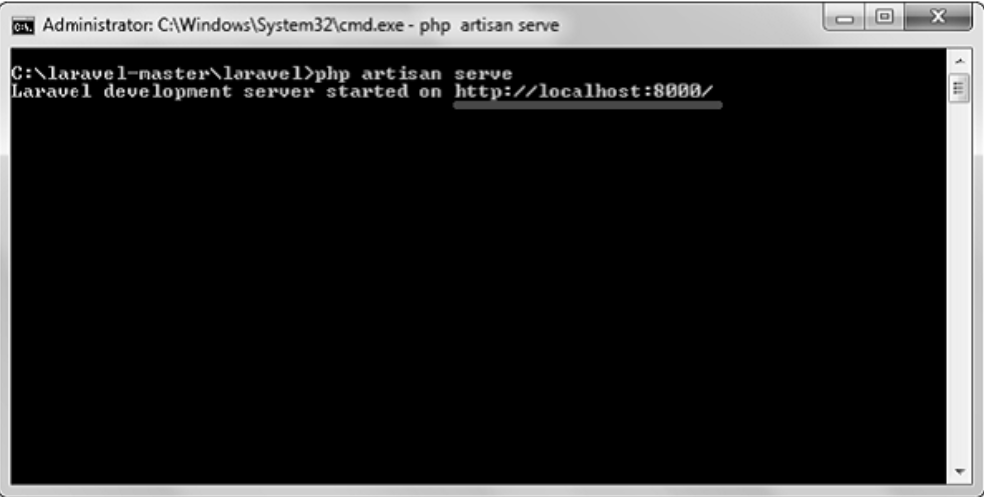
Copy the URL highlighted in gray in the screenshot above and paste it into your browser. If you encounter the screen shown below, it means Laravel has been successfully installed.
Common Laravel Installation Errors
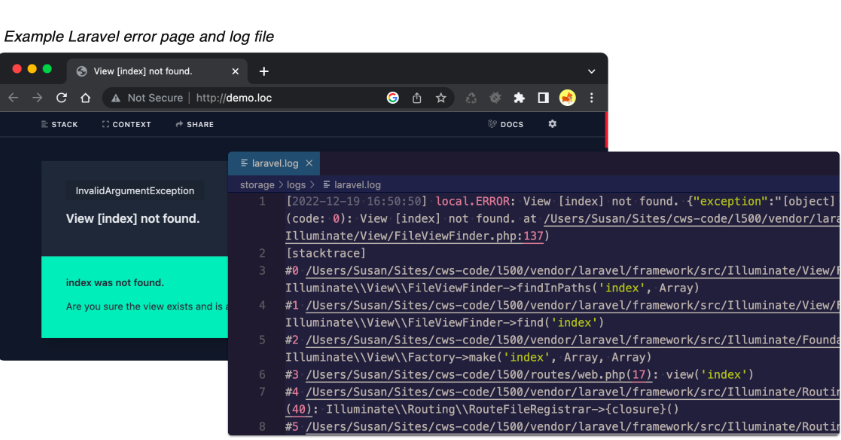
System-level bugs can stop Laravel applications from loading, leading to those annoying 500 server errors in your browser. These issues often pop up during installation or deployment.
Let’s take a look at these typical system-level bugs, what signs to look for, and how to fix them.
1. Missing .env file
For necessary environment-level settings, the Laravel application needs a.env file in the root. It is required for the application to boot up; otherwise, it would display a Laravel 500 SERVER ERROR page with the error message “No application encryption key has been specified.” Either copy the supplied.env.example file or build a.env file using an existing environment file to fix this problem.
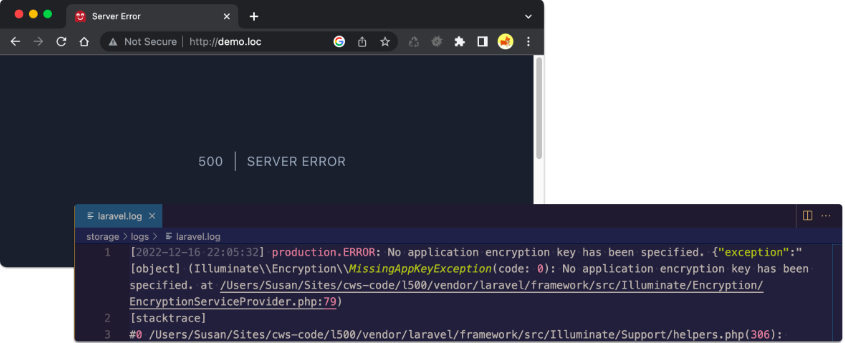
To solve this:
- Make use of an environment file copy that is already on another server.
- Make a clone of the supplied.env.example file if there isn’t an existing .env file.
- To create an encryption key, run php artisan key:generate.
- Modify the.env file to suit the requirements of the application.
> cp .env.example .env> php artisan key:generate2. Missing APP_KEY in .env file
If you’re running your app and get the error saying No application encryption key has been specified, it means your .env file is there, but the APP_KEY value is missing.
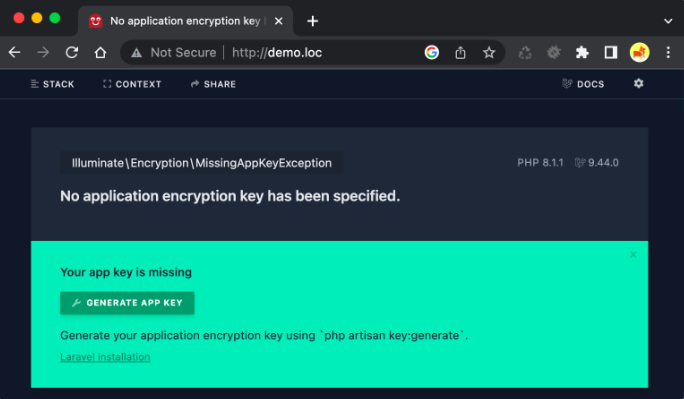
To sort this out, just let Laravel create a key for you by using this Artisan command:
> php artisan key:generate3. Bug in .env file
One more thing to consider with your .env file is that there could be a bug in it even after you install Laravel successfully. For instance, if you have multi-word values that include spaces, you need to wrap those values in quotes.

If there’s a bug like this, you’ll end up seeing a generic HTTP ERROR 500 page when you try to load your app.
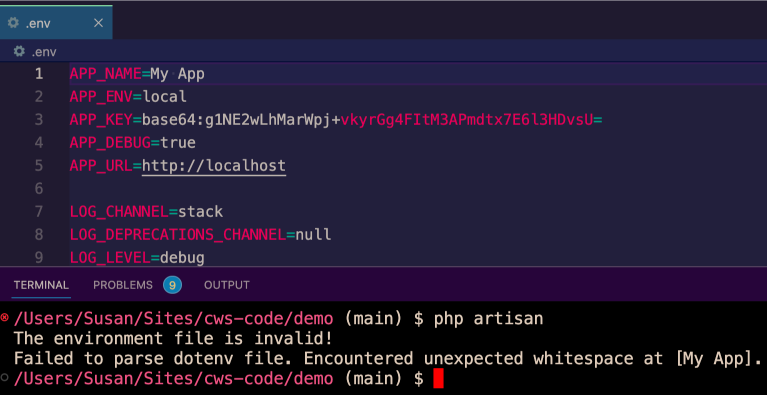
If you’re not sure whether there’s an error in your .env file, you can run Artisan (php artisan) since it usually points out any issues.
Conclusion
You are now equipped to Install Laravel. You’ve successfully installed Laravel on your preferred operating system, and now you’re all set to create amazing and sophisticated web applications with this well-loved PHP framework.
Getting started with Laravel is now simpler and quicker, whether you’re launching a new project or enhancing an existing one.
Good Luck & Happy Coding!
FAQ’s
1. How do we install Laravel?
Installing Laravel is a straightforward process:
- Via Laravel Installer. First, download the Laravel installer using Composer
- Via Composer Create-Project.
- Local Development Server.
- Public Directory.
- Configuration Files.
- Directory Permissions.
- Application Key.
- Additional Configuration.
2. How to check Laravel code?
Using your terminal or command prompt, navigate to your Laravel project’s root directory and run the following command check laravel install via composer:
- php artisan –version.
- Laravel Framework 10. …
- cat vendor/laravel/framework/src/Illuminate/Foundation/Application.php | grep “const VERSION”
- const VERSION = ‘10.3.0’;
3. How to check if Laravel is installed on my system?
To find out if Composer is installed on your system, simply open your terminal or command prompt and enter this command:
<strong>composer --version</strong>To check if Laravel is installed, just type “laravel -v” and hit enter. If Laravel is present, you’ll see the version number appear.
4. How do I run a Laravel project after installation?
To get your Laravel project up and running after installation, simply go to the project folder and execute this command:
php artisan serveThis will launch a local development server that you can access at http://127.0.0.1:8000.
