MySQL is an open-source Relational Database Management System which is a must-have for data-centric applications. If you want to install MySQL on Ubuntu, you are in the correct place. Web developers, application developers, IT professionals, and a lot of others use MySQL extensively due to its simplicity, dependability, and flexibility.
The process is simple, whether you are creating a MySQL install Ubuntu server for development, production, or web hosting. This guide will help you install MySQL on Ubuntu walkthrough, covering installation, server security, and basic configuration.
By the end of this article, you will have absolute authority over your MySQL server!
What You Need to Have to Install MySQL Ubuntu
Before you do anything, ensure you meet the below prerequisites:
- An Ubuntu server Up And Running: This guide works for Ubuntu 20.04 and all the latest versions.
- Root or sudo user access: You require root access to install and configure MySQL.
- Stable internet connection: Required for downloading MySQL packages and their dependencies
Install MySQL Ubuntu: A Beginner’s Manual
Here is the step-by-step process to install MySQL Ubuntu:
Step 1: Update the System
Always remember to update your package index in order to help you receive the latest software packages. This can be done in the following manner:
sudo apt updateNow, update your installed packages and make some changes to the items that require modifications:
sudo apt upgradeStep 2: Install MySQL Server
In order to install MySQL Ubuntu, one runs an APT command on the terminal. The user-friendly nature of this software makes MySQL’s installation process a walk in the park. Simply execute the command below:
sudo apt install mysql-serverBy running this command, you will have MySQL installed with the required dependencies. After this step is done, MySQL will start automatically.
Step 3: Verification of MySQL Installation
To check if it’s working as intended, you have to use systemctl. Start by typing in the command prompt:
sudo systemctl status mysqlOutput:
● mysql.service - MySQL Community Server

       Loaded: loaded (/lib/systemd/system/mysql.service;  enabled; vendor preset:  enabled)

       Active: active (running) since Mon 2025-02-18 10:30:42 UTC;  3s ago
If MySQL isn’t functioning, type in the following command prompt:
sudo systemctl start mysqlTo verify that MySQL starts on each start of the computer type in:
sudo systemctl enable mysqlAfter that, type in the command prompt:
sudo mysql_secure_installationStep 4: Secure MySQL Installation
Use the MySQL secure script to delete insecure default installations for the purpose of enhanced security. It is as simple as running the following command:
sudo mysql_secure_installationThe script will ask you to make sure to:

- Set a root password if not already configured.
- Remove insecure default installations.
- Prevent logins from remote servers.
- Remove test databases.
Always make sure to respond “Yes” to all prompts. It helps in added security.
Step 5: Access to MySQL
After installing and securing MySQL, logging into the MySQL server as the root account can be accomplished through the command line as follows,
sudo mysql -u root -p In the command above, you will need to input the root password set previously. After you have successfully authenticated, you will be in a MySQL shell where you can create databases and manage users.
Step 6: Add a New MySQL Database (This Step is Optional)
After using the command above, a new database can be created for your application. The command to do this is,
CREATE DATABASE my_database; Preceding this command, tables can now be created and added with data and privileges assigned to the database.
How CyberPanel Optimizes the Management of MySQL Databases
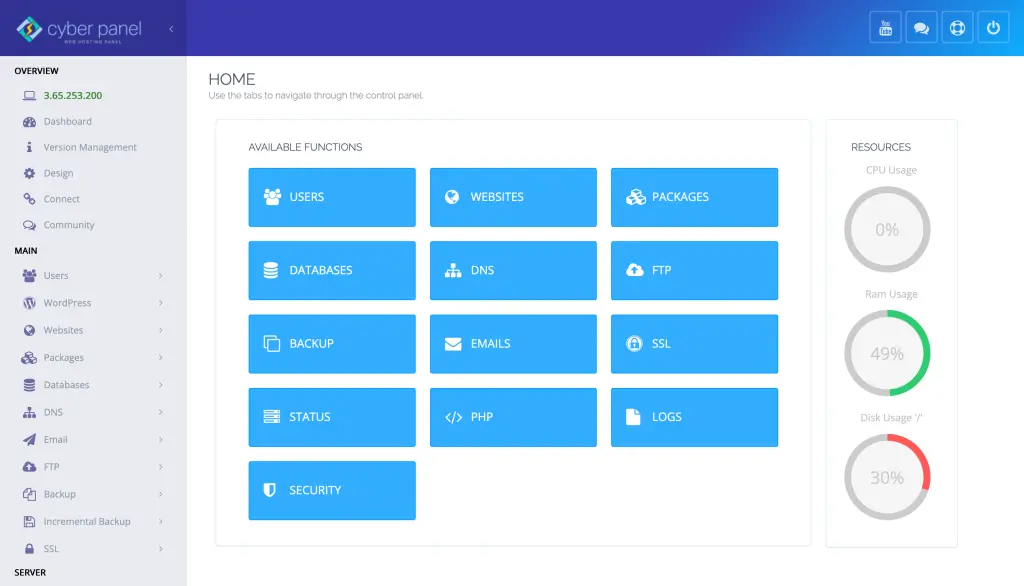
If you’re a MySQL user who installs Ubuntu on a web server, CyberPanel can greatly automate and ease multiple aspects regarding the management of databases. CyberPanel is a free, open-source web hosting control panel that simplifies the processes of server and database management with its specialized GUI.
Advantages of Using CyberPanel for MySQL Management
- Very Easy to Use: MySQL databases can be managed without the use of any command line tools.
- Backups with a Click of a Button: Regular backups of your databases can be organized and managed.
- Database Security Made Easy: Easily set up control over the database’s user permissions and access.
- Creating Databases is Quick and Easy: Users and MySQL databases can be created from the panel with zero hassle.
CyberPanel has streamlined processes for application developers and administrators completing database operations such as installing MySQL on Ubuntu without the need to extensively use the command line interface.
FAQs: Install MySQL Ubuntu
1. What version of MySQL comes packaged with Ubuntu 20.04 by default?
When starting from a fresh install, an Ubuntu install MySQL will assume MySQL 8.0 to be its latest stable version in the Ubuntu repositories.
2. How does one check whether MySQL is installed?
To check which version of MySQL is installed, the following command can be used:
mysql –version
This command displays the current installed MySQL version on the device in question.
3. Is it possible to install MySQL on a desktop version of Ubuntu?
Yes, MySQL is perfectly installable on Ubuntu’s desktop. The processes are identical for both server and desktop versions.
4. How do I set MySQL to auto-start after a reboot/ shutdown?
To ensure MySQL starts after a reboot, you need to do the following:
sudo systemctl enable mysql
5. How do I permit remote MySQL access on Ubuntu?
More configurations have to be made in permitting remote connections to Mysql. You have to edit the mysql configuration file /etc/mysql/mysql.conf.d/mysqld.cnf by changing bind-address into either the server’s IP address or 0.0.0.0 which enables all IPs. Then, you have to restart MySQL with:
sudo systemctl restart mysql
6. Is it possible to run MySQL and MariaDB simultaneously on the same server?
You can install both if you want to, but it is not advisable to do so since they share the same resources. It is your choice which program to utilize depending on the requirements or needs.
7. What is the process of upgrading MySQL on Ubuntu?
To do so, first, your package list should be updated:
sudo apt update
Next, use the command to upgrade MySQL:
sudo apt upgrade mysql-server
Final Thoughts: MySQL on Ubuntu can now be installed!
As you may have noticed, the installation of MySQL on an Ubuntu operating system is quite straightforward and can assist in creating a sophisticated application, managing a website’s backend database, or even running business-critical services. With the help of this guide, you will be able to install, configure, and secure MySQL as per your specific use case.
The steps provided above should guide you in the configuration of your MySQL server. Those who have to manage a MySQL server on a web hosting account can do so with the aid of CyberPanel which is a powerful web hosting control panel that can automate database management and enhance your productivity.
Are you ready to install MySQL on Ubuntu? Install MySQL now and manage your data without any hassle!