Do you sometimes wonder why certain pages in your WordPress site aren’t appearing on search engines or how some of your important content is ignored by search engines? It may indeed be due to misconfigured settings of your WordPress robots.txt file. The robots.txt file is a fundamental guideline for the web engines on how their bots crawl your website, the wrong setting could cause missed opportunities in search engine optimization (SEO).
This extensive guide will detail how the robots.txt file functions in WordPress, how to modify it accordingly, and how to create the best robots.txt template to suit your site’s specific needs. Another aspect that is being addressed here is issues like robots.txt in WordPress stuck on disallow and guide you on how to overwrite the robots.txt by hand.
What Is the WordPress Robots.txt File?
The robots.txt file is just a simple text file placed in the root directory of your website. It provides the crawlers (also called robots or bots) instructions regarding the pages it can visit and index on your website. Crawlers such as Googlebot use the robots.txt file to determine which areas of your site they can crawl and which they should avoid.
You may not want the admin or login pages indexed, for instance. Or, you may want to block search engines from crawling duplicate content. The robots.txt is your means of stating that preference.
Why Is the Robots.txt Important?
The robots.txt file is very important for the search engine in terms of managing load on its server. It also can give a shot in the arm to SEO because only relevant content will be crawled and indexed. Properly using robots.txt will prevent search engines from wasting time on pages that are low quality or irrelevant to your business goals and will give their time instead to high-priority content.
Below are some advantages of using the robots.txt file in WordPress:
Get exclusive access to all things tech-savvy, and be the first to receive
the latest updates directly in your inbox.
- Control over Search Engine Indexing: You can tell bots to ignore specific pages, which means that irrelevant or sensitive content cannot be shown in search results.
- Crawl Budget Improvement: Search engines have limited time and resources for crawling your site. The crawlers tend to focus on the most significant parts of your site by blocking unnecessary pages.
- Avoid Duplicate Content Issues: Robots.txt can avoid indexing duplicate content which is very relevant to SEO.
Interpreting the Syntax of Robots.txt
Before we learn how to create rules for robots.txt files, let’s have a short review of the syntax basics.
Format of a robots.txt file :
- User-agent: This means which search engine or bot the rule applies to.
- Disallow: This section will tell the bot which pages or sections not to crawl.
- Allow: It will tell the bot what pages are allowed to crawl even when a broader “Disallow” rule applies.
- Sitemap: This would contain the location of your XML sitemap, which helps search engines crawl all the pages you want them to have access to.
And here’s a simple example of what a robots.txt document might look like:
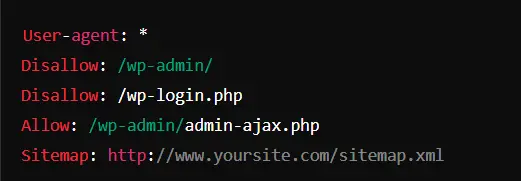
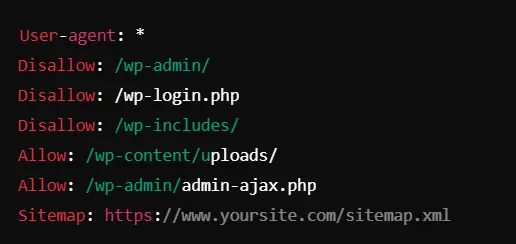
- User-agent: *: The rules apply to all bots including Googlebot, Bingbot, etc.
- Disallow: /wp-admin/: Disallow crawling of your admin site.
- Allow: /wp-admin/admin-ajax.php: Allows access to the admin-ajax.php file, which is essential for certain functions.
- Sitemap: Tells search engines where your sitemap file resides.
How to Find and Modify Your WordPress Robots.txt File
1. Check If Your Site Has a Robots.txt File
First, check whether your site has the robots.txt file. You can do that by visiting:

That will open the file in the browser if it exists; if not, a 404 error will appear. Most often WordPress does not create robots.txt file by default which is very simple to add.
2. Edit Robots.txt File in WordPress
There are various ways to create or edit the robots.txt file in your WordPress installation.
Method 1: Use a Plugin (Preferred by Beginners)
For most WordPress users, a plugin is the easiest way to manage robots.txt files. The plugins like Yoast SEO and All in One SEO help to edit robots.txt in the WordPress dashboard.
Here’s how you can do this through Yoast SEO:
- Install and activate the Yoast SEO plugin.
- Go to the SEO menu in WordPress, then Tools.
- Select the “File editor.”
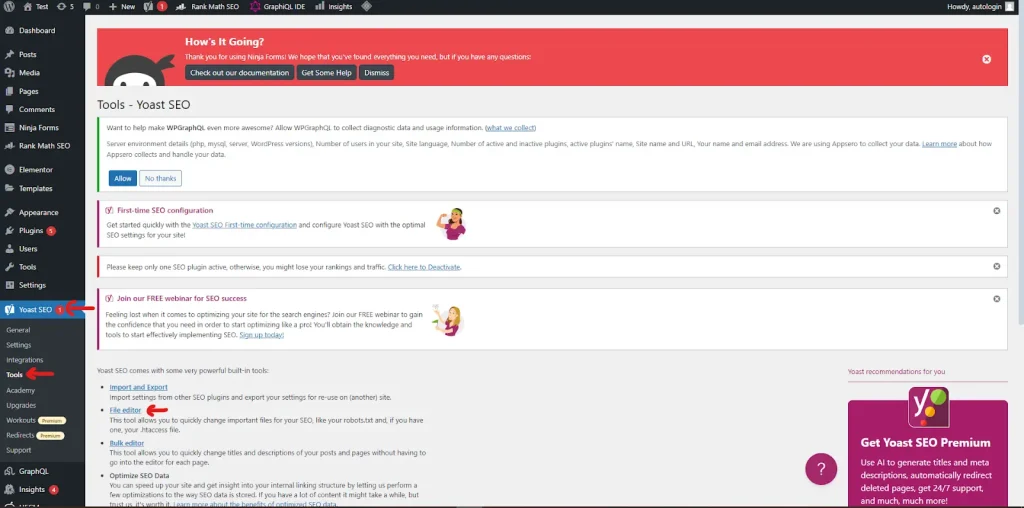
- If there is already a robots.txt file, then you will see it here, and edit it as per your requirement.
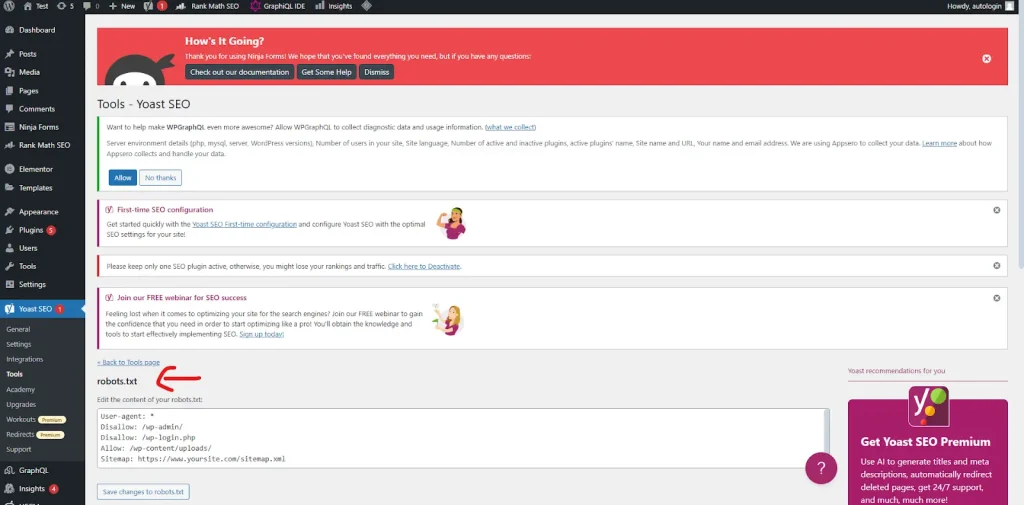
- If the file does not exist, then Yoast will prompt you to create one.
Method 2: Edit the File Directly (Advanced Users)
If you want to take more control and prefer to have the file edited manually, you can access your robots.txt file via FTP or the file manager found in your web hosting control panel.
Here’s how:

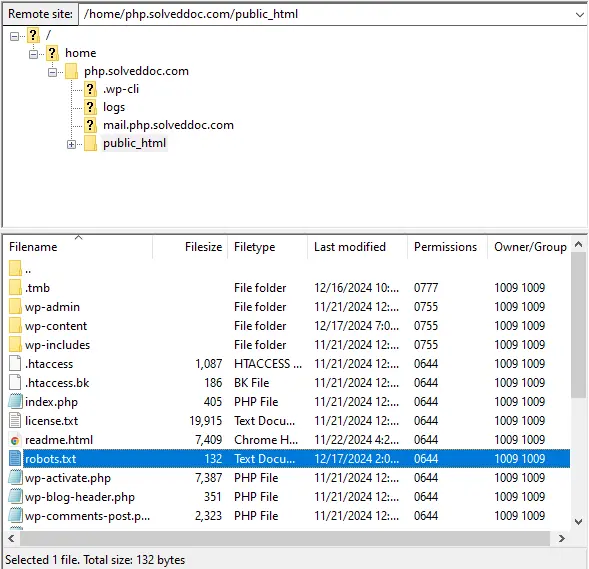
- Connect to your server using an FTP client (i.e., FileZilla) or your hosting provider’s file manager.
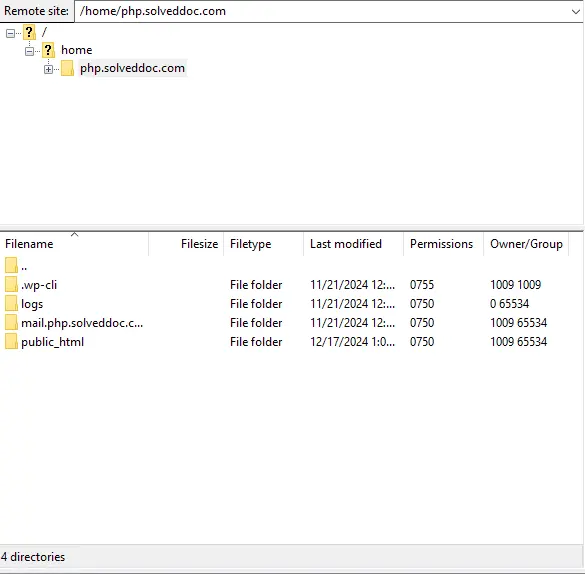
2. Approach the root directory of the WordPress installation.
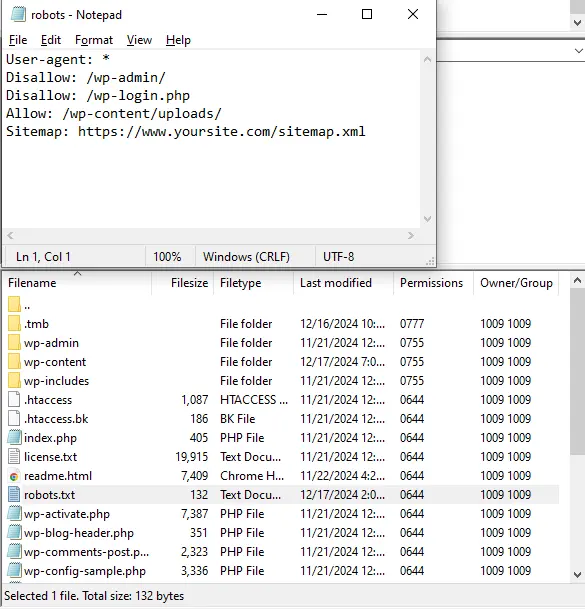
3. If the robots.txt file exists already, simply right-click and edit it. If it does not exist, then you may create a new one.
4. Add in your desired rules.
5. Make sure you save the robots.txt file after editing or creating it in the root directory of your site.
How Do You Manually Overwrite the Robots.txt file in WordPress
Sometimes, it may happen that your robots.txt file in WordPress actually stays stuck on disallow, meaning search engines are being told that they are not going to crawl your entire site or some of those critical pages.
Follow these simple steps to manually overwrite the default or the ticking rules:
- Connect to the WordPress root directory via FTP client or file manager.
- Open it for editing in the robots.txt.
- Remove all the unwanted Disallow which are blocking some important sections like the homepage, blog, and product pages.
- Be careful to add just the right Allow rules so that those important pages get indexed.
- Finally, save and upload the newly created robots.txt file
Issues in Robots.txt and Their Solutions
Problem 1: Robots.txt in WordPress stuck on Disallow
This is a problem created by the many WordPress plugins for automatically generating the robots.txt file. The default setting sometimes disallows even all crawlers for accessing the site. A line like Disallow: / will prevent search engines from indexing any of your pages.
Solution: Just remove the disallow rule or modify it so that it only prohibits the parts or sections you want excluded, like:

Problem 2: Absence-or-wrongly placed Robots.txt File
Having a missing and incomplete robots.txt file indicates that there is no clear indication as to which pages the search engine will crawl or the robots will crawl on the site. Indexing performance will naturally be poor, which, as a result, leads to lower rankings.
Solution: Create a robots.txt file, if missing, and configure it to block unnecessary sections while allowing crawlers to index your most important content.
Example of a simple robots.txt template:

Problem 3: Searching engines do crawling on new content.
Suppose you have created pages or added content but it’s not appearing in search results. The reason might be a wrong robot.txt setting.
Solution: Check if you have accidentally blocked the crawling bots from accessing your new pages. The Disallow rule shouldn’t be applicable to important contents or URLs.
Best Practices Regarding WordPress Robots.Txt Configuration
And now, as soon as you have learned how to fix and configure your robots.txt file, let’s have a look at some best practices that should make your site optimized from SEO perspectives:
Block Unnecessary Pages: Crawl nonpublic areas, like admin, login, and other external pages, for waste of your crawl budget.
Allow Important Pages.: Your crawlers should allow access to your valuable content such as blog posts, product pages, and the like.
Use the Sitemap Directive: For example, using the robots.txt file with a sitemap link helps search engines discover all your important pages.
Look for Errors: Such as through Google Search Console, and ensure important pages are not blocked with your robots.txt.
Example of the Best WordPress Robots.txt Template
Here is an example of an optimized WordPress Robots.txt template. You can surely use it for your website:
CyberPanel: Managing your WordPress Robots.txt Files
CyberPanel boasts an agile capability to serve as a robust web hosting control panel, providing dedicated users with the ability to manage easily their websites, databases, and server-side configurations using a user-friendly interface. Furthermore, CyberPanel provides server condition access and file management tools to allow one to easily manipulate the robots.txt file for WordPress.
How CyberPanel Facilitates Management of WordPress Robots.txt
Easy File Management: Through CyberPanel’s File Manager, you can directly access the root directory of your WordPress site; that’s where the robots.txt file is. From there, you can create, edit, and update the file as needed. This is ideal for those who are not keen on using FTP clients.
Edit the Robots.txt File: You can easily edit the robots.txt file with CyberPanel’s built-in text editor. You do not have to bother getting your hands dirty accessing your server through FTP; this results in a far easier change process for novices.
Monitor Site Performance: This is where CyberPanel comes in, as it allows you to monitor your server performance so that changes made in the robots.txt won’t end up risking your site performance. Configuration in the robots.txt guarantees non-crawl pages are not crawled, thus saving bandwidth and enhancing the server load.
Security and SSL: CyberPanel includes a lot of standard security-based features such as management of SSL and firewall rules, which will keep your website, as well as your robots.txt, secure from unauthorized access or attacks.
In essence, CyberPanel’s robots.txt files are easy interfaces for working with your WordPress site; they allow control over crawler behavior, even without much technical skills.
Use CyberPanel to Overwrite WordPress Robots.txt File
1. Log In to CyberPanel
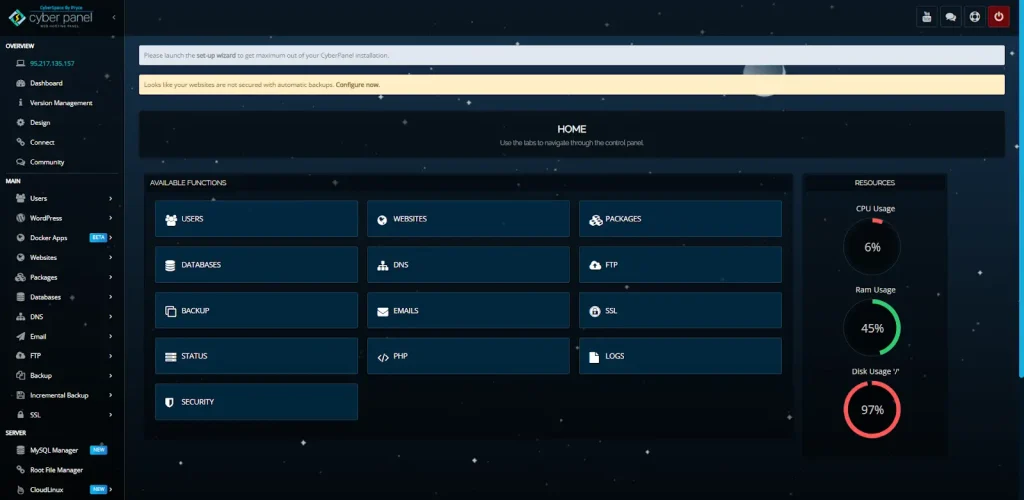
First open a web browser and access the URL that will take you to the CyberPanel dashboard (most likely https://yourdomain.com:8090).
Signature into your account using username and password credentials.
2. File Manager Navigation
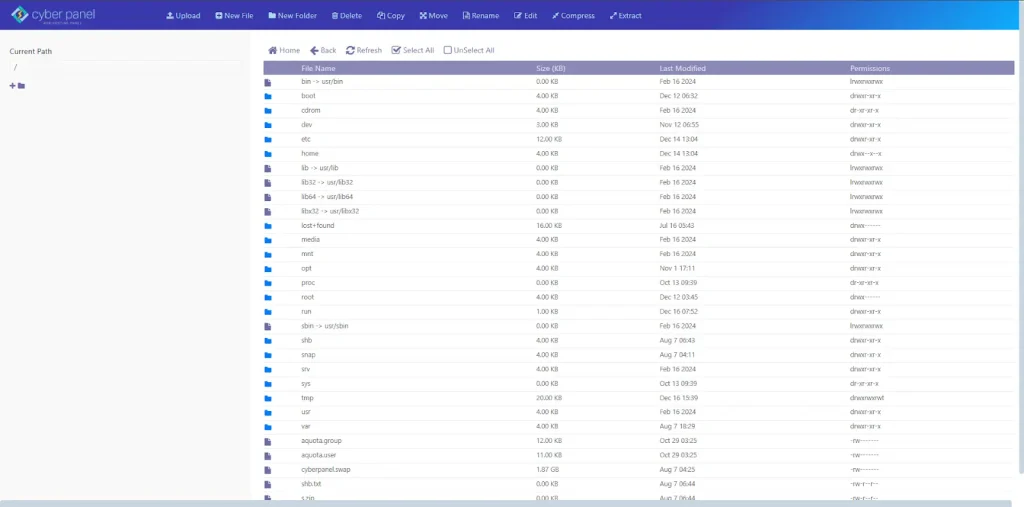
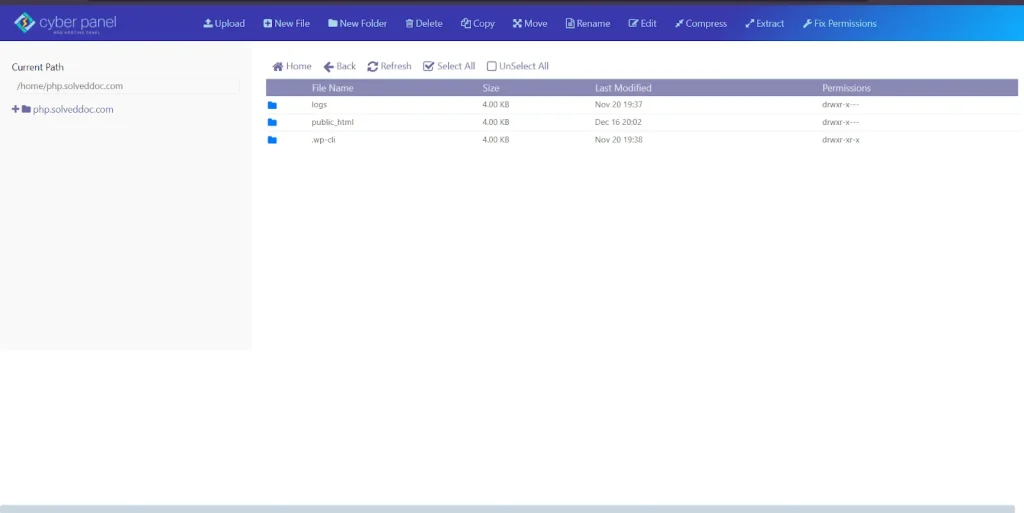
Under the dashboard of CyberPanel, navigate to the left sidebar and click on Root File Manager.
3. WordPress Site Root Directory
- The above image shows the File Manager with a list of directories on your server.
- Explore towards the root folder of the WordPress installation on this server. Most probably it will be: /home/youraccount/public_html/.
- You can define it as follows:
- Look for a directory that holds your existing WordPress files: wp-content, wp-admin, wp-includes.
4. Edit robots.txt
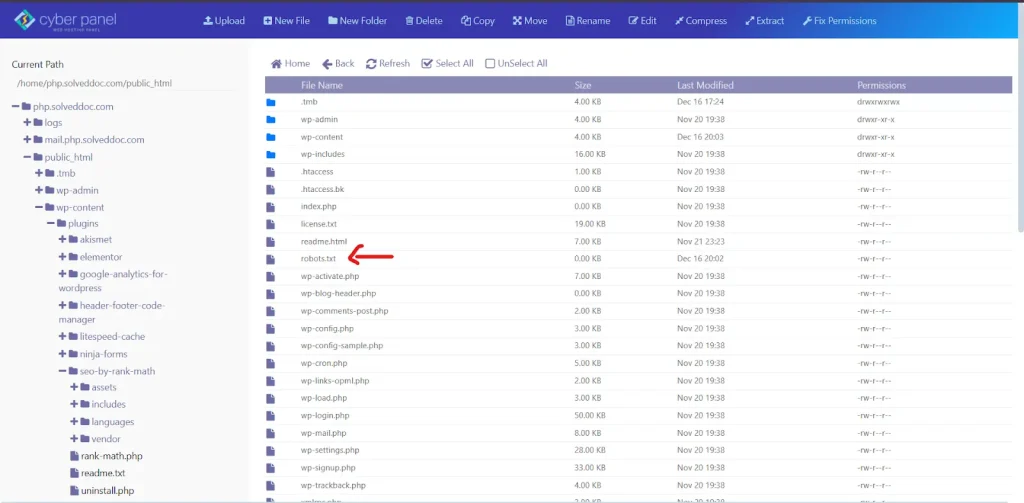
Search for robots.txt in the root directory of the WordPress installation.
You may see it in the list if it already exists;
Otherwise, click on Create File and name it robots.txt to create a new one.
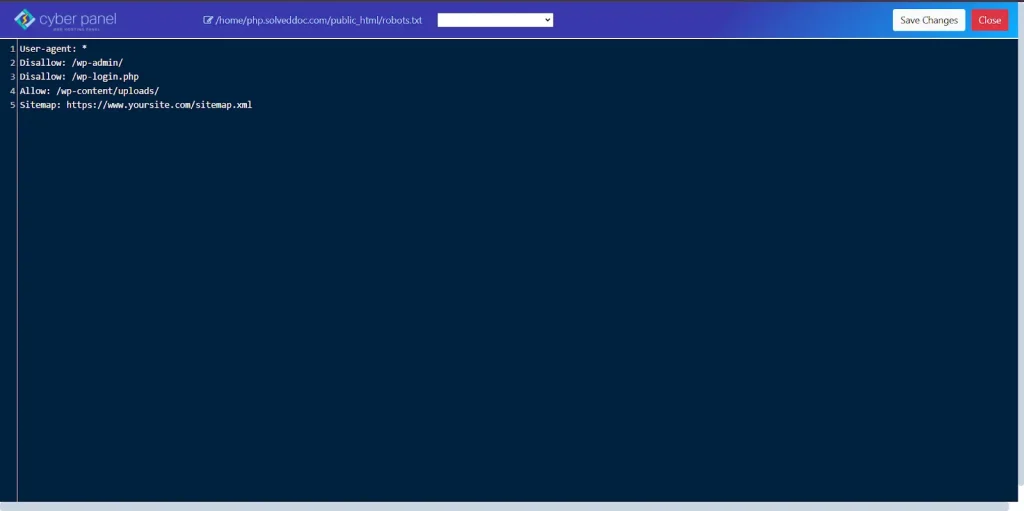
Righ- click on robots.txt to edit it.
5. Remove or Change the Content
In the editor, you can modify the existing rules or completely overwrite the file with new instructions for search engines.
Here is a simple example of a basic robots.txt template:
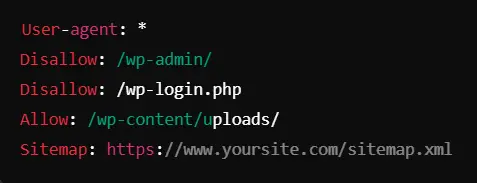
*User-agent:: It refers to rules applying to all search engine bots.
Disallow: Directives to prevent automatic crawling of specific pages or directories (e.g., the admin area).
Allow: This manual approval of pages or directories for crawling.
Sitemap: This function points to xml sitemap location for improvement indexing. Changes would simply save by clicking “Save”.
6. Confirm Changes
After saving the changes in the robot.txt file, appropriately configured robots can visit:
FAQS: WordPress Robots.txt File
1. What is a WordPress robots.txt file and why should I have it?
A robots.txt file is basically used to tell the search engine bots about the pages that they have to crawl or not crawl. This helps in controlling the indexing, which in turn helps in SEO, by blocking the irrelevant pages and bears the focus on the most important content.
2. What does the robots.txt file do for SEO?
The file helps crawlers crawl only the valuable pages, thus increasing their efficiency of indexing and finding out a lot for your website.
3. What if my WordPress robots.txt file is configured incorrectly?
It might block important pages from being crawled, therefore damaging SEO, or include irrelevant pages which are exposed towards search engines and create problems in indexing.
4. What is the best robots.txt file for a WordPress site?
A good robots.txt file will disallow all those parts which are non-essential such as a login page, but will allow crawlers to all those important pages of your site. It should include a link to your XML sitemap for easy indexing.
5. How can I edit my robots.txt in WordPress?
You may visit your robots.txt file through WordPress SEO plugins like Yoast SEO or you can do it manually via your hosting control panel (such as CyberPanel) or an FTP client.
6. What are the most common problems regarding robots.txt in WordPress?
Accidental blockage of important pages, non-existence of robots.txt files, or sometimes one might miss linking the sitemap may lead to improper indexing by search engines.
7. How will CyberPanel help in the management of my WordPress robots.txt file?
CyberPanel provides the option of viewing and editing your robots.txt file within its File Manager, making the process of configuration for crawler settings easy rather than needing advanced knowledge.
Final Thoughts!
Master Your WordPress Robots.text for Better SEO
To sum up, the WordPress Robots.txt file controls the entry points for crawlers across your site. When configured suitably, you have more of the bots on those pages which you consider to yield a higher payoff in terms of SEO and performance for your site. Whether through the use of CyberPanel or manual creation, it remains vital to consider that little file for improving search visibility.
Dominate Today! Have your WordPress Robots.txt configured today and enjoy improved SEO on your website. Start optimizing for improvement now!
See the detailed video for better understanding.


