

Have you ever created an amazing application with Next.js and then wondered how to deploy your Next.js build publicly and share it online? Deploying your Next.js build publicly is the only step that transforms your project from a local development environment to a live, user-friendly web application. But because there are numerous options for deployment, how do you determine the best judicious application to ensure your site is secure, scalable, and performs optimally?
When you deploy Next.js build publicly, it has many advantages, namely great accessibility, better performance from server-side rendering, and improved SEO facilities. Deployment knowledge is of major importance to one’s success as a web app developer. Selecting an appropriate host is as important as any other end in the entire setup process configuring the server environment and so forth.
Out of the many tools and platforms, CyberPanel stands out as one of the most powerful and easiest-to-use hosting control panels that allow you to deploy your Next.js application. With an easy-to-use interface, piles of functions, and built-in support for Node.js, CyberPanel makes it easier than ever to deploy your Next.js build. This is a comprehensive guide on deploying your Next.js application using CyberPanel so that your website can be life-secure and optimized for performance. Let’s start this journey to get your Next.js project to the global stage with minimal hassle.
Why You Should Deploy Next.js Build Publicly?
Open accessibility: Allow your application to be accessed by users across the globe.
Scalable: Seamlessly scale with hosting solutions that allow traffic flow to increase.
Optimization in performance: Reduce loading time through server rendering and static site generation.
SEO Benefits: Rank the web pages better on search engines with content and performance optimization.
Publishing your Next.js build publicly is an improvement in user experience; it secures your application as highly robust and reliable.
Deploy Next.js Applications
Before deploying your Next.js application, make it production-ready. Follow the steps below to prepare your build for deployment:
1. Optimize Your Code
- Remove Unused Code- Remove all unnecessary code to reduce bundle size.
- Enable Code Splitting- Use Next. Js automatic code splitting to load only the necessary javascript for the page.
2. Environment Variables Setup
Set up environment variables to manage sensitive data securely.
# .env.production

NEXT_PUBLIC_API_URL=https://api.yourdomain.com

DATABASE_URL=postgres://user:password@localhost:5432/mydb
3. Build the Application
Now, execute the build command to generate your production build.
npm run buildOutput
Creating an optimized production build...

Compiled successfully.

Automatically optimizing pages...

Page                                           Size     First Load JS

┌ ○ /                                          3.3 kB        65.1 kB

├   /_app                                      0 B           62.4 kB

├ ○ /404                                       3.4 kB        65.2 kB

└ ● /about                                     4.1 kB        69.3 kB

+ First Load JS shared by all                  62.4 kB

  ├ chunks/framework-xxxxxxxxxxxxxxxx.js       42.3 kB

  ├ chunks/main-xxxxxxxxxxxxxxxx.js            17.5 kB

  └ chunks/pages/_app-xxxxxxxxxxxxxxxx.js     2.6 kB
Choosing a Suitable Hosting Provider
Deployment becomes effective when the host is suitable. Some common hosts include:
Vercel
Vercel is the actual maker of Next.js and gives an integration way of one click.
Guide on Deploying to Vercel:
– Sign Up: Create a new profile on Vercel.

– Import Project: Now link your Git repository.
– Configure Settings: Add in your environment and build settings.
– Deploy: It’s as easy as clicking the deploy button and Vercel takes care of the rest.
Netlify
Another excellent host with all its features is Netlify.
Steps to Deploy on Netlify:
– Sign Up: Register on Netlify.
– Connect Repository: Connect your GitHub, GitLab, or Bitbucket repository.
– Set Build Command: npm run build.
– Deploy: Kick off the deployment.
Deployment on a VPS (Virtual Private Server)
To gain full control over deploying your application, it is best to deploy to a VPS such as DigitalOcean or AWS.
Example: Deploying on DigitalOcean
- Create a Droplet: Create a new Droplet according to your choice of OS.
- Access the server
ssh root@your_server_ip- Install Node.js and npm
curl -fsSL https://deb.nodesource.com/setup_16.x | bash -
apt-get install -y nodejs- Clone Your Repository:
git clone https://github.com/yourusername/your-nextjs-app.git

cd your-nextjs-app- Install Dependencies and Build
npm install

npm run build- Start the Application
npm start- Set Up a Reverse Proxy with Nginx
apt-get install nginxYou have to configure Nginx to route traffic to your Next.js app.
Example of Nginx Configuration
server {

    listen 80;

    server_name yourdomain.com;

    location / {

        proxy_pass http://localhost:3000;

        proxy_http_version 1.1;

        proxy_set_header Upgrade $http_upgrade;

        proxy_set_header Connection 'upgrade';

        proxy_set_header Host $host;

        proxy_cache_bypass $http_upgrade;

    }

}- Restart Nginx
For the correct routing by Nginx of traffic towards your Next. Js application uses a configuration sample as follows:
systemctl restart nginxOutput:
Server started on <a href="http://yourdomain.com">http://yourdomain.com</a>Setting Up Environment Variables on Hosting Platforms
They are important for handling sensitive information. Follow these steps across different platforms:
Vercel
- Head to Project Settings.
- Select Environment Variables.
- Add Variables:
KEY: NEXT_PUBLIC_API_URL

VALUE: https://api.yourdomain.com
Netlify
- Go to Site Settings.
- Find Build & Deploy > Environment.
- Add Variables similarly.
VPS
Edit your .env.production file with the necessary variables.
Ensuring Security and Performance
For every application deployed on public grounds, security comes first, and performance second.
1. HTTPS
Your application must be armed with SSL certificates.
Using Let’s Encrypt with Nginx:
apt-get install certbot python3-certbot-nginx

certbot --nginx -d yourdomain.com -d www.yourdomain.com
2. Optimize Images
Next.js has its own Image component to serve optimized images.
import Image from 'next/image'

function HomePage() {

  return (

    <Image

      src="/images/profile.jpg"

      alt="Profile"

      width={500}

      height={500}

    />

  )

}

export default HomePage
3. Enable Caching
Use caching strategies to improve the performance
Example: Adding Cache-Control Headers in Next.js:
// next.config.js

module.exports = {

  async headers() {

    return [

      {

        source: '/(.*)',

        headers: [

          { key: 'Cache-Control', value: 'public, max-age=31536000, immutable' },

        ],

      },

    ]

  },

}
Monitoring and Maintenance
Once deployed, constant monitoring will allow your application to always remain reliable.
1. Monitoring Tools
Integrate New Relic or Datadog in your applications to monitor the performance and uptime of those applications.
2. Automated Backups
For those events that can sometimes happen without a user being able to do anything about it, automatic backups will actually save your data.
3. Upgrade Dependencies
One always keeps upgrading dependencies to keep enjoying the new features and security patches.
npm update
Procedure to Deploy Next.js Build Publicly in CyberPanel
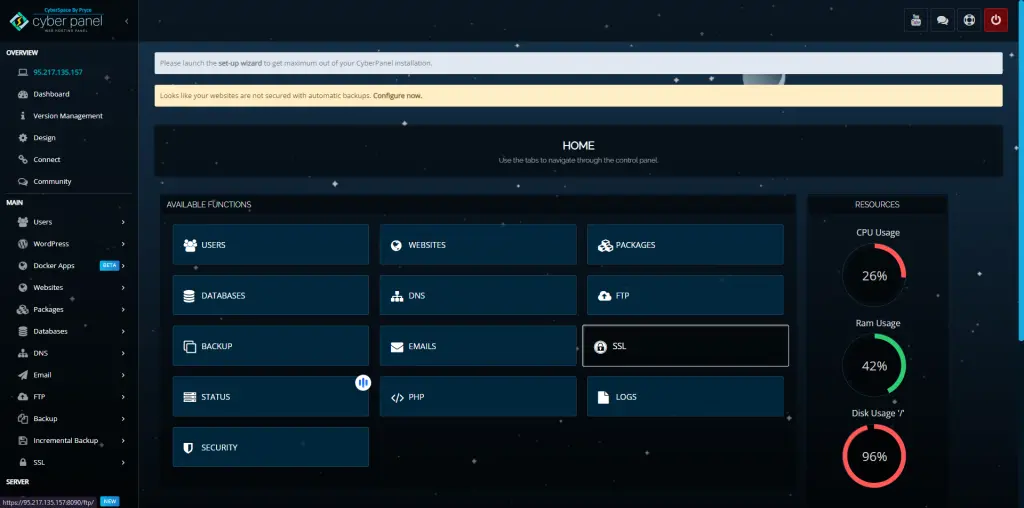
You can deploy Next.js build publicly with CyberPanel, which is a web hosting control panel, to make the whole process very streamlined and have a live application that is secure and optimized. Concisely narrate the steps and deploy your Next.js build publicly.
1. Pre-requisites
The Next.js build should first be made for public deployment with CyberPanel. Prerequisites include:
Cyberpanel Installed: A server configured with the CyberPanel. Refer to the CyberPanel installation guide, in case.
Domain Name: A registered domain name pointing to your IP address on the server.
Next.js Application: Your Next.js project is ready to be deployed.
SSH Access: Secure Shell access to your server for command-line operations.
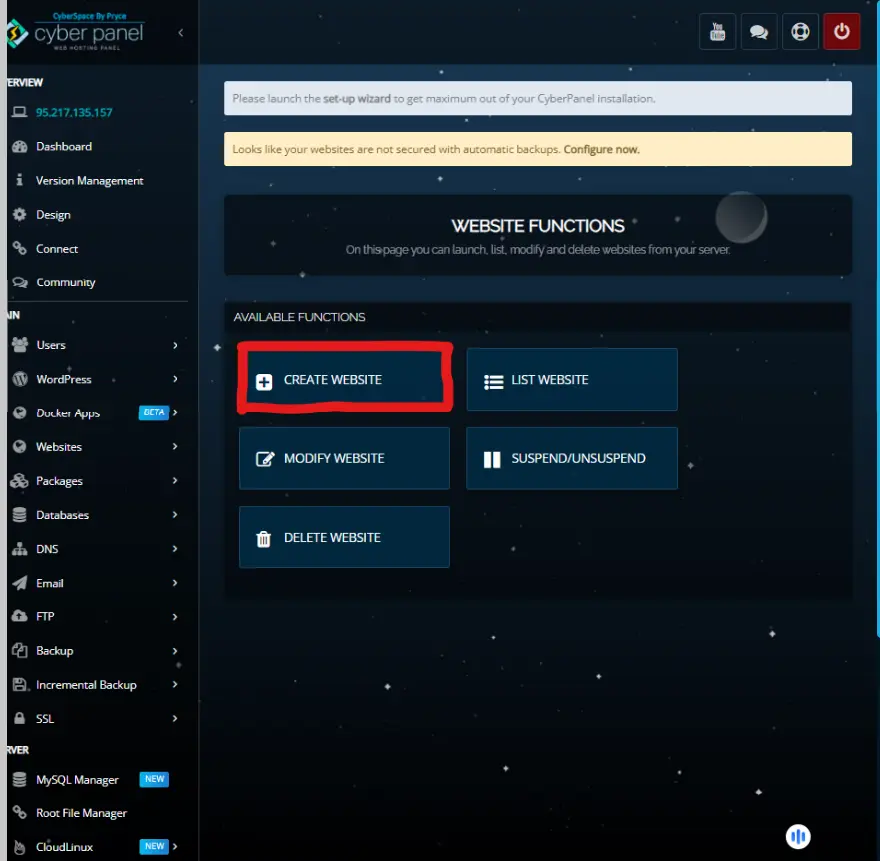
2. Add Your Domain in CyberPanel
Log in to CyberPanel:
- Go to https://your-server-ip:8090.
- Type in your CyberPanel credentials to enter the dashboard.
Create New Website:

- Click on “Websites” from the left sidebar.
- Select “Create Website”.
- Fill in the details:
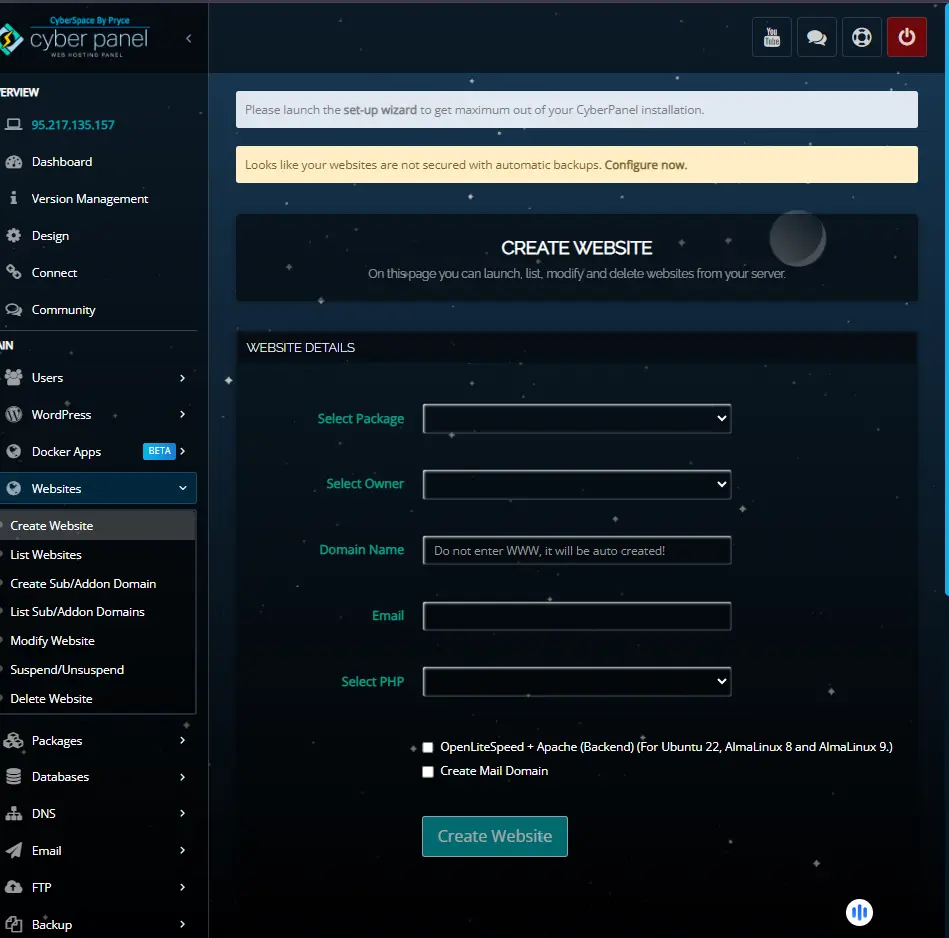
- Package: Select a hosting package or use the default.
- Domain Name: Enter your domain (for instance, yourdomain.com).
- Email: Give an admin email address.
- PHP Version: Any version is okay (optional for Next.js).
- Click on “Create Website”.
Output
Website yourdomain.com has been successfully created.3. Setting up Server Environment
For public deployment of a Next.js build unit, the server needs to be setup first:
Connect to Server via SSH:
ssh root@your_server_ipInstall Node.js and npm:
curl -fsSL https://deb.nodesource.com/setup_16.x | bash -

apt-get install -y nodejs
Output:
Node.js and npm have been successfully installed.Verify Installations:
node -v
npm -v
Output:
v16.13.0

8.1.0
4. Deploy Your Next.js Application
Navigate to Your Website Directory to Deploy Next.js build publicly:
cd /home/yourdomain.com/public_htmlOutput:
/home/yourdomain.com/public_htmlCloning your Repository:
git clone https://github.com/yourusername/your-nextjs-app.git .Output:
Cloning into '.'...

remote: Enumerating objects: 100, done.

remote: Counting objects: 100% (100/100), done.

remote: Compressing objects: 100% (80/80), done.

Receiving objects: 100% (100/100), 10.5 MB | 2.1 MB/s, done.
Installing Dependencies:
Now you have to install the necessary Node.js packages to deploy your Next.js build publicly:
npm installOutput:
added 500 packages, and audited 5000 packages in 10s

found 0 vulnerabilities
Building the Application:
Now create an optimized production build for your Next.js application:
npm run buildOutput:
Creating an optimized production build...

Compiled successfully.

Automatically optimizing pages...

Page                                           Size     First Load JS

┌ ○ /                                          3.3 kB        65.1 kB

├   /_app                                      0 B           62.4 kB

├ ○ /404                                       3.4 kB        65.2 kB

└ ● /about                                     4.1 kB        69.3 kB

+ First Load JS shared by all                  62.4 kB

  ├ chunks/framework-xxxxxxxxxxxxxxxx.js       42.3 kB

  ├ chunks/main-xxxxxxxxxxxxxxxx.js            17.5 kB

  └ chunks/pages/_app-xxxxxxxxxxxxxxxx.js     2.6 kB
5. Manage Application Using PM2
PM2 keeps your Next.js build public: it will be on, and automatically restart whenever needed.
Install PM2 Globally:
npm install -g pm2Output:
+ pm2@5.x.x

added 1 package from 1 contributor and audited 5000 packages in 10s
Run Application Using PM2:
pm2 start npm --name "nextjs-app" -- startOutput:
[PM2] Starting /usr/bin/npm in fork_mode (1 instance)

[PM2] Done.

┌─────┬──────────┬──────┬──────┬────────┬───────────┐

│ id  │ name     │ mode │ status │ cpu    │ memory    │

├─────┼──────────┼──────┼──────┼────────┼───────────┤

│ 0   │ nextjs-app │ fork │ online │ 0.1%   │ 50.0 MB   │

└─────┴──────────┴──────┴──────┴────────┴───────────┘
Save PM2 Process List:
pm2 saveOutput:
Saving current process list...
Saving [nextjs-app] successfully
Set PM2 Start on Boot:
pm2 startup systemdOutput:
[PM2] Init System found: systemd

[PM2] To setup the Startup Script, copy/paste the following command:

    sudo env PATH=$PATH:/usr/bin pm2 startup systemd -u root --hp /root
Run this command as provided:
sudo env PATH=$PATH:/usr/bin pm2 startup systemd -u root --hp /rootOutput:
[PM2] Spawning PM2 daemon with pm2_home=/root/.pm2

[PM2] PM2 Successfully daemonized
6. Configure Nginx as a Reverse Proxy
Configure the Nginx for routing traffic to your Node.js server to deploy your Next.js build publicly.
Open Nginx Configuration in CyberPanel:
- On the CyberPanel, go to Websites > List Websites.
- Click Manage next to your domain.
- Select Configure for editing.
Modify the Nginx Configuration:
Insert the following server block to proxy requests to your Next.js app which is running on port 3000:
server {

    listen 80;

    server_name yourdomain.com www.yourdomain.com;

    location / {

        proxy_pass http://127.0.0.1:3000;

        proxy_http_version 1.1;

        proxy_set_header Upgrade $http_upgrade;

        proxy_set_header Connection 'upgrade';

        proxy_set_header Host $host;

        proxy_cache_bypass $http_upgrade;

    }

}
(Alert: Replace yourdomain.com with your own domain name.)
Save and Restart Nginx:
systemctl restart nginxOutput:
Reloading Nginx configuration...7. SSL Securing Your Application
The public build of Next.js is made secure by enabling HTTPS:
Issue SSL Certificate using CyberPanel:
- On the dashboard of the CyberPanel, navigate to Websites > List Websites.
- Click Manage next to your domain.
- Then Select SSL > Issue SSL.
Follow the Prompts:
- Choose the “Let’s Encrypt” SSL provider option.
- Confirm your domain name.
- Then Click “Issue SSL.”
Output:
SSL certificate has been successfully issued for yourdomain.comCheck for HTTPS Access: Browse the https://yourdomain.com to ensure that the SSL certificate is activated.
8. Test Your Deployment
After having made your Next.js construction open to the real world, you would next want to check to see that everything works as expected.
Enter Your Site
Get your browser to visit: https://yourdomain.com
Expected Result:
- Your Next.js application then runs without problems.
- You’re told there’s a secure connection by the browser (that little lock icon).
Perform an Application Functionality Test
- Test All Pages: Work your way through each of the pages to verify that they load appropriately.
- Exercise Dynamic Operations: Fill in forms, play with dynamic content, and otherwise verify this works as intended.
- Mobile – Test your site responsiveness in real-world conditions.
Monitor PM2 Logs
With PM2, one can monitor the real-time logs of Next.js applications
pm2 logs nextjs-appOutput:
[PM2] Spawning PM2 daemon with pm2_home=/root/.pm2

[PM2] PM2 Successfully daemonized

[nextjs-app] 2024-04-27T12:00:00: Server started on http://localhost:3000

[nextjs-app] 2024-04-27T12:01:00: User accessed /about
Insights
- Error Monitoring: Watch out for any error messages that may inform you about issues affecting your deployment.
- Quantitative Information: Check on the CPU and memory performance to be assured that your application is performing well.
Best Ways to Maintain Your Deployed Next.js Application
To keep the publicly deployed Next.js application safe, performant, and up-to-date take into consideration the following best practices:
- Updating Dependencies Regularly
- Monitor Application Performance
- Automate Backup
- Optimize Images and Assets
Next.js has a built-in Image component to serve optimized images to speed up loading and performance.
import Image from 'next/image'

function HomePage() {

  return (

    <Image

      src="/images/profile.jpg"

      alt="Profile"

      width={500}

      height={500}

    />

  )

}

export default HomePage
Secure Your Server
Regularly update your server software and monitor it for security vulnerabilities. Use CyberPanel’s security features for managing firewalls and access control.
Deploy Next.js Build Publicly – FAQs
1. What does that mean to put up Next.js build in public?
Deploying Nextjs build public is a step of transforming your Next.js application from a local development environment to a live server where it can be accessible to users around the world. It consists of hosting configuration, server environment to have it run, and those related to the security concerns of the application and performance optimization.
2. What are the best hosting options to deploy Next.js build publicly?
Some options for public deployment of Nextjs applications are:
Vercel: This is the one-click deployment platform created by the Next.js team.
Netlify: The feature-rich and user-friendly hosting provider.
CyberPanel: very powerful web hosting control panel for VPS-based deployments.
DigitalOcean/AWS: Quite valuable in providing full control over servers.
3. How to secure my application when I deploy Next.js build publicly?
To secure your application, take the following steps:
Adopt globals for all data access methods.
HTTPS with SSL certificates (e.g., Let’s Encrypt).
Update dependencies and server software now and then.
Enjoy enhanced security features built into CyberPanel.
Enable caching and restrict privileges for certain sensitive areas.
4. What are the steps I need to take before I deploy Next.js build publicly?
Such are the steps that you have to take before you deploy Next.js build publicly:
Code optimization through removing dead weight.
Configure Environment variables for sensitive data
Run production build via npm run build.
Check the application’s performance issues before release.
5. Why do I have to deploy Next.js build publicly instead of keeping it local?
The Nextjs build when deployed outside would allow your application to:
– Build it robust, reach more people, as the application will be available online.
– Server-side rendering and static generation to speed things up.
– Improved SEO optimization would do wonders for rankings.
– A better experience that will expand for many.
Final Words!
Deploy Next.js Build Publicly to Conquer the Globe
To sum up, you can deploy Next.js build publicly to make your project a live, accessible, high-performance web application. With an efficient and secure deployment process via CyberPanel, you will receive access to a broader audience, improved SEO, as well as scale. You will now be able to contact this guide in confidence to deploy Next.js build publicly in order to take your application to the next level.
What are you waiting for? Deploy Next.js build publicly today and see that project shine across the globe!
