Does your checkout have long and arduous processes that tend to scare away customers? Almost 70% of would-be online shoppers have left their shopping before completing the process due to how drear the checkout experience can be. Now, here’s a thought: What if you could streamline the shopping experience so that customers throw items into their cart, check their selections, and make payments on a single page?
Well, here comes the marvelous feature called WooCommerce One Page Checkout! This amazing feature creates the whole process of the checkout into just one single page so that the cart abandonment ratio is cut down tremendously and customers can find satisfaction.
We will guide you through the whole process of creating, customizing, and editing your WooCommerce checkout page in this full guide. Find out from the world-class resources of WooCommerce as we look at plugins, customization options, advanced modifications, and case studies: That will take you a long way toward designing a checkout process that works for your store and your customers.
Understanding WooCommerce One Page Checkout
With WooCommerce one page checkout, you can combine the journey in wooCommerce from product selection, cart review, and payment in a single stage. That’s all our customers do today; they just don’t have to go across all these steps. All this will make it much faster and improve user experience to see.
Key Advantages
- Hassle-free Process: Shoppers complete their purchases quickly and without undue disruption.
- Improved Conversions: A simplified process will prevent cart abandonment, increasing sales.
- Layout Ability: The check-out pages can be adjusted to fit the personality and functionalities of your flagship store.
- Flexibility: You can set it up for one-page checkout options on certain products or pages only.
Why Choose WooCommerce One Page Checkout?
- Remove the Friction: No longer is it that customers need to go from page to page to complete their purchase.
- Boost Sales Conversion: One-tap checkouts have effectively reduced abandonment rates and increased sales volume.
- Mobile Friendly: A single-page checkout layout becomes more responsive and mobile-friendly.
- Massive Customization: Customize checkout flow to fit with those who are unique to your store.
Setting Up WooCommerce One Page Checkout
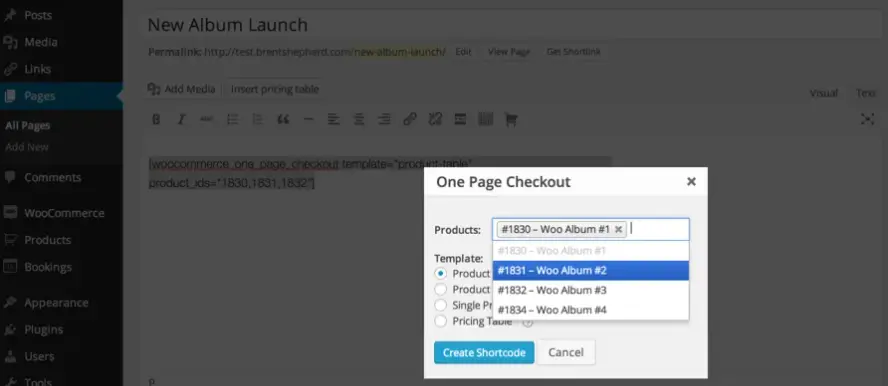
You may depend on the WooCommerce One Page Checkout plugin or other third-party alternatives to introduce this feature.
Step 1: Select and Install a Plugin
Initially start up a plugin for one-page checkout functionality. Here are some top plugins:
Get exclusive access to all things tech-savvy, and be the first to receive
the latest updates directly in your inbox.
- WooCommerce One Page Checkout (Official Plugin): One-page checkout will be added on any product or page.
- Price: $79/year
Package installation procedure:
- Procure plugin from the marketplace on WooCommerce.
- Go the WordPress dashboard, then go to Plugins and click Add New.
- Upload, install, and activate the plugin.
Other Alternatives
- YITH One Click Checkout: Minimalist Design; Guest Checkout Options.
- CartFlows: Equipped with Up-Selling Advanced Funnel Building Tools.
Step 2: Configure the Plugin
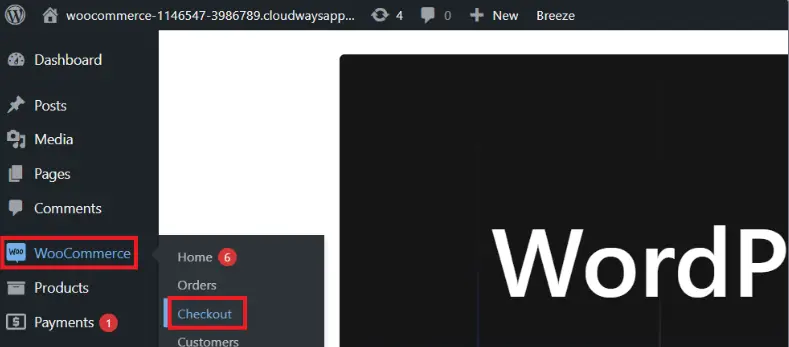
- Go to WooCommerce > settings > Checkout
- Choose to enable one-on-page checkout globally:
- For all products.
- For certain categories or pages only.
Step 3: Assign the Template to the Seminole Shortcode
- Add one page checkout to your favorite page using the plugin shortcode:
[woocommerce_one_page_checkout]- Test out the page and run a smooth operation.
How to Change Checkout Page WooCommerce
By changing the default checkout page for WooCommerce, you can create a customized experience that will better serve your customers and match your brand. Although functional, the default WooCommerce checkout page is not flexible or designed to meet the unique needs of your business. Here’s how you can change WooCommerce checkout page without a hitch:
1. Use a Page Builder
To design a custom WooCommerce checkout page, one can simply rely on page builders like Elementor or WPBakery. The drag-and-drop facility enables changing the layout from the front-end without learning codes.
How to Use Elementor to Create Custom Checkout Page:
1. Install Elementor and integrate it into WooCommerce.
2. Created a new page at Pages > Add New- this will be used for a custom checkout.
3. On the page create elements like:
- Trust badges for security payment assurance
- Payment gateways for convenience
- Personalized messages or upsell offers for convenience.
4. Publish and set up as default WooCommerce > Settings > Advanced > Page Setup.
Advantages of Page Builder:

- Flexible: Add or replace elements as required.
- Visually beautiful: Create a visually engaging layout that goes hand in hand with your brand.
- Easy: No technical skills required.
2. Designate a Unique Checkout Page
There is a provision in WooCommerce using which you can assign a checkout page to your use. This is especially helpful in cases where you have employed a one-page checkout plugin or a custom template.
Steps to Assign a Custom Page:
- Create a new post in WordPress.
- Put a shortcode like [woocommerce_checkout] into a page to display the checkout former.
- Go to WooCommerce then Settings then Advanced and then Page Setup.
- Set the page just created to your checkout page.
Why Assign a Custom Page?
- Better Control: You can change the layout and functionality without affecting the default WooCommerce structure.
- Customization: You can add items like countdowns, testimonials, or promotional banners.
3. Adjusting with checkout plugins
The easiest and simplest way of enhancing your checkout page without needing any coding functions is by using plugins. The most frequently used plugin for this job is Checkout Field Editor.
Steps to Modify Fields with Checkout Field Editor:
- Install the plugin and check the WooCommerce > Checkout Form.
- Add, remove, or reorder fields according to your needs.
- Test the new field arrangement on a staging site before going live.
More Features:
- Conditional Logic: Show or hide fields depending on user inputs.
- Custom Fields: Add a field like “Gift notes” or “Order instructions.”
Ways to Customize WooCommerce Checkout Page
Main Tools of Customization
- Checkout Field Editor: Add, remove, or rearrange fields.
- Custom CSS: Change layout, colors, and typography.
- WooCommerce Hooks and Filters: That’s for those who want to seriously customize their shopping cart experience.
New Placeholder Text
New placeholder entries can clear any demand for the field e.g. use this PHP snippet:
add_filter( 'woocommerce_checkout_fields', 'customize_checkout_fields' );

function customize_checkout_fields( $fields ) {

    $fields['billing']['billing_phone']['placeholder'] = 'Enter your contact number';

    return $fields;

}
Custom CSS Styling
To match it with the site’s brand, the checkout page can be styled via CSS:
.woocommerce-checkout input {

    border: 1px solid #ccc;

    padding: 10px;

    font-size: 14px;

}
Tips for effective styling
- Use a contrast that is easily readable with the background.
- Be bold or use colors to emphasize them, if that essential field is provided (ex it’s “Place Order”).
- Responsive layout for all devices.
Edit WooCommerce Checkout Page
Editing the WooCommerce checkout page can fulfill the requirements your business may need. A very simple checkout page from WooCommerce has very little flexibility to try and offer a whole new experience. Improvement in the checkout page will boost user engagement and conversion rates and sync the entire checkout process with your brand identity.
Reasons for changing the WooCommerce one page checkout
- Enhancing User Experience: Simplify the checkout process to decrease shopping cart abandonment.
- Increase conversion: It could be through trust signals clicked at once.
- Personalize the Brand: Ensure that the page serves the same style and tone as your store.
- Other features: Cross-selling, optional fields, or guest checkout for convenience.
What Things Can Be Edited on the WooCommerce Checkout Page?
Here are the important things that can be edited for an effective process of checking out:
Field Arrangement and Content:
- Add, delete, and rearrange fields like billing, shipping and delivery, and payment information.
- Edit labels and placeholders for better clarity.
Styling and Design:
- Change the colors, fonts, and layouts according to your brand identity.
Functionality:
- Allow guest checkout.
- Consider upsell opportunities or dynamic checkout options, e.g., PayPal Express.
Custom Scripts:
- Include JavaScript for real-time validation or interactivity.
A Step-by-Step Guide to Edit the Woo-Commerce Checkout Page
1. Using the Checkout Field Editor Plugin
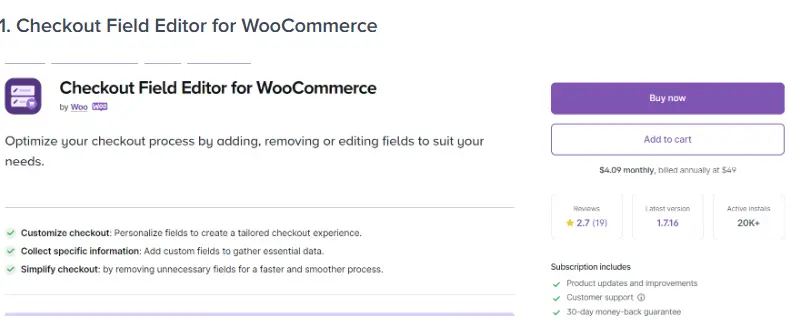
The Checkout Field Editor is one of the easiest ways to customize fields on a checkout page.
Checkout Field Editor Features:
- Add new fields(text, dropdowns, checkboxes, etc).
- Remove irrelevant fields from the process.
- Restructure fields for an easy understanding.
- Enable fields to appear according to the user’s inputs.
How to Use the Checkout Field Editor:
- Install the plugin by going to the default way Plugins > Add New on WordPress.
- Search “Checkout Field Editor” and activate it.
- Go to WooCommerce > Checkout Form.
- Use the drag-and-drop editor to:
- Add fields for example, “Gift Notes” or “Preferred Delivery Date”.
- Delete optional fields which can confuse users e.g. “Company Name”.
- Retain fields according to the logical flow of customer data entry.
Example Usages: Add a field for Gift Note.
- Put the name “Gift Note” for the field as text.
- Set it for orders marked by gift orders only.
- Save changes and check to function.
2. Adding Guest Checkout
Guest checkout is a must for stores that sell to a one-time buyer or to customers who do not like to keep an account.
Enable Guest Checkout by Following These Steps:
- Open WooCommerce from your dashboardSettings> Accounts & Privacy.
- Select Allow customers for placing order without an account.
- Save Changes.
The Benefits of Guest Checkout:
- Fast Track Checkout to Users.
- Reduce Barriers to Complete Purchase.
- Best Useful for Seasonal Stores or One-Time Buyer.
3. Customize Labels and Placeholders
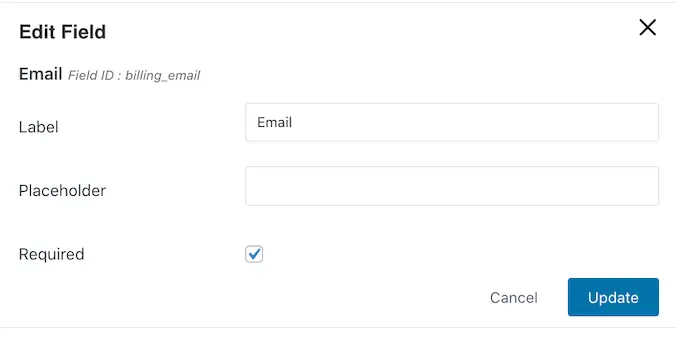
The field labels and placeholders are very important to help customers understand.
Why Editing Labels and Placeholders?
- Clarity: Make it obviously clear which information is mandatory.
- Brand Voice: Words that represent the personality of your store.
Editing Field Labels Using PHP:
Here, use the PHP snippet to customize field labels in the checkout form:
add_filter( 'woocommerce_checkout_fields', 'customize_checkout_labels' );

function customize_checkout_labels( $fields ) {

    $fields['billing']['billing_first_name']['label'] = 'Your First Name';

    $fields['billing']['billing_address_1']['placeholder'] = 'Enter your street address';

    return $fields;

}
e.g. Use Case: Simplify Labels
- Say Billing First Name to Your Name.
- Change the placeholder text for examples like 123 Main St.
4. Styling the Checkout Page
Styling assists with the visually appealing and customer-friendly nature of the checkout page.
How To Do CSS Styling:
- Access the CSS file of your theme using WordPress Customizer or child themes.
- Use custom CSS rules to change field borders, padding, or button styles.
Field Styling Example CSS:
.woocommerce-checkout input {

    border: 2px solid #000;

    padding: 12px;

    font-size: 16px;

    width: 100%;

}
Effective Styling Tips:
1. Use bright colors for highlighting the “Place Order” button.
2. Ensure the visual is mobile-friendly.
3. Use clean fonts and adequate spaces for readability.
5. Adding Upsells and Cross-Sell
Upsale or cross-sale on a checkout page can increase an average order value.
Checkout Ideas for Upselling:
- Provide gift wrapping for a fee.
- Advise customers about some other items related to the existing cart contents.
- Discount at checkout for including an additional item.
How to Add Upsells:
Plugins like CartFlows or WooFunnels can be used for creating upselling opportunities within the checkout process.
6. Establishing Conditional Logic
Conditional fields assist in making the checkout process as smooth as possible since they only show relevant fields.
Example Use Case: Show a Field for “Company Name” Only for Business Orders
- Implement a plugin like Checkout Field Editor.
- Create conditional logic to make the field “Company Name” visible only when the user chooses Business as the order type.
7. Real-time Validations
An example would be real-time field validations, which make it much easier for users by instantly catching any kind of error.
How to Add Real-Time Validation:
- Include JavaScript or plugins having dynamic validation support.
- Example: checking against a Phone Number for the formatting.
Advanced Custom Editing using Hooks and Filters
Hooks and filters are available in WooCommerce to its developers to make much deeper changes at their checkout pages.
Add a Custom Thank You Message
Display a custom thank you message once an order has been placed.
add_action( 'woocommerce_thankyou', 'custom_thankyou_message' );

function custom_thankyou_message( $order_id ) {

    echo '<p>Thank you for shopping with us! Your order has been successfully placed.</p>';

}
Test Your Modifications
After editing your checkout page, it becomes very essential for testing it to effectively run any forms as required.
Testing Checklist:
- Field Validation: To make certain that the fields capture the right data and display query-generated error messages.
- Mobile Responsive: To ensure that the multichannel user experience is captured on various devices.
- Payments Gateway Integration: To be sure that payment gateways do their jobs without glitches.
- Guest Checkout: To ensure no unnecessary nagging for an account is prompted when checking out as a guest.
Plugins Comparison
Here are some best plugins for WooCommerce One Page Checkout and customization:
| Plugin | Features | Pricing | User Feedback |
| WooCommerce One Page Checkout | Dynamic templates, and real-time updates. | $79/year | Trusted and efficient. |
| YITH One-Click Checkout | Guest checkout, simple layouts. | Free/Premium $69 | Highly rated for simplicity. |
| CartFlows | Advanced funnel creation, and upselling. | $239/year | Excellent for increasing AOV. |
| Checkout Field Editor | Field-level customizations. | Free/Premium $49 | Great for custom checkout fields. |
How CyberPanel Improves WooCommerce Performance
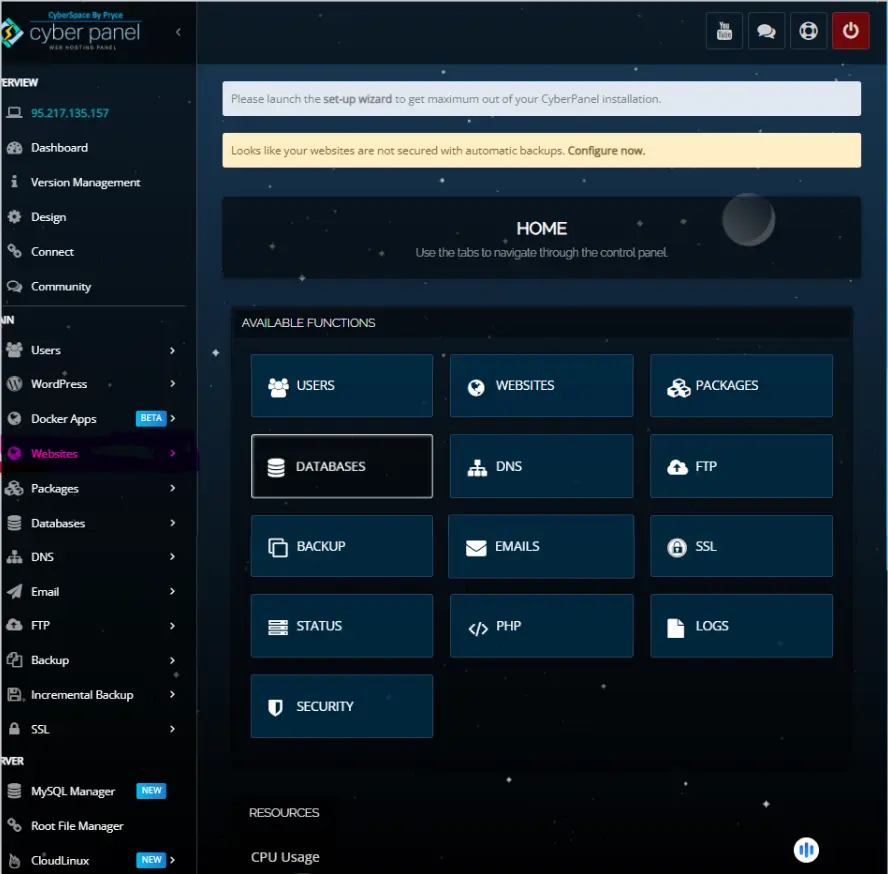
CyberPanel is a scalable web hosting control panel designed to cater to speed, simplicity, and security with which a WooCommerce website would excellently function. CyberPanel is a reasonable enhancer in WooCommerce performance due to the following parameters:
- Speed Optimization: OpenLiteSpeed-driven CyberPanel will provide LiteSpeed Cache Integration, HTTP/3 support, as well as dedicated resources provisioning to cater to the fast loading times which is most important in WooCommerce stores.
- Simple management: CyberPanel is the best site management tool for deploying and securing WooCommerce sites as well as one-click installations, automatic backups, and SSL certificate management.
- Scalability: It’s best suited for high-traffic stories as it can host VPS and cloud hosting facilities for better resource allocation.
- Security Characteristics: Integrated firewalls, real-time malware scans, and regular updates defend WooCommerce web pages from threats.
CyberPanel provides a very reliable hosting environment that guarantees improved performance for online WooCommerce stores, faster checkout, and the best user experience possible.
FAQs: WooCommerce One Page Checkout
1. What is WooCommerce One Page Checkout exactly?
This feature is a seamless combination of the product selection, the cart review, and the payment into a single simplified page.
2. What do I use for a Woocommerce checkout page modification?
You can use a page builder, assign a new page or customize it through plugins such as Checkout Field Editor.
3. Can I customize WooCommerce checkout pages without plugins?
Yes, you can customize WooCommerce checkout page using WooCommerce hooks, filters, and custom CSS.
4. Which plugins are the best for one-page checkout?
WooCommerce One Page Checkout, YITH One-Click Checkout, and CartFlows will offer up the most options for you.
5. How does one-page checkout improve conversions?
By reducing friction, speeding the process, and minimizing cart abandonment while making payments at the speed of light.
Final Take!
Streamline Your Store with WooCommerce One Page Checkout
To sum up, simplifying your checkout process is a must when you talk about e-commerce in today’s world. This will combine the whole transaction into one sweet and balanced flow – eliminate cart abandonment and drive up conversion rates. With tools like Checkout Field Editor, LiteSpeed Cache, and CyberPanel’s amazing hosting, your shopping experience will become faster and friendlier.
Are You Ready to Increase Sales?
Start with CyberPanel via well-secured and high-speed hosting and implement WooCommerce One Page Checkout today. Deliver the best shopping experience the world has ever seen and watch your business grow!
