Is there ever a time when you wanted to do something custom or change how your WordPress web is working? One of the best ways to achieve your wish is by creating a WordPress plugin, be it a new widget or just manipulating the content of pages or posts from external services or creating cool custom post types or advanced analytics. As you can see, these plugins are the best ways to go about it and enhance the performance and experience of your website. But how to build a WordPress plugin? While it may seem difficult to create a plug-in, it is quite easy if you break it down into small steps.
The most comprehensive guide about WordPress Plugins will take you through everything you need to know about them what makes up their basic elements, how they differ from themes, to examples of coding practically on how to build and activate a plugin. Further in this guide, we will dive into the crucial interaction with WordPress core functions through its hooks. At the end of this guide, you will have everything at your fingertips needed to produce your professional plug-in and simply putting it in place will make a difference in any WordPress site’s functionality. Let’s begin at the basic level, before moving to advanced areas including deployment through CyberPanel.
What exactly is a WordPress Plugin?
WordPress plugins are simply codes that provide your WordPress site with additional features. It expands the capabilities of WordPress so that you can build up custom features and add them to an existing site without having to directly change the core WordPress code. This is all so important because it makes your site modular and therefore easier to maintain in that the updates to WordPress won’t overwrite your features. Plugins could do anything from adding very minor tweaks to serving a very specific site function, maybe rather major ones.
Take SEO, for instance: it is not so much about optimizing your site for search engines as it has gotten a lot to do with safety-secured websites than discussing contact forms, which allow users to communicate directly with the owner of the site. All of these are done using various WordPress hooks (actions and filters) that will then interact with and change the general behavior of WordPress.
Why Would You Develop a WordPress Plugin?
Developing a WordPress plugin has several advantages, especially for developers who want to deliver specialized functionality to clients or maintain particular needs on their site. The plugin development can, therefore, be of importance in many ways:
- Customization: You might create plugins to meet very specific needs that either themes or other plugins cannot cover.
- Reusability: A plugin that has been developed can be reused in various WordPress sites.
- Portability: Plug-in does not tie or stick to the theme whereby it is going to be overridden by any update of the theme.
- Flexibility: Plugins have the functionality of doing complex work without affecting the original core files of the theme, such as custom post types, shortcodes, and widgets.
WordPress Plugin Vs. WordPress Themes
Let’s focus on the difference between plugins and themes before moving on to how to build a WordPress plugin because both are integral components of WordPress yet not similar.
Get exclusive access to all things tech-savvy, and be the first to receive
the latest updates directly in your inbox.
WordPress Plugins:
The purpose of plugins is to include functionality and activities on the website; they do not change designs or layouts, conform to and rather expand the facility of the resulting creation. Some examples are as follows:
SEO plugins, necessary security plugins, custom contact forms, payment gateway plugins, etc.,
WordPress Themes:
They control the overall design appearance and the overall look of the WordPress site. It involves layout, typography, colors, etc. Some examples are Astra, Divi, and OceanWP.
Differences:
- Functionality versus design: Feature additions in the case of plugins, designs in the case of themes.
- Independent Dependency: A plugin does not depend on a theme, whereas a theme would need to be active for proper rendering of the site.
WordPress Hooks Explained
The hook system in WordPress is among the most important attributes of the application; it enables developers to access WordPress at various specific points in time when a page loads. The two most common types of hooks are: actions and filters.
Action Hooks
Action hooks let you hook into WordPress at certain points with your code for some custom functionality. They don’t return any value but perform actions such as adding text to the page or modifying the database.
Example: Using an Action Hook

The line will be displayed at the end of any page in your WordPress installation: “This content is added to the footer by my plugin!” in the footer portion.

Filter Hooks
On the other hand, modification or converting data before making it output is the work of filter hooks. These come in handy when you want to change something that has already been generated but not output by WordPress.
Example: Using a Filter Hook

If a post’s title was ‘Hello World’, it will now be displayed as follows: ‘Custom Prefix: Hello World.’
Components of the WordPress Plugin
A regular WordPress plugin has a few of these components, which perform a particular function:
- Main plugin file: This is the main core php file of the plugin which tells WordPress what the plugin is and how it will function.
- Plugin Header: It usually resides at the top of the main plugin file and contains metadata about the plugin like its name, version, description, and author.
- Action or Filter Hooks: Hooks that enable interaction with WordPress, executing custom code at certain times or changing data.
- Other Files: Larger plugins may be composed of other files, such as javascript or CSS files, relevant for additional functionality and design.
How to Build A WordPress Plugin: Step-by-Step Process
How to build a WordPress plugin might seem like a total nightmare at first. But once you break it down into the pieces, it is clear and easy. This is a guide that accounts for the entire process through which the building of a WordPress plugin is made. Planning, writing the primary functionality, testing the plugin, and activating it on WordPress are all included, starting from the basic structure.
By the end of this tutorial, you will have a fully functioning WordPress plugin and all the basic knowledge needed to extend it for personal use. Now, let’s get started!
1. Establish Plugin Folder Structure and File
The first step for how to build a WordPress plugin is to create the folder structure where your plugin will be contained.
Proceed and Follow:
Navigate to the Plugin Directory:
Next, head to wp-content/plugins/- into the installation of WordPress. This is the home of all plugins.
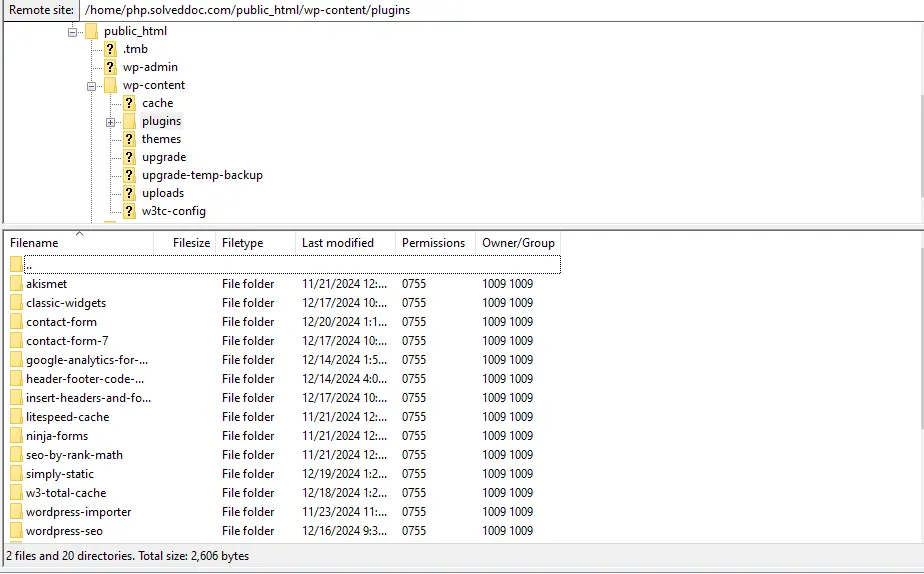
Make a Folder for Your Plugin:
Create a folder for your new plugin. Name it the same as the functionality you’re about to add. For example, if you’re building a plugin to add a contact form, you might call the folder contact-form
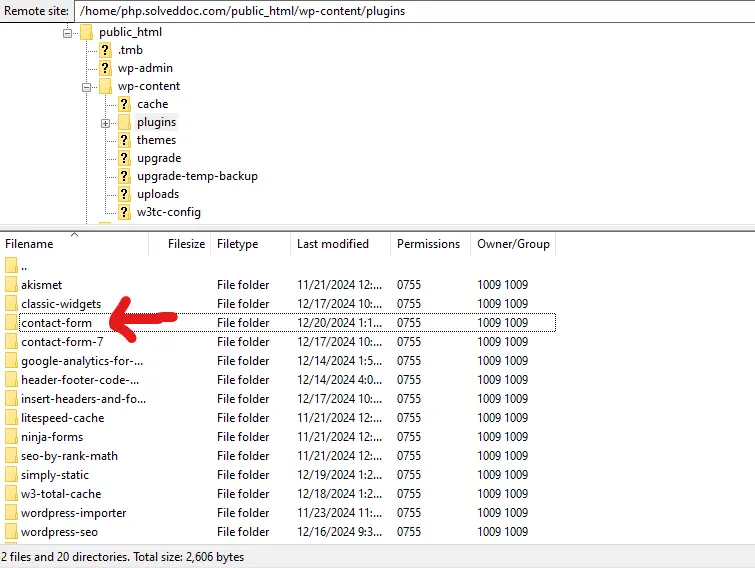
.
Make the Main Plugin File:
Then within the contact-form-plugin plugin folder create a PHP file that has the same name as the folder (like contact-form-plugin.php).
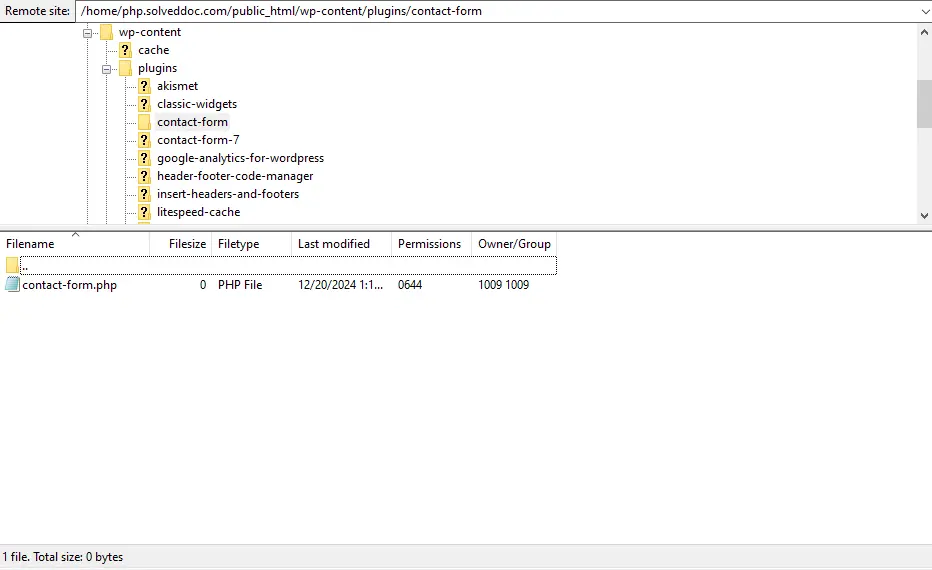
2. Append Header Metadata of Plugins
Now, this is the next step for how to build a WordPress plugin. WordPress consists of a particular header within the plugin file that recognizes information about the plugin. It is the metadata header that contains the simple pixel data like well, the plugin name, description, and version and author.
Example Code:
Now, open your contact-form-plugin.php file and add the following line of code at the beginning:
Elaboration:
- Plugin Name: This signifies the name of the plugin.
- Plugin URI: This becomes a necessity to have for more information on the particular plugin
- Description: This states a brief status of what the plugin does
- Version: This becomes the number version of the plugin
- Author: Your name.
- License: Type of license.
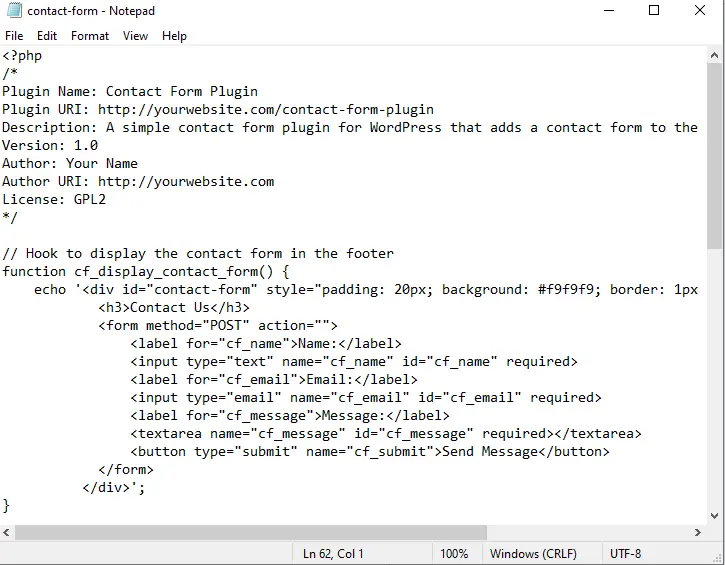
WordPress shall therefore be enabled to identify the file as a plugin once this header is added.
3. Develop the Core Functionality of the Plugin
Now, this is the third step for how to build a WordPress plugin. Your folder has been created in addition to adding a header, the next step is to start writing the functionality of your plugin. Here, we will develop a simple contact form that keeps showing up on all the website pages at the footer.
Stepwise Process:
Define a Function to Display the Contact Form:
Create a function that echoes an HTML structure for a simple contact form.
| function display_contact_form() { echo ‘<div id=”contact-form”> <h3>Contact Us</h3> <form action=”” method=”POST”> <label for=”name”>Name:</label> <input type=”text” name=”name” id=”name” required> <label for=”email”>Email:</label> <input type=”email” name=”email” id=”email” required> <textarea name=”message” id=”message” placeholder=”Your Message”></textarea> <button type=”submit”>Send Message</button> </form> </div>’; } |
Hook the Function into WordPress:
Use the wp_footer action hook to place the contact form at the bottom of every page. This hook fires just before the closing </body> tag of the page’s HTML structure.

Explanation:
add_action(‘wp_footer’, ‘display_contact_form’): This tells the WordPress engine to call the display_contact_form()
function when the wp_footer action is called.
4. Test Your Plugin
Moving towards the fourth step for how to build a WordPress plugin. Since the major functionality of the plugin has been added, it is time to test it and see if it works as expected.
Step-by-Step:
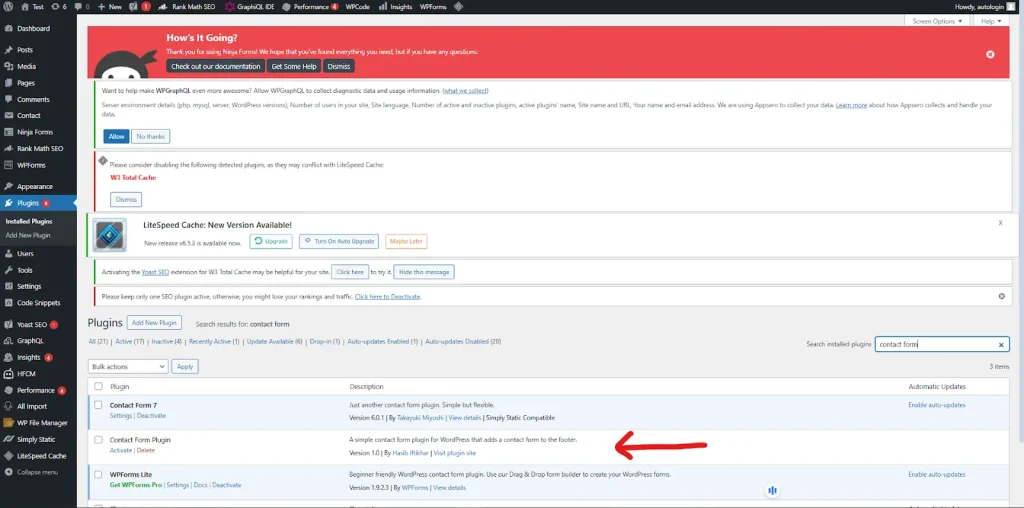
Activate the Plugin:
- Go to your dashboard in your WordPress administrative panel.
- Navigate to Plugins > Installed Plugins.
- Find your Contact Form Plug-in and activate it.
Verify the Output:
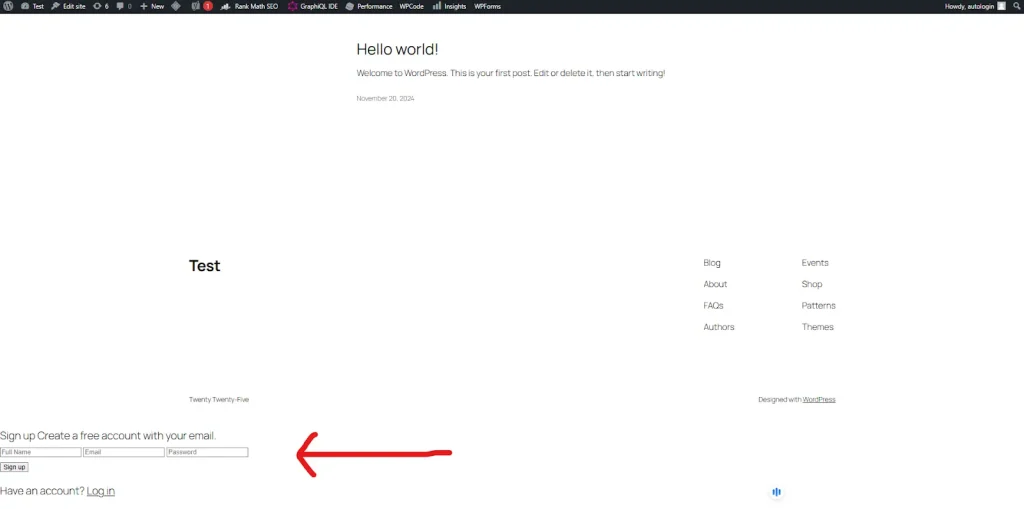
Now, go to any page on your website and scroll to the bottom; then you should find a contact form that you have just activated.
Output:
It will be rendered in the following manner in the footer as HTML content of the contact form:

5. Provide the form handling for submission(optional)
Now you have the contact form displayed conjunctively, so let’s move on to the fifth step for how to build a WordPress plugin and handle this form submission also. For the demonstration, when a form is submitted, it will now add the functionality to send an email.
Step-by-Step:
Process Form Submission:
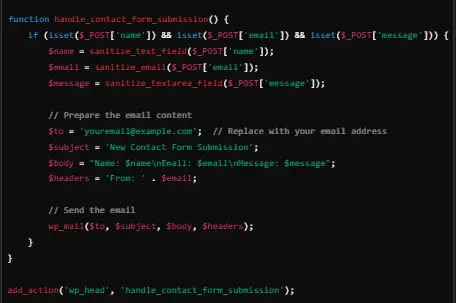
You will need to write a custom handler that will allow the form data to be sent through the mail using the wp_mail() function.
Adds to your contact-form-plugin.php the following codes:
Explanation:
sanitize_text_field(), sanitize_email(), and sanitize_textarea_field(): The functions that have been provided take care of sanitizing the input data from XSS security issues before being used.
wp_mail(): This function sends mail to a specific address with the form data.
Testing Form Submissions: Fill out the contact forms on your site and submit them. If you have done everything properly, you will now see in your inbox the message with the submitted data.
Output:
What would happen is that when the form was submitted an email with the contents:

7. Optional: Add Custom Styles to Your Plugin
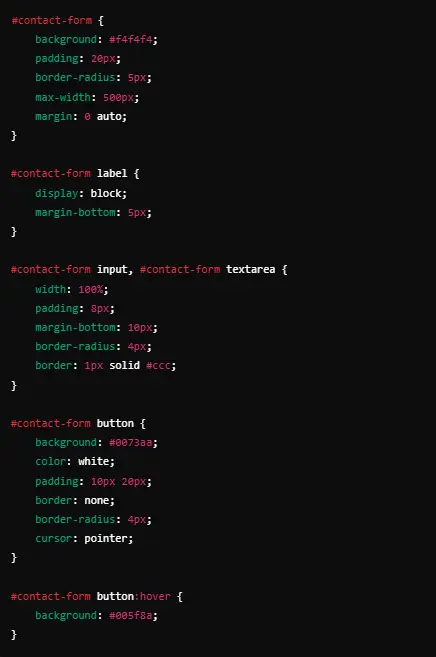
This is an optional step for how to build a WordPress plugin. You can also add some additional custom CSS for the contact form to further increase its appearance. Let us add a simple CSS file to the plugin now.
Step by step:
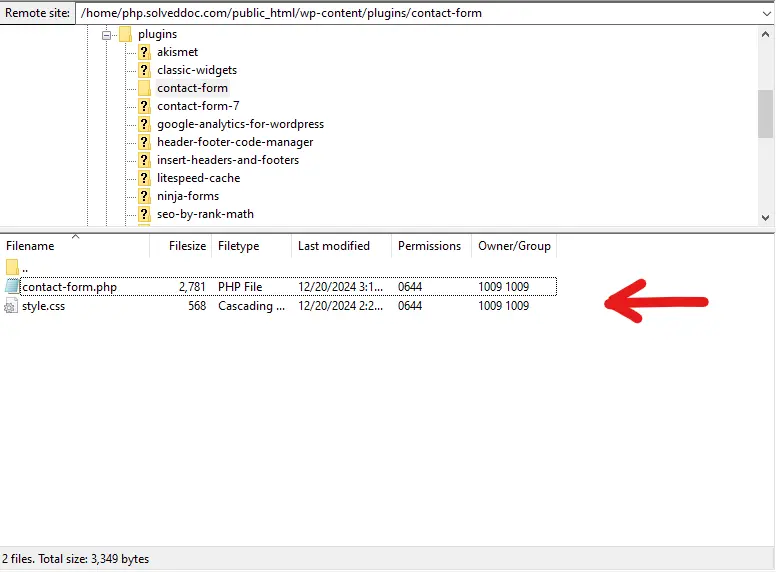
Create a CSS File:
Create a file named style.css inside your plugin folder.
Insert CSS Rules: Add the following CSS rules in style.css to style the contact form:
Import the Stylesheet:
The contact-form-plugin.php will also be modified for enqueuing the stylesheet.

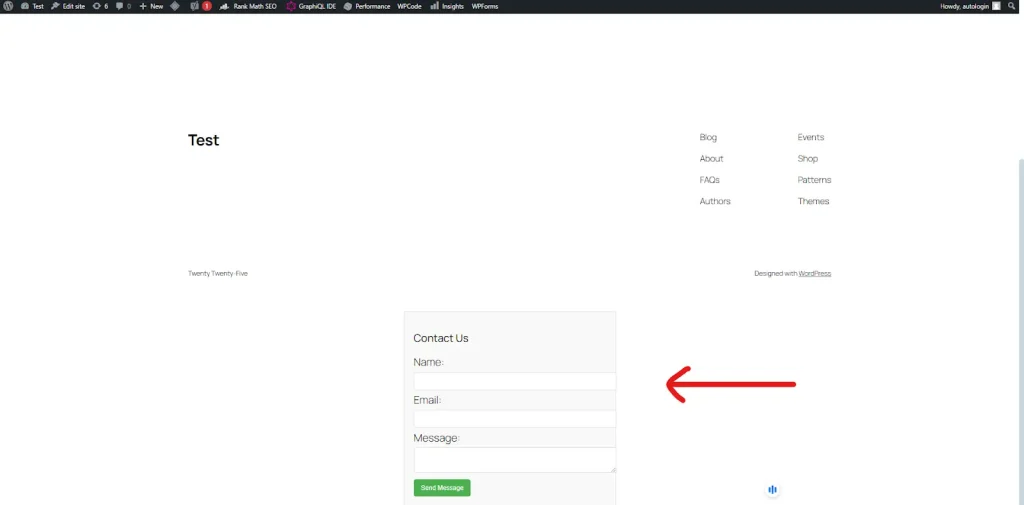
Testing the Styles:
After refreshing the page, the contact form should now appear with the styles applied.
How to Build A WordPress Plugin Using CyberPanel
In constructing a WordPress plugin under a web hosting control panel i.e. CyberPanel, the user must follow a set of instructions. The whole procedure is simple yet fraught with all the technicalities as well as creatively inclined tasks. Here is a step-by-step guide on how to create a WordPress plugin and use CyberPanel for hosting management.
Step 1: Setting Up WordPress with CyberPanel
First of all, you will need a WordPress installation for how to build a WordPress plugin. CyberPanel is a web hosting control panel that makes server management easy and WordPress installation swift. Now, make sure you have set up CyberPanel and have an existing WordPress site.
Log into CyberPanel: Go directly to https://yourserverip:8090 (replace your server IP with your actual IP address) to access your CyberPanel dashboard.
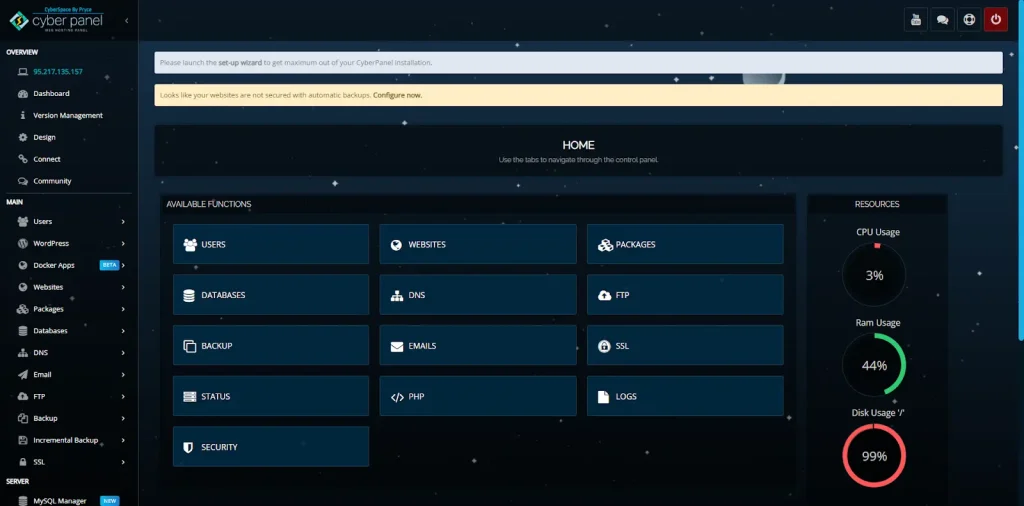
Build a Website: Getting into the dashboard will involve the avenues within the Micro-division of “Website” where a new domain has to be created where WordPress installations will be laid.
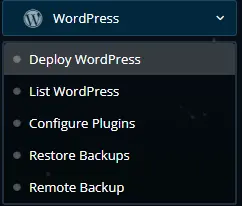
WordPress Install: Under your new website, navigate to the “Applications” and then “WordPress”. Click to install WordPress. CyberPanel will configure the server side for you.
Step 2: Create Your Plugin Directory
Now that WordPress is functional, you must create the plugin folder in the directory on your site.
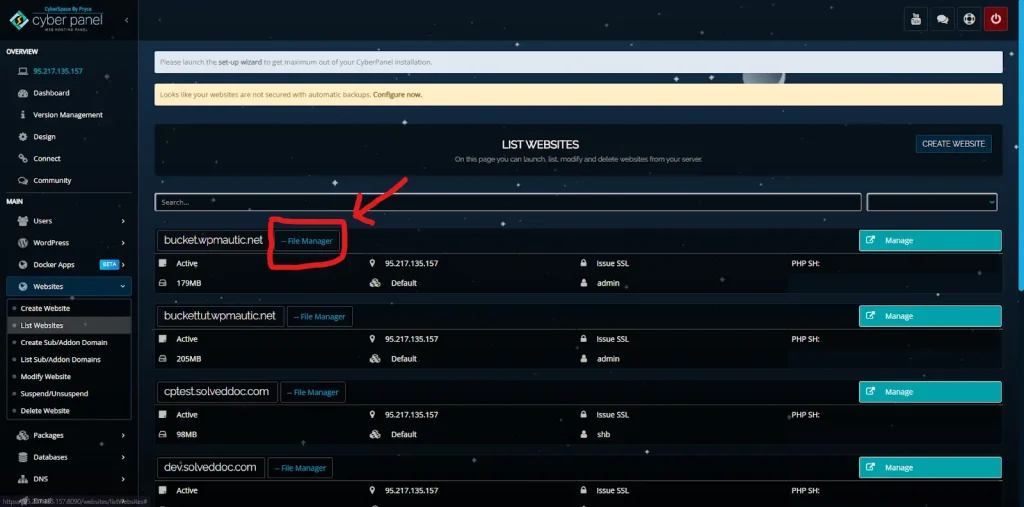
Access File Manager: In CyberPanel, the “File Manager” should be used to navigate to the folder public_html/wp-content/plugins/.
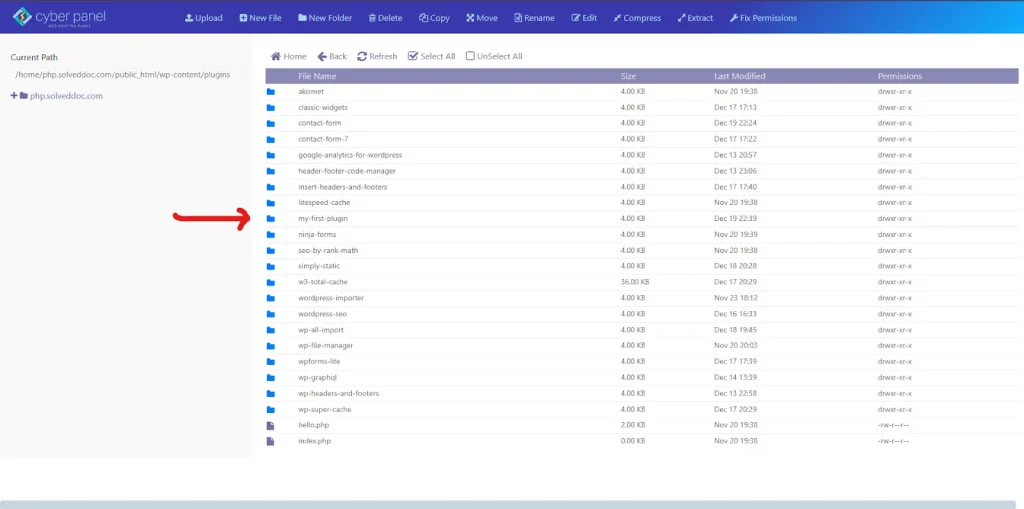
Make plugin folder: In the plugins directory, make a new folder for your plugin e.g. my-first-plugin.
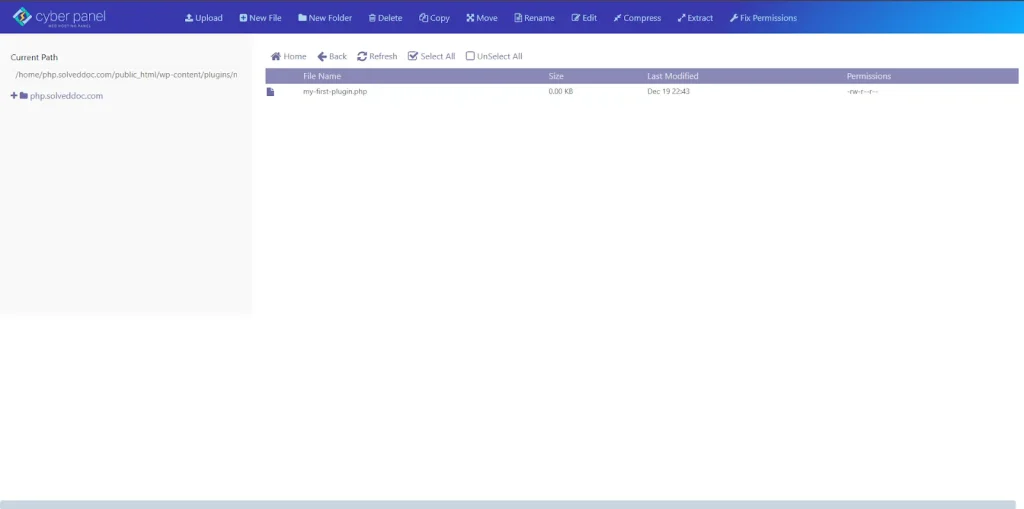
Create plugin file: Within your new folder, create a file called my-first-plugin.php.
Step 3: Write Plugin Code
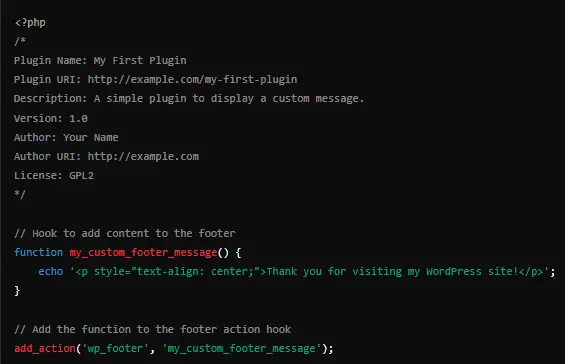
Now comes the part where you are going to create the core function of your WordPress plugin. The following is an example to get you started.
my-first-plugin.php
Code Explanation:
- Plugin Header: This initial bunch of comments lets WordPress know about the name, version, and other information in regard to your plugin.
- Function my_custom_footer_message: This function attaches a user-defined custom message in the footer of your website.
- Hook wp_footer: The add_action function connects your personal function to the WordPress footer hook to have your message in the footer.
Step 4: Activating the Plugin
After you write your code, the next thing would be activating the plugin in WordPress.
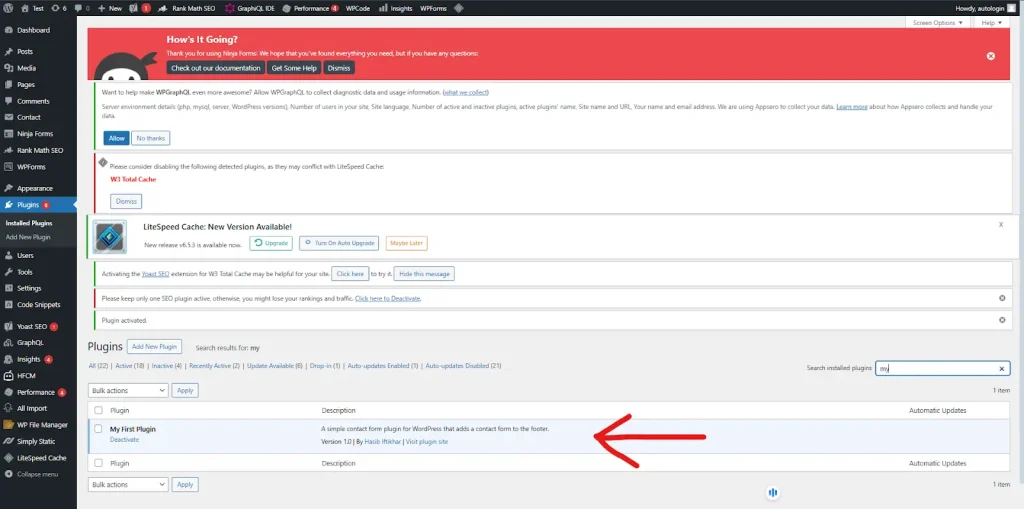
Go to the WordPress dashboard (http://yourdomain.com/wp-admin). Then to Plugins > Installed plugins: You should see “My First Plugin” listed there and activate it.
Step 5: Test Your Plugin
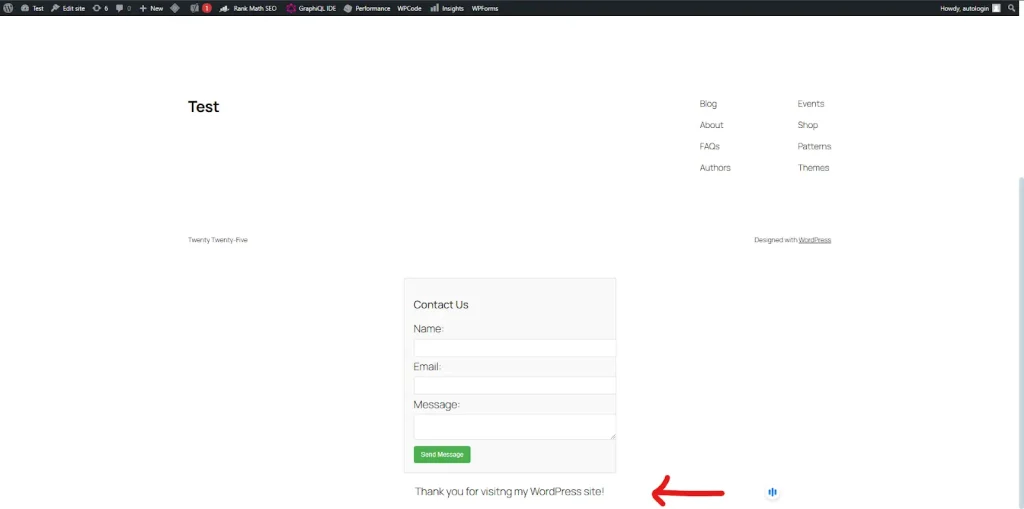
Now visit your WordPress site after activation scroll down the page and you will be able to notice your messages as “Thanks for visiting my WordPress site!”
FAQs for How to Build a WordPress Plugin
1. How to test a WordPress Plugin?
Test your plugin in staging or local development using Local by Flywheel or XAMPP.
2. Am I Allowed to Distribute My Plugin?
Yes, you may distribute your plugin on either the WordPress Plugin Repository or your site.
3. How to Create Settings for My Plugin?
You can create a setting page by using the add_menu_page() method and the get_option() method for storing other custom settings.
4. What is the Action Hook and Filter Hook?
Action hook creates a custom function within WordPress at a defined point while filter hooks are intended to alter data before it’s shown.
5. Can I build a plugin without PHP knowledge?
Yes, to create custom WordPress plugins PHP is essentially required, but rudimentary JavaScript or CSS knowledge comes very handy in making advanced features.
6. What is even the Plugin Header?
The first block of comments in your plugin file declares metadata for the plugin such as name, description, and version author.
7. How Do I Debug a Plugin?
Debugging tools Debug Bar Query Monitor, and WP_DEBUG in your wp-config.php file will always be on during plug-in development.
Epilogue for How To Build A Plugin for WordPress
Unlock Your WordPress Potential by Creating a WordPress Plugin
To wrap up, you have now learned how to build a WordPress plugin, from basic design to the use of WordPress hooks. The use of CyberPanel always makes it much easier to deploy and maintain a plugin.
So what are you waiting for? Start off with custom plugin building to try out various features that will help augment your site. Developer or site owner, plugin building is an avenue to endless possibilities in customizing WordPress.
Start coding today and elevate your WordPress experience!


