WordPress is one of the most widely used platforms for building websites due to its flexibility and ease of use. If you are looking to set up your own website, WordPress is an excellent choice on Ubuntu. This guide will walk you through the process with easy steps. Beginners and advanced users can both follow this guide.
Prerequisites to Install WordPress on Ubuntu
Before you install WordPress on Ubuntu, you need to take care of these requirements:
- Ubuntu Server
A physical system that is running Ubuntu 20.4/22.04 with root or sudo access.
- A Non-Root User with Sudo Privileges
You can use a non-root user with sudo access to execute commands for security.
- System Updates
Update your system to the latest package using:
sudo apt update && sudo apt upgrade -y
- LAMP Stack (Linux, Apache, MySQL, PHP)
- Apache Web Server: Handles HTTP requests.
- MySQL or MariaDB: Stores WordPress data.
- PHP: Processes WordPress scripts.
- MySQL Database and User
Use a dedicated database and user for WordPress.
- Firewall Configuration (If Enabled)
If UFW is active, allow web traffic using:
sudo ufw allow ‘Apache Full’
- Domain Name and SSL Certificate (Optional but Recommended)
Securing a domain name and SSL certificate is recommended for better accessibility.
How to Install WordPress on Ubuntu
To install WordPress on Ubuntu, you can follow these simple steps.
Step 1: Update and Upgrade the System
Before installing a new software, you need to update your package list and upgrade the existing packages to the latest versions.
sudo apt update && sudo apt upgrade -y
This ensures you have the latest security patches and bug fixes.
Step 2: Install LAMP Stack (Linux, Apache, MySQL, PHP)
To install WordPress on Ubuntu, you need to install Apache Web Server.
Install Apache Web Server
The most commonly used web server for WordPress is Apache. You can install and enable it with the following commands:

sudo apt install apache2 -y
sudo systemctl enable apache2
sudo systemctl start apache2
To verify that Apache is running smoothing, open your browser and go to http://your_server_IP.
If you are using the UFW Firewall, allow Apache traffic, run the command:
sudo ufw allow ‘Apache Full’
Install MySQL Database Server
WordPress needs a secure database to store content. You can install MySQL by using this command:
sudo apt install mysql-server -y
Secure the MySQL installation by running:
sudo mysql_secure_installation
- Set a root password (if prompted).
- Remove anonymous users and test databases for security.
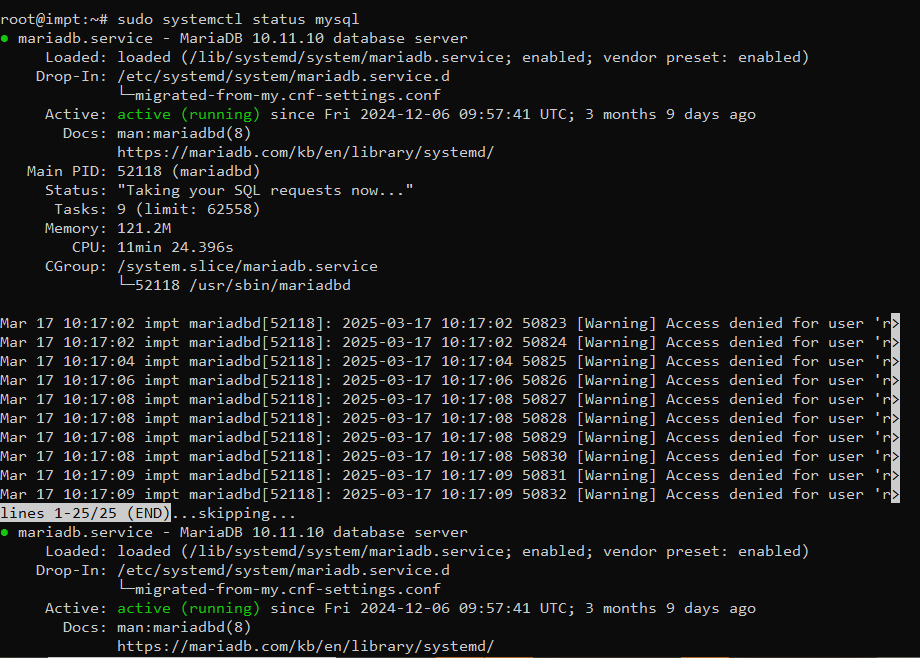
Verify MySQL is running:
sudo systemctl status mysql
Install PHP and Required Extensions
Install PHP along with all the essential extensions:
sudo apt install php libapache2-mod-php php-mysql php-curl php-xml php-mbstring php-zip php-gd -y
Check if PHP is installed:
php -v

It should display the installed PHP version.
Step 3: Download and Configure WordPress
Download WordPress
Move to the Apache web directory and download WordPress:
cd /var/www/html
sudo wget https://wordpress.org/latest.tar.gz

Extract the archive and remove the tar file:
sudo tar -xvzf latest.tar.gz
sudo rm latest.tar.gz
Rename the WordPress folder (optional):
sudo mv wordpress mywebsite
Set Proper Permissions
Change ownership and set the correct file permissions to avoid issues at the last minute.
sudo chown -R www-data:www-data /var/www/html/mywebsite
sudo chmod -R 755 /var/www/html/mywebsite
Create a WordPress Database
Log into MySQL:
sudo mysql -u root -p
Create a new database for WordPress:
CREATE DATABASE wordpress;
Create a new user and grant privileges:
CREATE USER ‘wpuser’@’localhost’ IDENTIFIED BY ‘your_password’;
GRANT ALL PRIVILEGES ON wordpress.* TO ‘wpuser’@’localhost’;
FLUSH PRIVILEGES;
EXIT;
Step 4: Configure Apache for WordPress
Create a Virtual Host File for WordPress
Create a new Apache configuration file:
sudo nano /etc/apache2/sites-available/wordpress.conf
Add the following configuration:
<VirtualHost *:80>
ServerAdmin [email protected]
DocumentRoot /var/www/html/mywebsite
ServerName your_domain_or_IP
<Directory /var/www/html/mywebsite>
AllowOverride All
</Directory>
ErrorLog ${APACHE_LOG_DIR}/error.log
CustomLog ${APACHE_LOG_DIR}/access.log combined
</VirtualHost>
Save and exit (Ctrl + X, then Y, then Enter).
Enable the WordPress Site and Required Modules
sudo a2ensite wordpress.conf
sudo a2enmod rewrite
sudo systemctl restart apache2
Step 5: Complete the WordPress Installation via Web Interface
- Open your browser and go to http://your_domain_or_IP.
- Select your preferred language and click Continue.
- Enter the database details:
- Database Name: wordpress
- Username: wpuser
- Password: your_password
- Database Host: localhost
- Table Prefix: wp_ (default)
- Click Submit, then Run the installation.
- Set up the following:
- Site Title
- Admin Username & Password
- Your Email Address
- Click Install WordPress, then log in to your WordPress admin panel through (http://your_domain_or_IP/wp-admin).
Step 6: Secure Your WordPress Installation
Enable UFW Firewall (If Not Enabled)
sudo ufw enable
sudo ufw allow ‘Apache Full’
Install SSL Certificate (Recommended for Security)
Make use of CyberPanel free SSL certificate.
sudo apt install certbot python3-certbot-apache -y
sudo certbot –apache -d your_domain_or_IP
Follow the prompts to configure SSL and automatically redirect HTTP to HTTPS.
Disable XML-RPC (Prevent Attacks)
WordPress’s XML-RPC features are often targeted by attackers. Disable it by adding this line in Apache’s .htaccess file:
<Files xmlrpc.php>
Order Allow,Deny
Deny from all
</Files>
Save the file and restart Apache:
sudo systemctl restart apache2
Troubleshooting Common Issues – Install WordPress on Ubuntu
| Issue | Possible Cause | Troubleshooting Steps |
| High CPU Load | Too many processes consuming CPU | – Use top or htop to identify CPU-hungry processes.- Kill unnecessary processes with kill -9 PID.- Optimize applications or adjust scheduling priorities (nice, renice). |
| High I/O Wait (High Disk Usage) | Slow or overloaded disk operations | – Check disk usage with iostat -x, iotop, or df -h.- Optimize disk performance using SSDs or RAID.- Reduce disk writes and optimize database queries. |
| Too Many Runnable Processes | Excessive background tasks | – Use `ps -eo stat,pid,cmd |
| Memory Shortage (High Swap Usage) | Insufficient RAM, excessive paging | – Check memory usage with free -m or vmstat.- Increase RAM if needed.- Tune swappiness to reduce swap dependency (sysctl vm.swappiness=10). |
| Network Bottlenecks | High network traffic affecting system | – Monitor network usage with iftop or nload.- Limit bandwidth for processes using tc (traffic control).- Optimize network configurations. |
| Misconfigured Applications | Poorly optimized software consuming resources | – Check logs for errors (/var/log/syslog, /var/log/dmesg).- Update or reconfigure applications.- Optimize database queries and caching mechanisms. |
Wrapping Up – Install WordPress on Ubuntu
Using this guide, you can easily install WordPress on Ubuntu with full configurations and security permissions and optimizations. With WordPress now installed, the next steps involve customizing the website, installing themes and plugins, and optimizing performance through caching and database tuning. No matter if you are a beginner or a technical user, this guide will help you out!
1. How do I access the WordPress installation page after setup?
Once WordPress is installed, visit http://your-domain-or-server-ip in a browser to complete the setup.
2. How can I back up my WordPress site on Ubuntu?
You can back up your database using mysqldump and your files using tar or rsync. Tools like UpdraftPlus or Akeeba Backup can automate this process.
3. Can I install WordPress on Ubuntu without a LAMP stack?
No, WordPress requires a web server (Apache or Nginx), a database (MySQL/MariaDB), and PHP to function properly.